Tutorial : How to post an entry.
Hey, just so you know this post is friend-only. It is finally open free to everyone! I made this post for fun and for someone, and whoever else needs help. I just want to make this in 3 easy steps but there are a lot of details. So, I hope that you would read everything. Once you remember all of these you'll easily make a nice post. I actually might make a lot of tutorial posts but friend locked. It took me a while to learn these and to make these. You can actually find these in livejournal's FAQ but I made these for fun remember!
Please note that I screencapped these so please credit if you take them!
(All blurred words are my username and if people don't like them there, I just blurred them)
[Step 1]
(Where to find it)
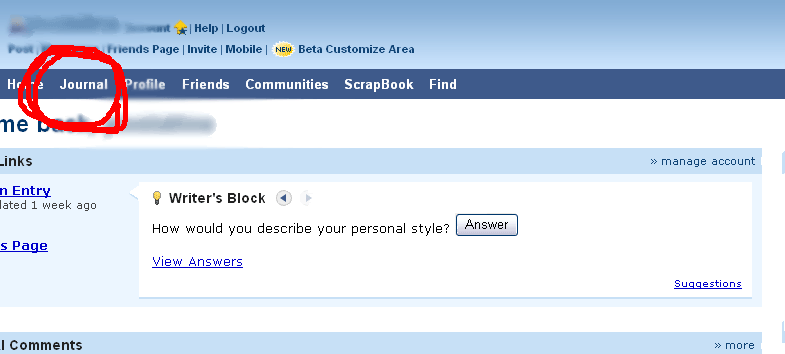
(Sorry for the huge picture.)
[Step 2]
(Where exactly!)
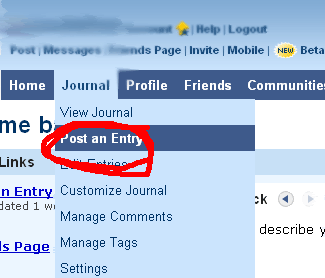
Okay, so we know where it is.
[Step 3]
Final step.
(What are all those buttons?)
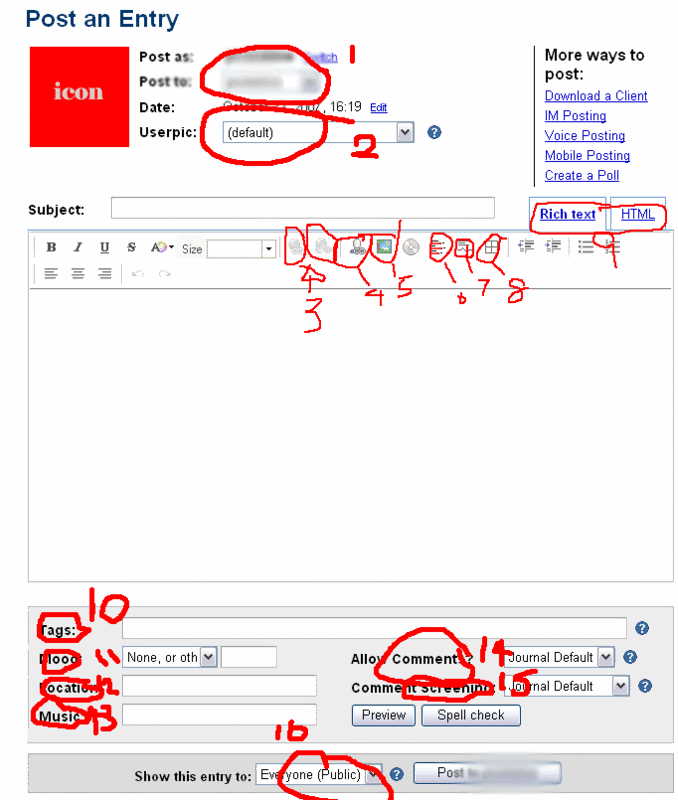
(Sorry again for the messiness!)
What are all those numbers?
I have numbered them off so it is easier to explain.
[1] Choosing to post to your journal or community.
[2] Choosing a userpic you are going to use for your post.
[3] Entering a link and breaking a link. Highlight the part you want as a link and click the button! (Ex. Click Here!)
[4] Livejournal user. Highlight a user (in livejournal) and click the button~ (Ex.
pixelatine)
[5] Entering an image. Much like number 3 and 4. Just click the button this time without highlighting.
[6] A poll. Click the button and you'll understand. *wink.
[7] A lj-cut. VERY IMPORTANT! You'll need to know what this is because you need to use this everywhere. Whenever your post is too long, you use this. If you are posting in a community and your post is super long (like this one) then you need this button. This is very simple. You just highlight the part where you need to hide and click the button and a pop-up will come up and it'll say "Read more..." change that part into whatever text you want. I just want to let you know that this is very important, because long posts annoy us when they are not hidden.
[8] A table. I do not think that you will use it that much because if you choose HTML (will explain later) then this button is no use to us. It is just a table and you put text or images or whatever you want in it.
[9] Rich Text and HTML. I personally do not use HTML unless I really need it (because there is no button for something). I find Rich Text much easier to use too. But some people use HTML too. You'll just need to know HTML for HTML (makes sense, huh?). Rich text doesn't that much of my time so its much better for me.
[10] Tags. In communities, there are different rules for this. So please follow their rules for tags. But if your posting in your journal then you can just write what this entry is about mainly and if there is more than one thing then seperate it by a comma. You have your own choice to write a sentence for a tag but no one does that. (Maybe there is, but then that is a different matter) If you go to my journal then you'll see a tag list and maybe you will understand.
[11] Mood. Your mood. Very easy. (This is optional)
[12] Location. Where are you right now? (Some people write random text) (This is optional)
[13] Music. What are you listening to right now? (This is optional)
[14] Allow comments? (Do you want people to comment?)
[15] Comment screening (Who do you want to see the comments?)
[16] Show this entry to.. (Do you want people to see this post/entry?)
Ahh, finally finished. Took me an hour to complete this tutorial.. O_O" Wow, this must be my longest post ever. But since I don't want to finish my homework yet, I'll just complete this.
If you have any questions about this, feel free to ask! I don't mind ^_^"~
Also, I hope this helped~
PLEASE CREDIT IF YOU ARE TAKING!! Although I do not think that anyone should be taking this. But I don't really mind that much, just trying to be strict because I worked on this for a long time. (Although this is not hard at all)
Please note that I screencapped these so please credit if you take them!
(All blurred words are my username and if people don't like them there, I just blurred them)
[Step 1]
(Where to find it)
(Sorry for the huge picture.)
[Step 2]
(Where exactly!)
Okay, so we know where it is.
[Step 3]
Final step.
(What are all those buttons?)
(Sorry again for the messiness!)
What are all those numbers?
I have numbered them off so it is easier to explain.
[1] Choosing to post to your journal or community.
[2] Choosing a userpic you are going to use for your post.
[3] Entering a link and breaking a link. Highlight the part you want as a link and click the button! (Ex. Click Here!)
[4] Livejournal user. Highlight a user (in livejournal) and click the button~ (Ex.
pixelatine)
[5] Entering an image. Much like number 3 and 4. Just click the button this time without highlighting.
[6] A poll. Click the button and you'll understand. *wink.
[7] A lj-cut. VERY IMPORTANT! You'll need to know what this is because you need to use this everywhere. Whenever your post is too long, you use this. If you are posting in a community and your post is super long (like this one) then you need this button. This is very simple. You just highlight the part where you need to hide and click the button and a pop-up will come up and it'll say "Read more..." change that part into whatever text you want. I just want to let you know that this is very important, because long posts annoy us when they are not hidden.
[8] A table. I do not think that you will use it that much because if you choose HTML (will explain later) then this button is no use to us. It is just a table and you put text or images or whatever you want in it.
[9] Rich Text and HTML. I personally do not use HTML unless I really need it (because there is no button for something). I find Rich Text much easier to use too. But some people use HTML too. You'll just need to know HTML for HTML (makes sense, huh?). Rich text doesn't that much of my time so its much better for me.
[10] Tags. In communities, there are different rules for this. So please follow their rules for tags. But if your posting in your journal then you can just write what this entry is about mainly and if there is more than one thing then seperate it by a comma. You have your own choice to write a sentence for a tag but no one does that. (Maybe there is, but then that is a different matter) If you go to my journal then you'll see a tag list and maybe you will understand.
[11] Mood. Your mood. Very easy. (This is optional)
[12] Location. Where are you right now? (Some people write random text) (This is optional)
[13] Music. What are you listening to right now? (This is optional)
[14] Allow comments? (Do you want people to comment?)
[15] Comment screening (Who do you want to see the comments?)
[16] Show this entry to.. (Do you want people to see this post/entry?)
Ahh, finally finished. Took me an hour to complete this tutorial.. O_O" Wow, this must be my longest post ever. But since I don't want to finish my homework yet, I'll just complete this.
If you have any questions about this, feel free to ask! I don't mind ^_^"~
Also, I hope this helped~
PLEASE CREDIT IF YOU ARE TAKING!! Although I do not think that anyone should be taking this. But I don't really mind that much, just trying to be strict because I worked on this for a long time. (Although this is not hard at all)