(no subject)
chocoflip requested a coloring tut for 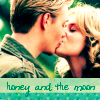
.
I didn't save the layers of this exact icon so I made a tut using a different cap but the technique is the same. This is just a gudie for this type of coloring, feel free to be creative, that's what icon making is all about after all. I use GIMP but the tut should be easily translateable.
Go from

to

1. Duplicate your base three times and set the layers above your base to screen at 100. Duplicate your base again and drag that layer to the top of the others, setting it on overlay at 100. You should have something similar to
Keep in mind that not all caps are going to colorize the same way so if it's lighter or darker you can play with the opacities or just wait until the end to alter the layers.
2. Create a new layer on top of all the others and fill it with fdff4d, this is going to be a rich yellow. Set it to overlay at 100. You should get something like this.

Don't worry we aren't done yet. ;)
3. Create a new layer on top of all the others and fill it with 4dcfff, this is going to be a rich turquoise blue. Set it to burn at 100. You should get something like this.

4. Create a new layer on top of all the others and fill it with ff4dc6, this should be a rich purple-pink. Set it to overlay at 100. You should get something like this.

If you're satisfied with your result you can stop there and apply any textures/affects/text/crop that you choose. But I thought it was too green so I fiddled with the blue layer, lowering the opacity to about 82. I did the same to the pink layer and I ended up with this:
.
I didn't save the layers of this exact icon so I made a tut using a different cap but the technique is the same. This is just a gudie for this type of coloring, feel free to be creative, that's what icon making is all about after all. I use GIMP but the tut should be easily translateable.
Go from
to
1. Duplicate your base three times and set the layers above your base to screen at 100. Duplicate your base again and drag that layer to the top of the others, setting it on overlay at 100. You should have something similar to
Keep in mind that not all caps are going to colorize the same way so if it's lighter or darker you can play with the opacities or just wait until the end to alter the layers.
2. Create a new layer on top of all the others and fill it with fdff4d, this is going to be a rich yellow. Set it to overlay at 100. You should get something like this.
Don't worry we aren't done yet. ;)
3. Create a new layer on top of all the others and fill it with 4dcfff, this is going to be a rich turquoise blue. Set it to burn at 100. You should get something like this.
4. Create a new layer on top of all the others and fill it with ff4dc6, this should be a rich purple-pink. Set it to overlay at 100. You should get something like this.
If you're satisfied with your result you can stop there and apply any textures/affects/text/crop that you choose. But I thought it was too green so I fiddled with the blue layer, lowering the opacity to about 82. I did the same to the pink layer and I ended up with this: