Helo icon tutorial...scratchy texture...PS:CS2
This tutorial is for alexandral and anyone else who wants to learn how to do that scratchy textury look. We will be learning how to change a background, work with textures and work with simple masks. :)
I made this icon using Photoshop CS2, but I'm pretty sure it can be made using other graphics software programs.
We are going to be making
icon using this Hi-Def photograph of Helo from Battlestar Galactica.
Helo icon tutorial...scratchy textured background
At the end of the tutorial is a graphic with all the layers for reference
Crop your base and prepare it in your usual way.
Duplicate your base. This duplicate will now be your new base. Turn off your original base by clicking on the eye next to that layer. The eye should disappear. You won't be using this original base any longer.
Hi-lite the duplicated base. Click on your "magic wand tool". Put it over the white area on your duplicated base and click. You should see the marching dashed line surrounding the white area like this.
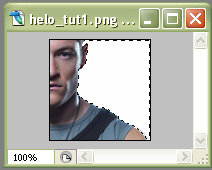
Now hit the "delete" key on your keyboard. The white area should disappear and you will have a gray and white checked area like this.
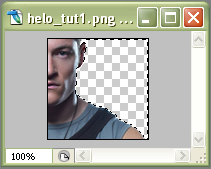
Go to "select>deselect" to get rid of the marching dashed line.
Now you are ready to put in your background. I wanted a soft grungy background so I picked a couple of textures by oxoniensis. The color wasn't quite right so I made them a bluish color that kind of matches the blue color in Helo's undershirt. (I'm really sorry, but I do not remember how I changed the color. I either did it using "image>adjustments>hue/saturation" or I did it using a "new adjustment layer" and either "curves" or "selective coloring". I would pick selective coloring if I were to guess though.)
Here are the textures I picked.
txt 1
txt 2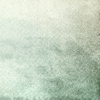
And this is how they looked after I change the color.
txt 1
txt 2
See the difference?
OK, back to the icon.
The reason you have to make a duplicate of your base is so that you can slip your textures underneath it. So now drag your textures over to your icon and put them beneath your duplicate base.
Put the second texture on top of the first texture. Leave the first texture at normal 100%. Hi-lite the second texture in your layers and set it at "multiply 75%". (You can mess with the opacity to get it to look the way you want. Or even try a different blending mode. Experiment.)
Your icon will look something like this.

Duplicate your Helo base. Set it to screen at 35%. This brightens up just Helo as you can see.

Make a new layer and fill with #131c39 a dark blue. Set to exclusion at 100%.

Make another new layer and fill with #badaf8 a light blue. Set to color burn at 100%.

Now for the next two layers you are going to use those nifty "scratch masks" that are popular right now. I used two on this icon.
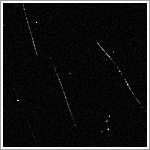
Make a new layer and fill it with #ffffff-white. Take this scratch mask by lovelamp and set it as a brush. Stamp it in #000000-black, on the same layer you filled with white. Set it to screen at 100%. I erased the part of the brush that was covering Helo. You don't have to do this if you don't want.
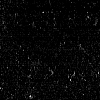
Make another layer and follow the same steps as above, except use this brush. This brush is a little bigger so you can move it around on your icon. (Sorry I don't know who made this brush, but if someone recognizes it please let me know who made it so I can credit properly.)
Your icon looks like this now. You can leave it like this or you can add some text or a brush or both. I added both.

I took this tiny text brush by setine_kitsune and stamped it on a new layer in the light blue color. Just use your eye dropper tool and pick up a color from your icon and maybe lighten it up a bit and use that color for your brush. For this icon I pulled a color from Helo's shirt and lightened it up a bit.
EDIT: Actually, I think the brush and text are white. But you can do them in color like I described it you would like
Then I just typed his last name "Agathon" in all caps and left a space between each letter. I used the font "Augustus" at 9 pt. I duplicated the text layer and set the top one to 50% opacity.
Now you're done. :)

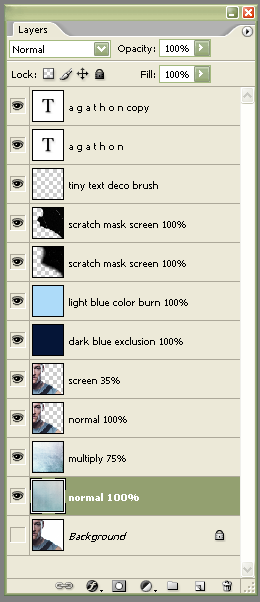
I made an image of the layers and put it below for your reference.
SOME TIPS FOR CHANGING BACKGROUNDS: There are several ways to change the background in a picture/icon. I chose the "magic wand" for this icon because the background was one solid color and did not blend in with the subject. So it was easy to select the white with the magic wand and delete it.
If you are using a picture that doesn't have a solid background there are other ways to change it. Some people put the texture over the base and then just use the "eraser tool" to erase the parts of the texture they don't want. Usually the parts covering the subject of the icon.
You can also use the "polygonal lasso tool" to draw a line around the parts you don't want then delete them.
HELO ICON...LAYERS IMAGE
Helo photograph from Battlestar Galactica: Dark Thoughts
The dark blue and light blue layers are colors I got from a tutorial by mariarita.
All other credits are in my Resources Entry
I made this icon using Photoshop CS2, but I'm pretty sure it can be made using other graphics software programs.
We are going to be making
icon using this Hi-Def photograph of Helo from Battlestar Galactica.
Helo icon tutorial...scratchy textured background
At the end of the tutorial is a graphic with all the layers for reference
Crop your base and prepare it in your usual way.
Duplicate your base. This duplicate will now be your new base. Turn off your original base by clicking on the eye next to that layer. The eye should disappear. You won't be using this original base any longer.
Hi-lite the duplicated base. Click on your "magic wand tool". Put it over the white area on your duplicated base and click. You should see the marching dashed line surrounding the white area like this.

Now hit the "delete" key on your keyboard. The white area should disappear and you will have a gray and white checked area like this.

Go to "select>deselect" to get rid of the marching dashed line.
Now you are ready to put in your background. I wanted a soft grungy background so I picked a couple of textures by oxoniensis. The color wasn't quite right so I made them a bluish color that kind of matches the blue color in Helo's undershirt. (I'm really sorry, but I do not remember how I changed the color. I either did it using "image>adjustments>hue/saturation" or I did it using a "new adjustment layer" and either "curves" or "selective coloring". I would pick selective coloring if I were to guess though.)
Here are the textures I picked.
txt 1

txt 2

And this is how they looked after I change the color.
txt 1

txt 2

See the difference?
OK, back to the icon.
The reason you have to make a duplicate of your base is so that you can slip your textures underneath it. So now drag your textures over to your icon and put them beneath your duplicate base.
Put the second texture on top of the first texture. Leave the first texture at normal 100%. Hi-lite the second texture in your layers and set it at "multiply 75%". (You can mess with the opacity to get it to look the way you want. Or even try a different blending mode. Experiment.)
Your icon will look something like this.

Duplicate your Helo base. Set it to screen at 35%. This brightens up just Helo as you can see.

Make a new layer and fill with #131c39 a dark blue. Set to exclusion at 100%.

Make another new layer and fill with #badaf8 a light blue. Set to color burn at 100%.

Now for the next two layers you are going to use those nifty "scratch masks" that are popular right now. I used two on this icon.
Make a new layer and fill it with #ffffff-white. Take this scratch mask by lovelamp and set it as a brush. Stamp it in #000000-black, on the same layer you filled with white. Set it to screen at 100%. I erased the part of the brush that was covering Helo. You don't have to do this if you don't want.

Make another layer and follow the same steps as above, except use this brush. This brush is a little bigger so you can move it around on your icon. (Sorry I don't know who made this brush, but if someone recognizes it please let me know who made it so I can credit properly.)

Your icon looks like this now. You can leave it like this or you can add some text or a brush or both. I added both.
I took this tiny text brush by setine_kitsune and stamped it on a new layer in the light blue color. Just use your eye dropper tool and pick up a color from your icon and maybe lighten it up a bit and use that color for your brush. For this icon I pulled a color from Helo's shirt and lightened it up a bit.
EDIT: Actually, I think the brush and text are white. But you can do them in color like I described it you would like

Then I just typed his last name "Agathon" in all caps and left a space between each letter. I used the font "Augustus" at 9 pt. I duplicated the text layer and set the top one to 50% opacity.
Now you're done. :)
I made an image of the layers and put it below for your reference.
SOME TIPS FOR CHANGING BACKGROUNDS: There are several ways to change the background in a picture/icon. I chose the "magic wand" for this icon because the background was one solid color and did not blend in with the subject. So it was easy to select the white with the magic wand and delete it.
If you are using a picture that doesn't have a solid background there are other ways to change it. Some people put the texture over the base and then just use the "eraser tool" to erase the parts of the texture they don't want. Usually the parts covering the subject of the icon.
You can also use the "polygonal lasso tool" to draw a line around the parts you don't want then delete them.
HELO ICON...LAYERS IMAGE

Helo photograph from Battlestar Galactica: Dark Thoughts
The dark blue and light blue layers are colors I got from a tutorial by mariarita.
All other credits are in my Resources Entry