T U T O R I A L : how to credit
Ok, I'm not really a credit nazi. As in, if I run across my icons uncredited in someone's userpics, I'm not going to comment in that person's journal demanding (or even asking nicely) to be credited. The reason for this is that although I do tend to spend a lot of time on the icons/other graphics I make, I also appreciate the fact that by making them at all I am technically breaking copyright laws because the pictures I use are not my own. So while I do appreciate keyword credit because it allows other people to find this journal if they happen to see an icon of mine that they like, you'll never see me throwing a fit about not getting it.
However, the question of exactly how to credit seems to be a pretty common one, so this is a brief tutorial on just that: a keyword credit how-to.
Step 1:
When saving icons, it's generally best to save them with the creator's username in some way. If you save a lot of icons from various people/communities, you'll quickly forget who made what otherwise. I've found that the easiest way to do it is to create an "icon" folder on your hard drive, and subfolders within that with each folder named for the creator. For instance, if you snag an icon from me (perceptible), you would save it to something similar to C:\Images\Icons\perceptible\file.jpg.
If you don't want to make subfolders, you could instead change the file name to the creator's name. It would look something like this: C:\Images\Icons\perceptible01.jpg.
[ Common question:
Why should I save the icon at all? Why not just use the "upload from URL" feature on the edit userpics page?
There is a very practical reason for this. If you change your icons a great deal (especially if you have a free account with only 3 userpics), once you delete the icon from your LJ userpics, you can't get it back. If you haven't saved the icon to your hard drive and later decide you want to use the icon again, you're going to have to track down the original post, which will take an awful lot of time. And which may actually be impossible, because it's likely that you'll have forgotten who made it. And thus, that truly excellent Libertines icon that you really wish you hadn't deleted from your userpics is lost forever. ]
Step 2:
Now that you have the icon saved, it's time to upload it to your LJ userpics. I think everyone knows how to do that, so we'll just move on to the next step. ;)
Step 3:
Ah, the elusive art of keywording. This is where people tend to become confused, and it is the heart of this tutorial.
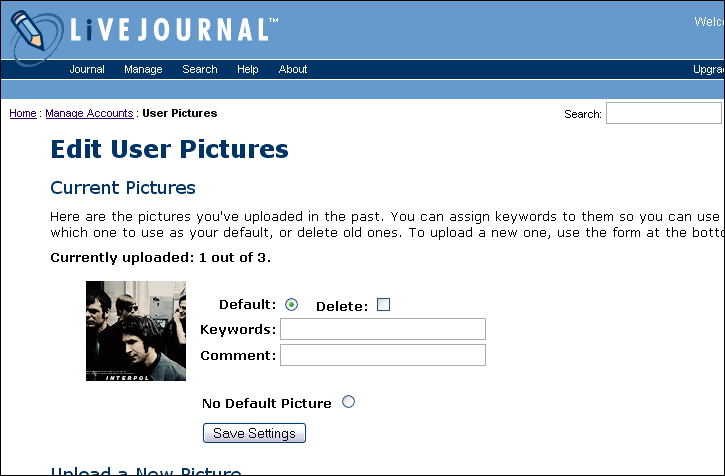
At this point, you should be on a page (http://www.livejournal.com/editpics.bml) that looks something like this:

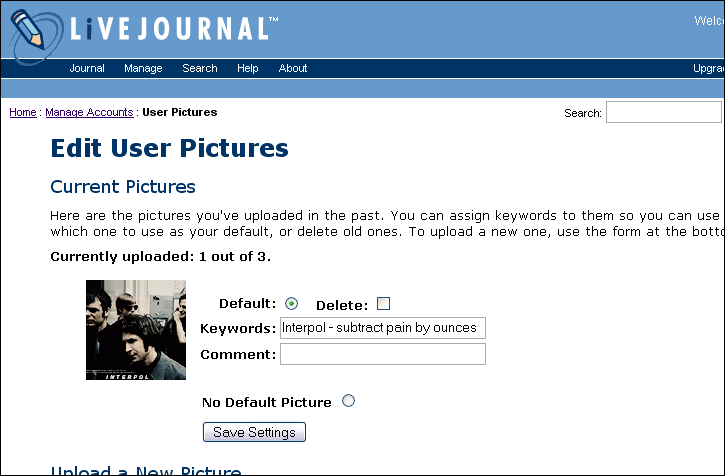
Now you're going to enter the actual keywords. Keywords are the method by which you can later use the icon in posts or comments via the "User Picture Icon" drop-down menu. You can use anything you want to help you remember what the icon is or show your originality.
This is what I have now:

One of the really nifty features of LJ is the additional "comment" space beneath the "keywords" option. If you've been around long enough, you'll remember keywording icons before LJ added that feature, and how little space you actually had for keywords. With the "comment" option, you have twice as much room for keywords, making crediting a lot easier.
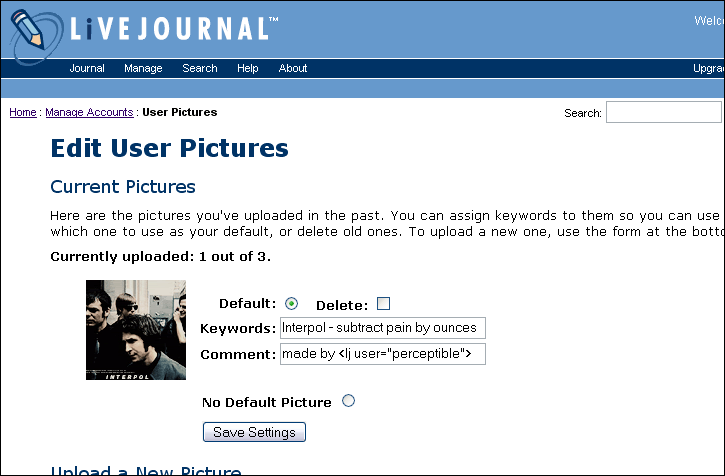
Now that you have your actual keywords defined, it's time to use the "comment" area for credit. And here's the really great thing: you can use the lj user tag here (perceptible).
This is what it looks like now:

Now all you have to do is click the "Save Settings" button.
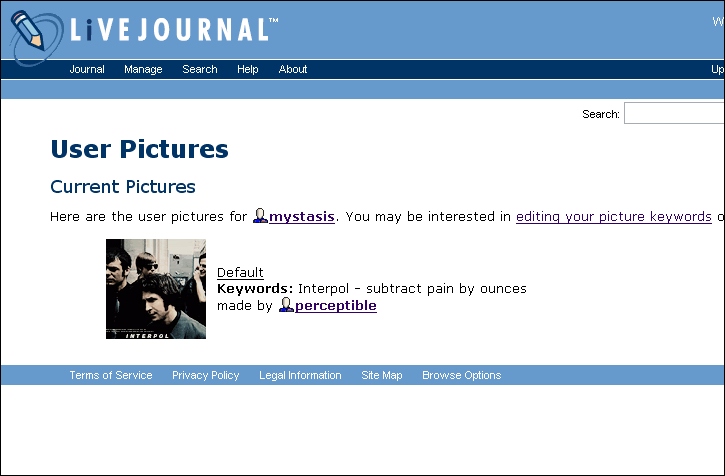
That's it! You now have a brand-new icon, properly credited. To see what it looks like, go to your "allpics" page (http://www.livejournal.com/allpics.bml).
It should look like this:

And that's all there is to giving keyword credit for icons. :)
However, the question of exactly how to credit seems to be a pretty common one, so this is a brief tutorial on just that: a keyword credit how-to.
Step 1:
When saving icons, it's generally best to save them with the creator's username in some way. If you save a lot of icons from various people/communities, you'll quickly forget who made what otherwise. I've found that the easiest way to do it is to create an "icon" folder on your hard drive, and subfolders within that with each folder named for the creator. For instance, if you snag an icon from me (perceptible), you would save it to something similar to C:\Images\Icons\perceptible\file.jpg.
If you don't want to make subfolders, you could instead change the file name to the creator's name. It would look something like this: C:\Images\Icons\perceptible01.jpg.
[ Common question:
Why should I save the icon at all? Why not just use the "upload from URL" feature on the edit userpics page?
There is a very practical reason for this. If you change your icons a great deal (especially if you have a free account with only 3 userpics), once you delete the icon from your LJ userpics, you can't get it back. If you haven't saved the icon to your hard drive and later decide you want to use the icon again, you're going to have to track down the original post, which will take an awful lot of time. And which may actually be impossible, because it's likely that you'll have forgotten who made it. And thus, that truly excellent Libertines icon that you really wish you hadn't deleted from your userpics is lost forever. ]
Step 2:
Now that you have the icon saved, it's time to upload it to your LJ userpics. I think everyone knows how to do that, so we'll just move on to the next step. ;)
Step 3:
Ah, the elusive art of keywording. This is where people tend to become confused, and it is the heart of this tutorial.
At this point, you should be on a page (http://www.livejournal.com/editpics.bml) that looks something like this:

Now you're going to enter the actual keywords. Keywords are the method by which you can later use the icon in posts or comments via the "User Picture Icon" drop-down menu. You can use anything you want to help you remember what the icon is or show your originality.
This is what I have now:

One of the really nifty features of LJ is the additional "comment" space beneath the "keywords" option. If you've been around long enough, you'll remember keywording icons before LJ added that feature, and how little space you actually had for keywords. With the "comment" option, you have twice as much room for keywords, making crediting a lot easier.
Now that you have your actual keywords defined, it's time to use the "comment" area for credit. And here's the really great thing: you can use the lj user tag here (perceptible).
This is what it looks like now:

Now all you have to do is click the "Save Settings" button.
That's it! You now have a brand-new icon, properly credited. To see what it looks like, go to your "allpics" page (http://www.livejournal.com/allpics.bml).
It should look like this:

And that's all there is to giving keyword credit for icons. :)