Glowing effect for PS7
My first tutorial!!! Not to be massively annoying, but it's a picture of me and my boyfriend. I just realy really liked the effect I managed on this picture, and couldn't find another picture it worked so well with. I'm using Photoshop 7, easily translatable.
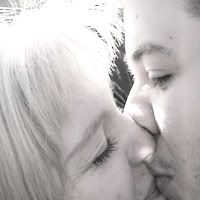
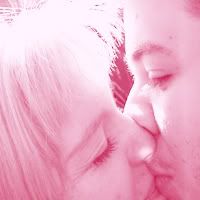
Go from
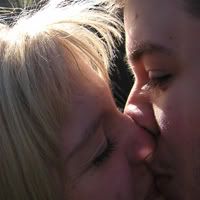
This to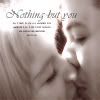
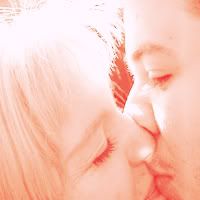
This!
Step 1: Take your image and crop it down. I like to crop to 200x200 px because it makes it easier to work with, then resize it to 100px later.
Step 2: Duplicate the background layer and desaturate.
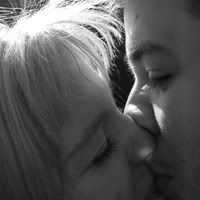
Step 3: You are going to duplicate several of these layers, and set them to any combination of soft light and screen. Whatever gets you close to this (I used 1 soft light, with 4 screen on top of it). You can also go back and play with it when your icon is finished.
Step 4: Create a new pink fill layer (I used #DE7A9D) and set to hard light.
Step 5: Create another fill layer with an orangeish brown (I used #D3A959) and set to overlay.
Step 6: Duplicate one of the black and white layers and drag it to the top. Set it to gaussian blur 3.0. (This sounds weird, but wait till you see how it turns out)

Step 7: Set it to hard light.
Step 8: Duplicate one of the b/w screen layers and drag it to the top. Leave it at screen.
Step 9: Resize to 100px, and bravo, there's your icon! On this one, I didn't like how overexposed and bright my bangs looked, so I added some text over them. (It's actually a brush by customer_mimi)
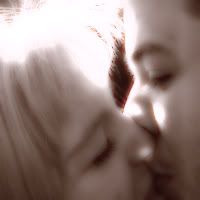
Go from
This to
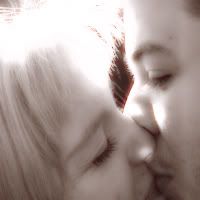
This!
Step 1: Take your image and crop it down. I like to crop to 200x200 px because it makes it easier to work with, then resize it to 100px later.
Step 2: Duplicate the background layer and desaturate.
Step 3: You are going to duplicate several of these layers, and set them to any combination of soft light and screen. Whatever gets you close to this (I used 1 soft light, with 4 screen on top of it). You can also go back and play with it when your icon is finished.
Step 4: Create a new pink fill layer (I used #DE7A9D) and set to hard light.
Step 5: Create another fill layer with an orangeish brown (I used #D3A959) and set to overlay.
Step 6: Duplicate one of the black and white layers and drag it to the top. Set it to gaussian blur 3.0. (This sounds weird, but wait till you see how it turns out)
Step 7: Set it to hard light.
Step 8: Duplicate one of the b/w screen layers and drag it to the top. Leave it at screen.
Step 9: Resize to 100px, and bravo, there's your icon! On this one, I didn't like how overexposed and bright my bangs looked, so I added some text over them. (It's actually a brush by customer_mimi)