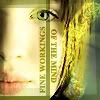
FULL ICON TUTORIAL: Violet Baudelaire
Making this icon in PS7:

Pretty short, and it's more a stylistic tutorial than a technical one, I think. Makes use of lesser-used blend modes. Not really for beginners, because I'm assuming you know what and where the tools are.
These are the layers, in reverse order. I hope this is easy enough to follow. :)

Base, already sharpened and smoothed.
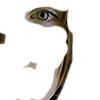
Duplicate of the base, sharpened once more. All the bits except the eye and the bit where hair meets the jaw have been erased. This layer is set to Normal @ 84% opacity.

Duplicate of the base, set to Color Dodge @ 55% opacity.

Exclusion layer. 1F2E70, 100% opacity

Gradient by crumblingwalls, set to Color Dodge @ 42% opacity.

Duplicate of the base, set to Overlay @ 100%

Brush by sweetdisease in #FFFFB1, Soft Light, 100% opacity.

Brush in #91994C on Color Dodge, 100%
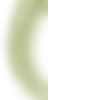
Same brush, same settings
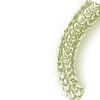
A piece of a LotR jewelry brush from Evenstar Art in #91994C, set to Color Dodge @ 81%. The previous two brushes are actually this same brush, only run through Gaussian Blur and rotated a bit.

Border brush by I forget who in #91994C, set to Multiply @ 100%

Border brush by I forget who in #91994C, set to Multiply @ 44%
Text: Times New Roman, Bold, 8 pt, antialias Strong, #91994C, set to Linear Burn @ 93%
End result:


Pretty short, and it's more a stylistic tutorial than a technical one, I think. Makes use of lesser-used blend modes. Not really for beginners, because I'm assuming you know what and where the tools are.
These are the layers, in reverse order. I hope this is easy enough to follow. :)

Base, already sharpened and smoothed.

Duplicate of the base, sharpened once more. All the bits except the eye and the bit where hair meets the jaw have been erased. This layer is set to Normal @ 84% opacity.

Duplicate of the base, set to Color Dodge @ 55% opacity.

Exclusion layer. 1F2E70, 100% opacity

Gradient by crumblingwalls, set to Color Dodge @ 42% opacity.

Duplicate of the base, set to Overlay @ 100%

Brush by sweetdisease in #FFFFB1, Soft Light, 100% opacity.

Brush in #91994C on Color Dodge, 100%

Same brush, same settings

A piece of a LotR jewelry brush from Evenstar Art in #91994C, set to Color Dodge @ 81%. The previous two brushes are actually this same brush, only run through Gaussian Blur and rotated a bit.

Border brush by I forget who in #91994C, set to Multiply @ 100%

Border brush by I forget who in #91994C, set to Multiply @ 44%

Text: Times New Roman, Bold, 8 pt, antialias Strong, #91994C, set to Linear Burn @ 93%
End result:
