Tutorials whuuuuut. :)
Zwei Tutorials. One requested by alleyb and the other one ripped from my personal journal.
All images done in CS2, non-translatable.

So here we have this:
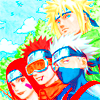
A boring old color scan. Only it has MINATO in it, so it's okai.
First, we're gonna saturate this bitch up. Go to Layer > New Adjustment Layer > Hue/Saturation. You'll be on Master immediately, raise the saturation to +75
NAO IT LOOKS LIEK THIZZ:
That is very bright.
Now we go again to Layer > New Adjustment Layer, but now go to Selective Color. It's a bit complicated, but no worries. I will guide you, like your own personal Yoko Ono.
Selective Color Numero Uno
Reds: Cyan: -100 // Magenta +19 // Yellow +9 //
Greens: Cyan +100
Cyans: Cyan +100
Blues: Cyan +100
Magentas: Cyan -100
Whites: Cyan +12 // Yellow -16 // Black -12
Neutrals: Cyan -45 // Magenta +8 // Yellow +16 // Black -11
Now duplicate that. It might hurt your eyes a little, but don't worry. All in due time, my friends. All in due time.
AND NAO WE FSCK WITH IT SUM MOAR.
Selective Color Nummer Zwei
Reds: Cyan -100
Cyans: Cyan +100
Blues: Cyan +100
Neutrals: Cyan +12 // Yellow -13
DUPLICATE THAT TOO PLZ, SO NAO IT LUUK LIEK THIZZ:
Moar Hue/Saturation tiem.
Master: +16
Red: +15
Yellow: +100
Cyan: +41
Now Duplicate ur baes. Set it to Soft Light, 50% opacity.
WE B MIXIN CHANNULZ NAO?
Go to Layer > New Adjustment Layer > Channel Mixer
Red: Red +120 // Green -30
Blue: Red -2 // Green -12 // Blue +106
Nao we're in ur iconz, duplicatin ur bases and settin dem tuu soft liet, 50% aginn.
Hue/Sat again, Cyan +100
Now, we are coming to a close. Go to Layer > Fill Layer > Solid Color and fix those crappy settings you see. Instead of Mode: Normal, change it to Mode: Exclusion, and change the opacity to 78%. Once you hit OK, hit the little box in the lower left with a bunch of numbers and letters in it and delete whatever it says. Replace it with #0e1b33.
Now add this texture:
by evastefania and set it to Screen 100%. Stretch, rotate, or erase it how you wish. I had to screw around with it because one of the little shinies covered Minato's very smexayful eyes.
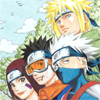
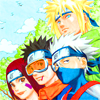
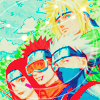
FINAL RESULT IN OVERABUSED BOLD CAPS:
OTHER EXAMPLES:

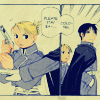
ANDNAOWERDUNGITTHEHELLOUTOFMAIJURNULL.

We start with a manga page. I used the first appearance of Roy and Riza from Chapter 4 of FMA, ripped off of OneManga.com. IT IS SMEXY.
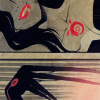
Now, we're going to color this shit. On the "Layers" palette, there should be a tab labeled "Channels". Click to it. There should be a Red Channel (If not, go to Image > Mode > RGB Color and change it to that. If it asks you to flatten layers, do it.), click on it by hitting the CTRL button (The apple button on Macs) and holding down on it until it turns orangey and your mouse turns into a little hand with a dotted box. It will select all the white on your page. Hit the "DEL" button, and all the white will disappear.
DON'T CROP IT YET. It will be impossible to color the lines and your icon will look crappy. Just deal with the laggy size for now.
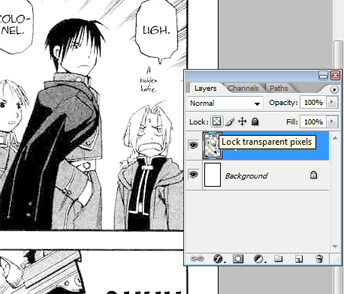
Now click the little squarey button on top of your image while your lines layer is highlighted. This will lock the transparent pixels and let you color your lines. Another options is to make a new layer, right-click it and hit Create Clipping Mask. This will do basically the same thing, but you can put other clipping masks under it like regular layers.
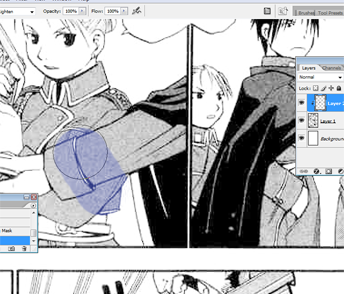
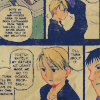
I colored in their awesome blue uniforms by selecting a dark blue color, setting the brush mode to "Lighten" and going just friggin' nuts.
After the image is colored, you've done all you want with it and you're like "Woah, I'm pretty fucking chill", NAO you can crop it. You can confine it to one panel, or you can select a bunch of panels to create a nice, retro effect.
Now make a new fill layer of #130f3d by going to Layer > New Fill Layer > Solid Color and b setting it to Exclusion 100%.
Now make ANOTHER fill layer of #31587c and set this one to Overlay.
NAOZMAEKAHUE/SATLAYERPLZ.
Master: 0, +16, 0
Cyans: +6, +20, +23
Make another Hue/Saturation and set this one to Soft Light
Master: 0, +22, 0
Make yet another fill layer of #040a2a and set it to Exclusion.
Now take this texture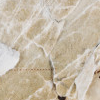
by reysphile and bend the opacity to your will.
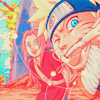
Your result should resemble (But not exactly) this:
OTHER EXAMPLES:
And you are done! :D Let me see your results and happy icon-in'!
All images done in CS2, non-translatable.
So here we have this:
A boring old color scan. Only it has MINATO in it, so it's okai.
First, we're gonna saturate this bitch up. Go to Layer > New Adjustment Layer > Hue/Saturation. You'll be on Master immediately, raise the saturation to +75
NAO IT LOOKS LIEK THIZZ:
That is very bright.
Now we go again to Layer > New Adjustment Layer, but now go to Selective Color. It's a bit complicated, but no worries. I will guide you, like your own personal Yoko Ono.
Selective Color Numero Uno
Reds: Cyan: -100 // Magenta +19 // Yellow +9 //
Greens: Cyan +100
Cyans: Cyan +100
Blues: Cyan +100
Magentas: Cyan -100
Whites: Cyan +12 // Yellow -16 // Black -12
Neutrals: Cyan -45 // Magenta +8 // Yellow +16 // Black -11
Now duplicate that. It might hurt your eyes a little, but don't worry. All in due time, my friends. All in due time.
AND NAO WE FSCK WITH IT SUM MOAR.
Selective Color Nummer Zwei
Reds: Cyan -100
Cyans: Cyan +100
Blues: Cyan +100
Neutrals: Cyan +12 // Yellow -13
DUPLICATE THAT TOO PLZ, SO NAO IT LUUK LIEK THIZZ:
Moar Hue/Saturation tiem.
Master: +16
Red: +15
Yellow: +100
Cyan: +41
Now Duplicate ur baes. Set it to Soft Light, 50% opacity.
WE B MIXIN CHANNULZ NAO?
Go to Layer > New Adjustment Layer > Channel Mixer
Red: Red +120 // Green -30
Blue: Red -2 // Green -12 // Blue +106
Nao we're in ur iconz, duplicatin ur bases and settin dem tuu soft liet, 50% aginn.
Hue/Sat again, Cyan +100
Now, we are coming to a close. Go to Layer > Fill Layer > Solid Color and fix those crappy settings you see. Instead of Mode: Normal, change it to Mode: Exclusion, and change the opacity to 78%. Once you hit OK, hit the little box in the lower left with a bunch of numbers and letters in it and delete whatever it says. Replace it with #0e1b33.
Now add this texture:
by evastefania and set it to Screen 100%. Stretch, rotate, or erase it how you wish. I had to screw around with it because one of the little shinies covered Minato's very smexayful eyes.
FINAL RESULT IN OVERABUSED BOLD CAPS:
OTHER EXAMPLES:
ANDNAOWERDUNGITTHEHELLOUTOFMAIJURNULL.
We start with a manga page. I used the first appearance of Roy and Riza from Chapter 4 of FMA, ripped off of OneManga.com. IT IS SMEXY.
Now, we're going to color this shit. On the "Layers" palette, there should be a tab labeled "Channels". Click to it. There should be a Red Channel (If not, go to Image > Mode > RGB Color and change it to that. If it asks you to flatten layers, do it.), click on it by hitting the CTRL button (The apple button on Macs) and holding down on it until it turns orangey and your mouse turns into a little hand with a dotted box. It will select all the white on your page. Hit the "DEL" button, and all the white will disappear.
DON'T CROP IT YET. It will be impossible to color the lines and your icon will look crappy. Just deal with the laggy size for now.
Now click the little squarey button on top of your image while your lines layer is highlighted. This will lock the transparent pixels and let you color your lines. Another options is to make a new layer, right-click it and hit Create Clipping Mask. This will do basically the same thing, but you can put other clipping masks under it like regular layers.
I colored in their awesome blue uniforms by selecting a dark blue color, setting the brush mode to "Lighten" and going just friggin' nuts.
After the image is colored, you've done all you want with it and you're like "Woah, I'm pretty fucking chill", NAO you can crop it. You can confine it to one panel, or you can select a bunch of panels to create a nice, retro effect.
Now make a new fill layer of #130f3d by going to Layer > New Fill Layer > Solid Color and b setting it to Exclusion 100%.
Now make ANOTHER fill layer of #31587c and set this one to Overlay.
NAOZMAEKAHUE/SATLAYERPLZ.
Master: 0, +16, 0
Cyans: +6, +20, +23
Make another Hue/Saturation and set this one to Soft Light
Master: 0, +22, 0
Make yet another fill layer of #040a2a and set it to Exclusion.
Now take this texture
by reysphile and bend the opacity to your will.
Your result should resemble (But not exactly) this:
OTHER EXAMPLES:
And you are done! :D Let me see your results and happy icon-in'!