Tut 02: Kimi No Tame Ni Dekiru Koto Gackt Calendar Tutorial
TUTORIAL: Kimi no Tame Ni Dekiru Koto Calendar Tutorial (featuring Gackt) by iwannabe_gackt
3 Tutorials In One (Blending, Text Border, Calendar)
PROGRAM: Paint Shop Pro 8. Can be translated, not by me though.
WARNING: Time Consuming. please have patience with it, & bare with me as well, i try my best to explain. Image Heavy.
If there's any questions, please ASK. i'll try my best to help
Requested by ozzie_dingo
Making:
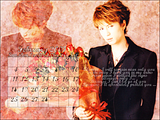
this & this to
Step oo1.
First I opened up a new blank canvas, 800x600. You can make it any size you want, this size just happened to look best with the photos I chose. I chose 2 clear pictures of the oh so very talented Gackt.
Step oo2. BLENDING
I chose one of the picture and played around with the layers until it was the coloring I liked. Copy and paste ONE of the images onto the canvas.
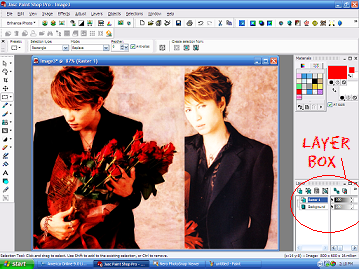
Then go to Layers > New Raster Layer and created one new layer. Take the second photo and place it directly on top, like so.
Step oo3. BLENDING
We want the second photo to blend into the first photo. There are different ways to do this. For this particular photo, I set the layer for the second photo to Soft Light / Opacity 100.
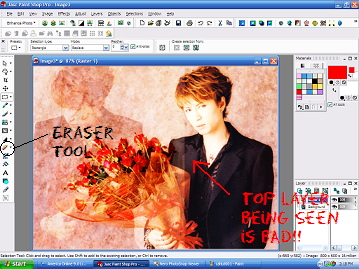
However, the layer can clearly be seen because the blending isn't over. It looks very icky, and we don't like that, so we have to get rid of it
Step oo4. BLENDING
So we're going to take our Eraser Tool, the circled icon shown above. We want a small sized brush, so take a round brush that's the size 20 or smaller at an 100 opacity and start erasing around the blended Gackt.

That looks a lot prettier now, doesn't it?
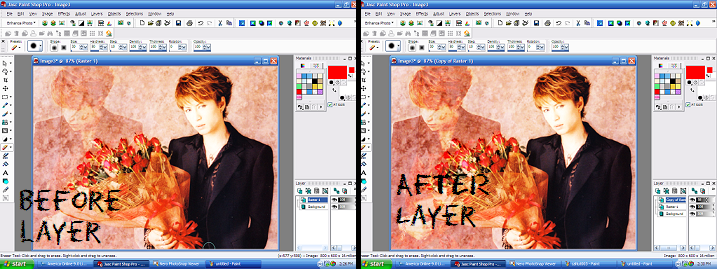
I wanted the blended photo of Gackt to be a bit darker, so I duplicated the top layer & played around with the opacity. The after photo below is at an opacity of 58. I think it looks better than before, but it's your option.
Step oo5.
Now that the first tutorial is over, we can now get to the part that it actually starts looking like a calendar.
Next open up a new canvas of a square. You can choose a size you would like the size of the boxes to be. I chose a 50x50 canvas and then added a border by going to Image > Add Border.
NOTE* I suggest checking the amount of days there are in each month before making the boxes so you wouldn't have to do the whole calendar over. The communities seemed to like the work of the month of February most, so i'm working with that month.
February has 28 days, starts on THURSDAY and ends on WEDNESDAY. There will be 5 rows of 7 boxes across. DON'T MESS THIS UP!!
I wanted to make things easier for myself, so opened up the bootleg Paint program that comes with the computer and pasted the amount of boxes needed into it, like so
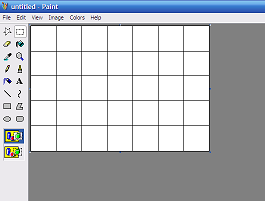
Step oo6.
Go make to PSP and make another layer on your canvas. Copy the boxes from paint and paste it where ever you want onto the canvas.
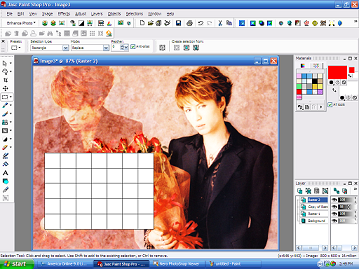
It's starting to look like a calendar, but let's face it, the white boxes makes it look really ugly. So we're going to keep the top layer set to Normal, but play around with the opacity. I think it looks best between the opacities of 40-60.
Now the boxes are faded in the background, so you can see through the boxes, but you're still able to see the lines.

Step oo7. BORDERED TEXT
Choose the font of your choice. I chose Marcelle Script because the broken script looks pretty with the photos.
To make bordered text, open up a new canvas and paint it black. Select your font button and move your mouse up to the top of the program where is says Create As: and make sure it's set to Floating.

We want to use a small size for the days of the week and we want the font to be in WHITE.
Step oo8. BORDERED TEXT
Let's start off with SUNDAY, which I shortened to Sun. Once you type it, there should be moving lines around it. Scroll to the top and go to Selections > Modify > Expand and a window should pop up.
A window like below should pop up that says Expand Selection, keep the number of pixels as one and hit ok.
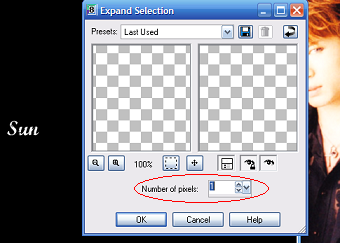
Add another layer to the calendar for just the days of the week and copy and paste the word day over the first box of. Repeat this step over (without adding a layer for each one) for each day and also for the name of the month. Then play around with the opacity once all each day is added. I changed my opacity to 56

Step o10.
Now make a new layer and start filling the numbers into the boxes. (to be perfectly honest, this takes THE MOST patience out of the whole damn thing XD). You can add anything else you want, doesn't matter, be creative. I just added some lyrics to Gackt's song Kimi No Tame Ni Dekiru Koto and a border.
COMPLETE! CONGRATS! YOU DID IT!

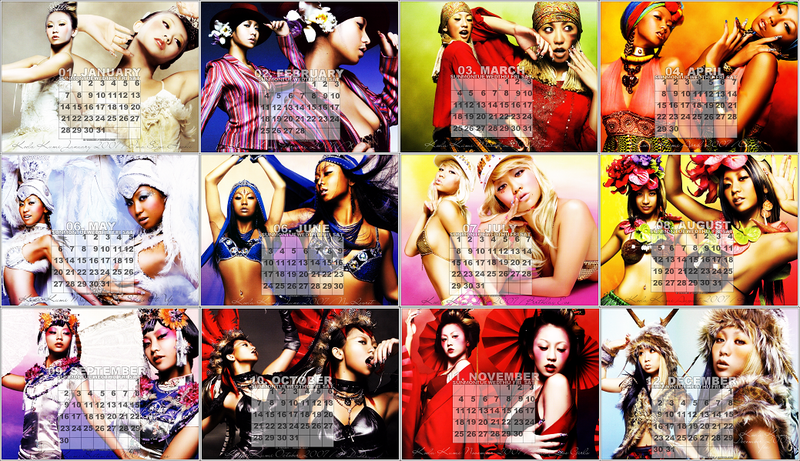
Making twelve of these, though, takes TONS of patience, but the outcomes are beautiful. Here are the examples of my work:
Gackt Calendar
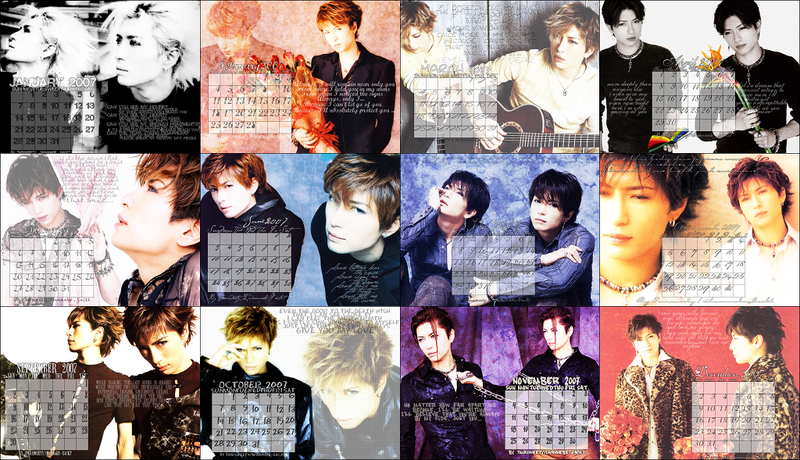
Koda Kumi Calendar
crossposted: icon_tutorial
Hope you liked the tutorial! ^^V
3 Tutorials In One (Blending, Text Border, Calendar)
PROGRAM: Paint Shop Pro 8. Can be translated, not by me though.
WARNING: Time Consuming. please have patience with it, & bare with me as well, i try my best to explain. Image Heavy.
If there's any questions, please ASK. i'll try my best to help
Requested by ozzie_dingo
Making:
this & this to

Step oo1.
First I opened up a new blank canvas, 800x600. You can make it any size you want, this size just happened to look best with the photos I chose. I chose 2 clear pictures of the oh so very talented Gackt.
Step oo2. BLENDING
I chose one of the picture and played around with the layers until it was the coloring I liked. Copy and paste ONE of the images onto the canvas.
Then go to Layers > New Raster Layer and created one new layer. Take the second photo and place it directly on top, like so.

Step oo3. BLENDING
We want the second photo to blend into the first photo. There are different ways to do this. For this particular photo, I set the layer for the second photo to Soft Light / Opacity 100.
However, the layer can clearly be seen because the blending isn't over. It looks very icky, and we don't like that, so we have to get rid of it

Step oo4. BLENDING
So we're going to take our Eraser Tool, the circled icon shown above. We want a small sized brush, so take a round brush that's the size 20 or smaller at an 100 opacity and start erasing around the blended Gackt.

That looks a lot prettier now, doesn't it?
I wanted the blended photo of Gackt to be a bit darker, so I duplicated the top layer & played around with the opacity. The after photo below is at an opacity of 58. I think it looks better than before, but it's your option.

Step oo5.
Now that the first tutorial is over, we can now get to the part that it actually starts looking like a calendar.
Next open up a new canvas of a square. You can choose a size you would like the size of the boxes to be. I chose a 50x50 canvas and then added a border by going to Image > Add Border.
NOTE* I suggest checking the amount of days there are in each month before making the boxes so you wouldn't have to do the whole calendar over. The communities seemed to like the work of the month of February most, so i'm working with that month.
February has 28 days, starts on THURSDAY and ends on WEDNESDAY. There will be 5 rows of 7 boxes across. DON'T MESS THIS UP!!
I wanted to make things easier for myself, so opened up the bootleg Paint program that comes with the computer and pasted the amount of boxes needed into it, like so

Step oo6.
Go make to PSP and make another layer on your canvas. Copy the boxes from paint and paste it where ever you want onto the canvas.

It's starting to look like a calendar, but let's face it, the white boxes makes it look really ugly. So we're going to keep the top layer set to Normal, but play around with the opacity. I think it looks best between the opacities of 40-60.
Now the boxes are faded in the background, so you can see through the boxes, but you're still able to see the lines.

Step oo7. BORDERED TEXT
Choose the font of your choice. I chose Marcelle Script because the broken script looks pretty with the photos.
To make bordered text, open up a new canvas and paint it black. Select your font button and move your mouse up to the top of the program where is says Create As: and make sure it's set to Floating.

We want to use a small size for the days of the week and we want the font to be in WHITE.
Step oo8. BORDERED TEXT
Let's start off with SUNDAY, which I shortened to Sun. Once you type it, there should be moving lines around it. Scroll to the top and go to Selections > Modify > Expand and a window should pop up.
A window like below should pop up that says Expand Selection, keep the number of pixels as one and hit ok.

Add another layer to the calendar for just the days of the week and copy and paste the word day over the first box of. Repeat this step over (without adding a layer for each one) for each day and also for the name of the month. Then play around with the opacity once all each day is added. I changed my opacity to 56

Step o10.
Now make a new layer and start filling the numbers into the boxes. (to be perfectly honest, this takes THE MOST patience out of the whole damn thing XD). You can add anything else you want, doesn't matter, be creative. I just added some lyrics to Gackt's song Kimi No Tame Ni Dekiru Koto and a border.
COMPLETE! CONGRATS! YOU DID IT!

Making twelve of these, though, takes TONS of patience, but the outcomes are beautiful. Here are the examples of my work:
Gackt Calendar

Koda Kumi Calendar

crossposted: icon_tutorial
Hope you liked the tutorial! ^^V