(no subject)
Tutorial #2 - Singin’ in the Rain (PSP 8)
From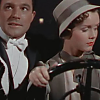
to
in Paint Shop Pro 8 (translatable)
1.
My base is from capthat
Crop and sharpen using unsharp mask, settings: radius, 1.00; strength, 75; clipping 7 (or whatever combination works better for your base.)
2.
Add this gradient (it comes with PSP I’m fairly sure) at Lighten, 60%
3. Duplicate your background and drag it to the top, set to Screen, 100%
4.
Add this texture by colorfilter , Screen 100%
5.
Also by colorfilter, also Screen 100%
6. Duplicate your background again, drag to top, Soft Light 100%
7.
Add this tiny text brush by me, or create tiny text of your own (I usually use Courier New, size 1, with a high kerning) in a color picked with the dropper from the icon. The “>>>” symbols above were written in Courier New, size 4, with a kerning around 600.
And that’s it!
The great thing about this icon is you can change the color of it using the colorize feature or by adding a color balance adjustment layer… or a whole variety of ways actually… so you can make it whatever color you wish to match your layout du jour.
For example:

For best quality results, save a .png
Feel free to adjust the different opacities, layer settings, brushes, textures… be creative! Comments are greatly appreciated. :)
From
to
in Paint Shop Pro 8 (translatable)
1.
My base is from capthat
Crop and sharpen using unsharp mask, settings: radius, 1.00; strength, 75; clipping 7 (or whatever combination works better for your base.)
2.
Add this gradient (it comes with PSP I’m fairly sure) at Lighten, 60%
3. Duplicate your background and drag it to the top, set to Screen, 100%
4.
Add this texture by colorfilter , Screen 100%
5.
Also by colorfilter, also Screen 100%
6. Duplicate your background again, drag to top, Soft Light 100%
7.
Add this tiny text brush by me, or create tiny text of your own (I usually use Courier New, size 1, with a high kerning) in a color picked with the dropper from the icon. The “>>>” symbols above were written in Courier New, size 4, with a kerning around 600.
And that’s it!
The great thing about this icon is you can change the color of it using the colorize feature or by adding a color balance adjustment layer… or a whole variety of ways actually… so you can make it whatever color you wish to match your layout du jour.
For example:
For best quality results, save a .png
Feel free to adjust the different opacities, layer settings, brushes, textures… be creative! Comments are greatly appreciated. :)