Fashion Model Tutorial
To
10 steps in Photoshop CS3
Should be translatable to earlier versions.
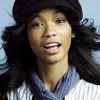
001.Find a base crop it and increase the contrast if need.
002.Next you need to make your image black and white.
I made a black and white adjustment layer with these settings:
Reds: -15
Yellows: 104
Greens: 40
Cyans: 60
Blues: 20
Magenta: 80
without the tint checked.
You can do this any number of ways, I like this one because it's nondestructive and gives you more control over your image.
003.Then add a layer of the colour #e0e3a7 with the blending mode set to multiply and the opacity set to 57.
004.Now add this texture and set it to lighten and erase the parts covering and anything important.
005.Add the same texture again, but this time set to screen with the opacity at 47% and erase anything that's un-necessary. Try to erase less then before.
006.brighten up the image if needed.
I did this using a curve with the following settings:
First point Output: 121 Input: 88
Second point Output: 194 Input: 145
Then I set the layer to 68% opacity.
007.Next make a selective colour layer with the following settings:
Neutrals: -16 6 0 0
Blacks: -11 11 -34 4
008. Add a hue/saturation layer and change the saturation to +15.
009. Add a colour layer of #e0e3a7 and set it to multiply at 54%.
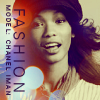
010.Then add some text if you want.
I added a 2 text layers.
I used the font: Univers LT 45 Light and rotated the text 90%.
On the word fashion I used the following layer style settings:
Outer Glow:
colour: ffffbe
opacity: 15%
blend mode: liner dodge(add)
Spread: 7 Size: 24
And that's it! I hope you find this useful!
I'd love to see your results.