Pattern Review: Burda Plus Fashion Magazine: 09-2003-403 (Long Gored Skirt)
Originally published at Acorns to Oaktrees. You can comment here or there.
UPDATE: 4/21/04
I made the skirt again. Confession time. This time, I followed the
direction and made the skirt out of stretch gabardine with a facing and
zipper. Last time, I used a knit with an elastic waistband. Both skirts
came out well.
If you make it out of a knit, it is essential to add ease, unless you
are plus sized woman with no lumps or bumps on your hips, thighs, and
tummy. In the stretch gabardine, the skirt looks good on me with
minimal/zero ease at the hips.
The skirt is kinda a pain to fit. Each gore needs to be adjusted.
OTOH, the gores give you a lot of opportunity to get your fit exactly
right. The lycra content in the fabric adds to the difficulty in
fitting. The first time I finished this skirt, it was way too big,
my fault. I took it apart and tried again. This time, I got good
fit in the hips and tummy, but the waist is still too big. I have a
small waist, and I always have to take waists in. Again, the lycra
makes this problematic because it stretches, so the waist grows.
I need to take the waist in some more in the back.
CHANGES: I moved the zipper to center back. I think center back will
less stress on it than the side. That meant I had to change the
facings. I topstitched the waist and stitched in the ditch between
the gores to keep the facing down. I used a nominal 1 inch side seam
allowance. I recommend this because it will give you lots of fitting
room.
FITTING CHANGES: Set the datum or zero plane at the waist. I let the
gores out 1/8 of an inch at the hips (all the way to the hem). On me
that is 4 inches from the waist. From 2 inches to 4 inches down, I used
the pattern size, and from 2 inches down up to the waist, I bought it
back in 1/8 of an inch at every gore. This is fine in front, but I
need to bring the back in more. The front of the skirt is the same as
the back of the skirt, so everyone will have to make this adjustment
to some extent.
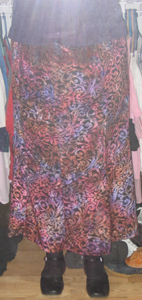
UPDATE:
I added the picture. As you can see, it’s not nearly as formfitting on me as on the model. I really think it’s more flattering that way.
Pattern Description:
A long, gored, mostly straight skirt, that narrows at the knee then bells out.
Pattern Sizing:
Well, shoot, I don’t have the pattern with me, and I don’t recall what sizes it comes it. I think it starts at a hip of 42. I made the one for hips 47 inches. It was form fitting. I decided that was fine in the back, but I let the front out about 4 inches.
Did it look like the photo/drawing on the pattern envelope once you were done sewing with it?
It’s hard to tell. The skirt is black in the picture, the jacket is obscuring details, and the model is standing in a strange position. However, the general lines are the same.
Were the instructions easy to follow?
Yes. There are 8 goes in this skirt, with the front and back being the same, but reversed right and left. So left center front is the same piece as right center back. I’d go on, but it gets confusing very quickly. The instructions were very clear on what piece went where.
What did you particularly like or dislike about the pattern?
LOVE: The shape of the skirt. It’s very much in the style of early 1930s suit skirts which I’m totally gaga over right now, but with modern construction techniques. When I saw it, I knew I had to make it.
DISLIKE: My front and back are not shaped the same. The bump (aka tummy) in front is much higher than the bump (aka butt) in back. Unaltered, the skirt would fit a plus sized woman with a very flat tummy. However, for most of us, it would be much more practical to make the front in a larger size than the back. I recommend flat measuring of the gores, 4 inches below the waist (tummy height) to determine the size you need in front.
Fabric Used:
The pattern calls for a stretch woven, but I have a really hard time finding them in colors and styles that I like. I made the skirt out of a burnout panne,” tie-dyed” in rusts, maroons, and purples from Joanne’s.
Pattern Alterations or any design changes you made:
When I traced the pattern, I used 1 inch seam allowances. In the back, I sewed with 1 inch seam allowances. In the front, I sewed with 0.25 inch seam allowances.
I used a knit fabric with lots of stretch, so I omitted the zipper and tucked elastic under the facing. If I make this again out of a knit, I’ll use a waistband. If I try it in a stretch woven, I’ll move the zipper to the center back.
The skirt is cut in 3 pieces (per gore) lengthwise. The original design showcases a striped fabric, and the 3 pieces make a pleasing pattern, but since I was using a fabric with an allover pattern, I left the middle piece on the top gores. It’s drawn that way on the pattern sheet. Why sew an extra seam that isn’t going to show?
Would you sew it again? Would you recommend it to others?
I will absolutely sew it again, and as long as you take into account the probabl3 need for a larger size in front than in back, I think this would be an easy and flattering skirt for plus sized women.
Conclusion
A great style remniscent of the 1930s.