2 Tutorials
i have come with 2 tutorials for you!
first one requested by karen, and the second thanks to ernest!
to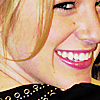
(this coloring was used throughout my entire mega batch)
to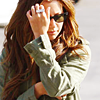
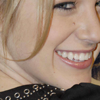
First tut:
to
1. Layer > New Adjustment Layer > Vibrance
Vibrance: 100 (this can be changed according to the image)
Saturation: 0
(this makes the image more natural and colorful)
2. Layer > New Adjustment Layer > Selective Color
REDS:
0/+100/-23/0
YELLOWS:
0/-48/+79/+5
NEUTRALS:
0/+2/+1/0
BLACKS:
0/0/0/+26
(this is where you get your nice lipstick color on blake and beautiful blond color on her hair)
sometimes the image might turn up too pink or too magenta, so all you have to do is lower magenta (from REDS). So when you do that, your REDS palette will look something like that:
0/+60/-23/0
it doesnt have to be 60, just lower it.
3. Layer > New Adjustment Layer > Curves
First point:
Output: 122
Input: 95
Second point:
Output: 184
Input: 141
(this brightens the image. if the image is too bright, just lower the points.)
4. Sharpen your image :D
and with that, YOU ARE DONE WITH THE FIRST TUT! :D
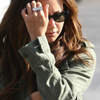
Second tut:
to
1. Layer > New Adjustment Layer > Curves
First Point:
Output: 175
Input: 119
Second Point:
Output: 202
Input: 153
2. Layer > New Adjustment Layer > Vibrance
Vibrance: +64
Saturation: 0
3. Layer > New Adjustment Layer > Selective Color
REDS:
0/+16/+3/0
YELLOWS:
0/-4/+52/0
4. Layer > New Adjustment Layer > Color Balance
Midtones:
+15/-3/-13
WITH THIS YOU ARE DONE! :D
i hope these 2 tuts have been helpful! :D
first one requested by karen, and the second thanks to ernest!
to
(this coloring was used throughout my entire mega batch)
to
First tut:
to
1. Layer > New Adjustment Layer > Vibrance
Vibrance: 100 (this can be changed according to the image)
Saturation: 0
(this makes the image more natural and colorful)
2. Layer > New Adjustment Layer > Selective Color
REDS:
0/+100/-23/0
YELLOWS:
0/-48/+79/+5
NEUTRALS:
0/+2/+1/0
BLACKS:
0/0/0/+26
(this is where you get your nice lipstick color on blake and beautiful blond color on her hair)
sometimes the image might turn up too pink or too magenta, so all you have to do is lower magenta (from REDS). So when you do that, your REDS palette will look something like that:
0/+60/-23/0
it doesnt have to be 60, just lower it.
3. Layer > New Adjustment Layer > Curves
First point:
Output: 122
Input: 95
Second point:
Output: 184
Input: 141
(this brightens the image. if the image is too bright, just lower the points.)
4. Sharpen your image :D
and with that, YOU ARE DONE WITH THE FIRST TUT! :D
Second tut:
to
1. Layer > New Adjustment Layer > Curves
First Point:
Output: 175
Input: 119
Second Point:
Output: 202
Input: 153
2. Layer > New Adjustment Layer > Vibrance
Vibrance: +64
Saturation: 0
3. Layer > New Adjustment Layer > Selective Color
REDS:
0/+16/+3/0
YELLOWS:
0/-4/+52/0
4. Layer > New Adjustment Layer > Color Balance
Midtones:
+15/-3/-13
WITH THIS YOU ARE DONE! :D
i hope these 2 tuts have been helpful! :D