#004, 5 Tutorials ..
Hey all ..
I was on the mood to write some tutorials .. so hope you'll find them useful ..I don't know who made the textures .. so if you know tell me ..
How to make

,

,

,

,

..
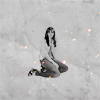
How to go

to
..
-Open this texture By **** ..

-Brightness/Contrast ..
B:+38, C:35 ..

-Open your picture and crop it , try to crop the whole person .. I used this one ..
-Remove the background .. I use this way ..
http://nalazhar.livejournal.com/18401.html#cutid1
-Make your picture B&W by any way you want .. I use Black&White in PS CS3 .. Check this list ..
http://community.livejournal.com/icon_tutorial/8706910.html#cutid1

-take this texture by *** and set it to Multiply .. [ you can used any similar ones ] ..


the last step .. take this texture [ you can used any similar ones ] by *** set it to Screen and duplicate it if you like ..


Other Exampels ..

,
,
..
Psd :
How to get
..
Open this texture By ****

thake this texture by *** drage it to your base set it to Multiply ..

in a new layer create a blue circle .. set it to multiply ..


open the picture you want to use .. by the elliptical selection tool select the part you want and drag it .. resize it ..

move it to the place you want .. set it to multiply ..

thw last steps .. the picyure is little dark .. so you'll need to increase the light I used the curves & then Desaturate it ..

Other Exampels ..

,

,

..
Psd:
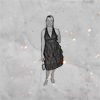
How to go

to
..
Open your Picture crop it ..
add new layer .. color the background with a Black one .. like this one ..

take this texture by *** set it to Screen ..


the coloring as I said is optional .. but I used this one ..
-Hue/saturated : S:-100 .. set it to Softlight ..

-new layer fill it with #d0e5f5 set it to Multiply ..

-selective color :
R:-32, +32, -100, 0
Y:-100, +42, +100, 0
W:+7, +2, -9, -11
N:-7, +2, +18

-add new layer fill it with #e9ddb9, set it to Color Burn, change the opacity to 40% ..

-Curves:
RBG: 1st point: O: 202, I:193
2nd point: O:48, I: 40
Red: O:145, I:159
Green: O:165, I: 158
Blue: O:125, I:129

-Color Balance:
M: +17, 0, -11
S:-7, 0, +2
H:-10, 0, +7

take this texture set it to Lighten ..

Other Exampels ..
Coloring :

technique :

Psd:
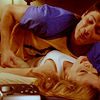
How to go

to
..
Open your picture .. Crop it .. Duplicate it & set it to Screen ..
-Levels:
RGB: 20, 1, 246
Red: 0, 1.06, 255
Blue: 0, 0.80, 255
Change the fill to 80% ..

-add new layer fill it with #e9d4b9 set it to multiply, change the opacity to 60% ..

-add new layer, fill it with #240d0d set it to Exclusion ..

-another Levels ..
RGB: 12, 1.10, 228
Blue: 0, 1.05, 255

-add new layer, fill it with #74bfee .. change the opacity to 24% ..

-Color Balance:
M:+37, 0, -17
S:+10, 0, -5
H:-4, 0, +7

- Curves to darken the image:
RGB: move the left point in the corner to O:0, I:60

- add new layer, fill it with #183377, set it to darken, change the opacity to 10% ..

-one last levels layer ..
RGB: 12, 0.90, 230

- Duplicate your base, bring it to the top and set it to Softlight ..
Other Exampels ..
,
Psd
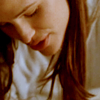
How to go

to
..
-open the picture, crop it .. duplicate it & set it to screen if it needs ..


-Levels:
RGB: 40, 1.43, 255
Red: Input:0, 1.37, 255
Output: 0, 224
Blue: 0, 1.13, 255

-Channel Mixer:
Red: +94, +8, -8, -5
Blue: -4, +14, 100

-Color Balance:
M:+24, -4, +6
S:-34, 0, -13

-Slecetive Color .. just to add shadows ..
Reds: -13, +1, +31, +6
Yellows: +6, +6, +10, 0
Whites: 0, 0, 0, -100
Neutrals: -3, -2, +6, +4
Blacks: 0, 0, 0, +100

-add new layer, fill it with #c28787 and set it to softlight ..

-add new Layer, fill it with #858aa7 and set it to softlight ..
Other Exampel ..

..
Psd: