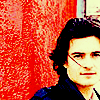
Icon Tut no.3
For some one who's on "hitaus" she has an icon tut to share

to
Made in Photoshop 7.0 not sure if it works in any other programm but I think so...
#1:Crop your base, I got mine from dont_be_so_base and it was made by mnemosynes_eyes
#2:Duplicate it and set to SCREEN 100%
#3:Duplicate the screened the layer and this time set it to OVERLAY 100%
#4:Duplicate the overlay layer and leave it with the same settings.
#5:Merge all layers
#6:New Layer fill with: 060024 and set to EXCLUSION 100%
#7:New Layer fill with: BAEBFF and set to SOFT LIGHT 100%
#8:Merge all layers
#9:Duplicate and set to LINER BURN 100%
#10:New Adjustment Layer > Selective Clouring:
-Red's
Cyan: -40
Magenta: +40
-Yellow's
Cyan: -50
Magenta: +36
Yellow: +50
-Neutrals
Cyan: -20
Magenta: +50
Black: +20
And as for the other ones should just be left at 0.
#11:Merge all layers (again!)
#12:New Layer fill with: C1C1C1 and set to CLOUR BURN 100%
#13:Merge all of the layers and...

DONE! My tip is just to fiddle around with the layers and stuff it usually depends on your pic as well, well i hope you understood this! : D questions are welcome!

to

Made in Photoshop 7.0 not sure if it works in any other programm but I think so...
#1:Crop your base, I got mine from dont_be_so_base and it was made by mnemosynes_eyes
#2:Duplicate it and set to SCREEN 100%
#3:Duplicate the screened the layer and this time set it to OVERLAY 100%
#4:Duplicate the overlay layer and leave it with the same settings.
#5:Merge all layers
#6:New Layer fill with: 060024 and set to EXCLUSION 100%
#7:New Layer fill with: BAEBFF and set to SOFT LIGHT 100%
#8:Merge all layers
#9:Duplicate and set to LINER BURN 100%
#10:New Adjustment Layer > Selective Clouring:
-Red's
Cyan: -40
Magenta: +40
-Yellow's
Cyan: -50
Magenta: +36
Yellow: +50
-Neutrals
Cyan: -20
Magenta: +50
Black: +20
And as for the other ones should just be left at 0.
#11:Merge all layers (again!)
#12:New Layer fill with: C1C1C1 and set to CLOUR BURN 100%
#13:Merge all of the layers and...

DONE! My tip is just to fiddle around with the layers and stuff it usually depends on your pic as well, well i hope you understood this! : D questions are welcome!