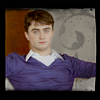
5 tutorials w/ .psd's =)
Thanks to Kate navi_glow for reminding me that I have .psd's/tutorials to share xD
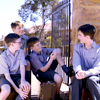
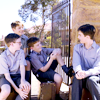
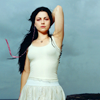
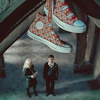
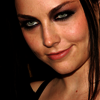
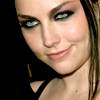
We're going from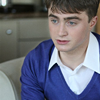
to
**You can download the .psd here
1. Crop your picture to where desired.
2. Create new layer.
Fill it with a pink kind of colour...In this case, I chose #bf8bab.
Set to Soft Light %100.
3. Create another layer.
Fill it with a weird looking green. I used #75832d.
Set to Soft Light %100.

4. Create a new Adjustment Layer, Hue/Saturation:
Reds - Saturation -> +19
Yellows - Saturation -> -40
5. Create new Adjustment Layer, Levels:
RGB Input Levels -> 12, 1.10, 245

6. Create new Adjustment Layer, Brightness/Contrast:
Contrast -> +10
7. Create a new layer.
Fill it with a really soft blue colour. For this icon, I used #8899c4.
Set to Soft Light %100.
And that's it! So simple. I'd love to see your results ^-^
Other icons made with this colouring:

~~
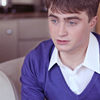
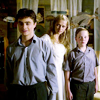
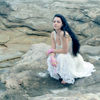
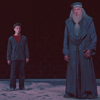
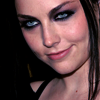
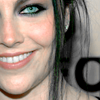
We're going from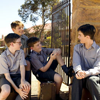
to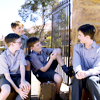
**You can download the .psd here.
1. Crop picture to where desired.
2. Create new layer.
Fill with a purple colour...I chose #8686c4.
Set to Overlay 100%.
3. Make a new Adjustment Layer, Levels:
RGB Input Levels -> 10, 1.20, 245
4. Duplicate your base and bring it to the top.
Set to Screen 50%.
5. Create a new layer.
Fill it with a dark green colour. I used #25702e.
Set to Soft Light 100%.

6. Duplicate your base again and bring it to the top.
Set to Soft Light 12% or until the image looks just right ;)
That's all! =)
Other icons made with this colouring:
~~
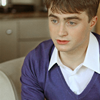
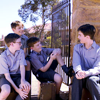
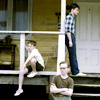
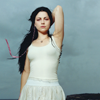
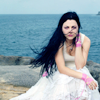
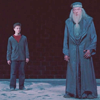
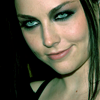
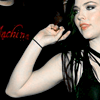
We're going from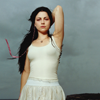
to
or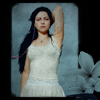
**You can download the .psd here.
1. Crop your image.
2. Create new layer.
Fill it with a pale blue colour. I used #6c94ad for this icon.
Set to Soft Light 100%.

3. Duplicate your base and drag to top.
Set to Screen 25%.
4. Create a new Adjustment Layer, Hue/Saturation:
Master -> Saturation -> +19
5. Create another Adjustment Layer, Levels:
RGB Input Levels: 15, 1.10, 245
6. Create another layer.
Fill with a similar kind of pale blue. I chose #7b90aa.
Set to Soft Light 100%.
And that's it!
Or, you can also do this step:
7. Add this texture by mata090680.
Set to Multiply 100%.
Other icons made with this colouring:
~~
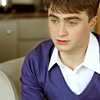
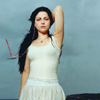
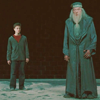
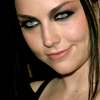
We're going from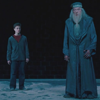
to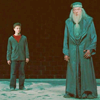
**You can download the .psd here.
1. Crop your image.
2. Make a new layer.
Fill it with a pinky colour. I used #c2646d.
Set to Soft Light 100%.
3. Duplicate your base and bring to the top.
Set to Screen 82%.
4. Make a new layer.
Fill it with a green colour. I chose #75832d.
Set to Soft Light 100%
5. Create an Adjustment Layer, Hue/Saturation:
Master -> Saturation -> +24
Greens -> Saturation -> -16

6. Create another Adjustment Layer, Levels:
RGB Input Levels -> 10, 1.10, 235

7. Duplicate your base and bring to the top.
Set to Screen 23%.
And you're done!
Other icons made with this tutorial:
~~
We're going from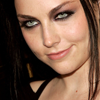
to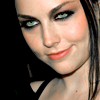
**You can download the .psd here.
1. Start with your cropped image.
2. Create a new layer.
Fill it with black (#000000).
Set to Soft Light 100%.
3. Create a new layer.
Fill it with a nice blue colour. I used #84aaf3.
Set to Soft Light 100%.
4. Create a new layer.
Fill it with light green. I chose #71cd86.
Set to Soft Light 100%.
5. Create a new layer.
Fill it with a soft red colour. #cd7171.
Set to Soft Light 100%.
6. Create an Adjustment Layer, Levels:
RGB Input Levels -> 10, 1.20, 235
7. Create another Adjustment Layer, Hue/Saturation:
Master -> Saturation -> +33
Reds -> Saturation -> -10
Yellows -> Saturation -> -100
And you're done!!
Other icons made with this tutorial:
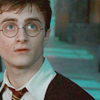
We're going from
to
**You can download the .psd here
1. Crop your picture to where desired.
2. Create new layer.
Fill it with a pink kind of colour...In this case, I chose #bf8bab.
Set to Soft Light %100.
3. Create another layer.
Fill it with a weird looking green. I used #75832d.
Set to Soft Light %100.
4. Create a new Adjustment Layer, Hue/Saturation:
Reds - Saturation -> +19
Yellows - Saturation -> -40
5. Create new Adjustment Layer, Levels:
RGB Input Levels -> 12, 1.10, 245
6. Create new Adjustment Layer, Brightness/Contrast:
Contrast -> +10
7. Create a new layer.
Fill it with a really soft blue colour. For this icon, I used #8899c4.
Set to Soft Light %100.
And that's it! So simple. I'd love to see your results ^-^
Other icons made with this colouring:
~~
We're going from
to
**You can download the .psd here.
1. Crop picture to where desired.
2. Create new layer.
Fill with a purple colour...I chose #8686c4.
Set to Overlay 100%.
3. Make a new Adjustment Layer, Levels:
RGB Input Levels -> 10, 1.20, 245
4. Duplicate your base and bring it to the top.
Set to Screen 50%.
5. Create a new layer.
Fill it with a dark green colour. I used #25702e.
Set to Soft Light 100%.
6. Duplicate your base again and bring it to the top.
Set to Soft Light 12% or until the image looks just right ;)
That's all! =)
Other icons made with this colouring:
~~
We're going from
to
or
**You can download the .psd here.
1. Crop your image.
2. Create new layer.
Fill it with a pale blue colour. I used #6c94ad for this icon.
Set to Soft Light 100%.
3. Duplicate your base and drag to top.
Set to Screen 25%.
4. Create a new Adjustment Layer, Hue/Saturation:
Master -> Saturation -> +19
5. Create another Adjustment Layer, Levels:
RGB Input Levels: 15, 1.10, 245
6. Create another layer.
Fill with a similar kind of pale blue. I chose #7b90aa.
Set to Soft Light 100%.
And that's it!
Or, you can also do this step:
7. Add this texture by mata090680.
Set to Multiply 100%.
Other icons made with this colouring:
~~
We're going from
to
**You can download the .psd here.
1. Crop your image.
2. Make a new layer.
Fill it with a pinky colour. I used #c2646d.
Set to Soft Light 100%.
3. Duplicate your base and bring to the top.
Set to Screen 82%.
4. Make a new layer.
Fill it with a green colour. I chose #75832d.
Set to Soft Light 100%
5. Create an Adjustment Layer, Hue/Saturation:
Master -> Saturation -> +24
Greens -> Saturation -> -16
6. Create another Adjustment Layer, Levels:
RGB Input Levels -> 10, 1.10, 235
7. Duplicate your base and bring to the top.
Set to Screen 23%.
And you're done!
Other icons made with this tutorial:
~~
We're going from
to
**You can download the .psd here.
1. Start with your cropped image.
2. Create a new layer.
Fill it with black (#000000).
Set to Soft Light 100%.
3. Create a new layer.
Fill it with a nice blue colour. I used #84aaf3.
Set to Soft Light 100%.
4. Create a new layer.
Fill it with light green. I chose #71cd86.
Set to Soft Light 100%.
5. Create a new layer.
Fill it with a soft red colour. #cd7171.
Set to Soft Light 100%.
6. Create an Adjustment Layer, Levels:
RGB Input Levels -> 10, 1.20, 235
7. Create another Adjustment Layer, Hue/Saturation:
Master -> Saturation -> +33
Reds -> Saturation -> -10
Yellows -> Saturation -> -100
And you're done!!
Other icons made with this tutorial: