Tutorial #07
Go from this to 
using PSP 9!
*A high quality image would show best results*
1. Crop your image and sharpen it Adjust >> Sharpness >> Sharpen.
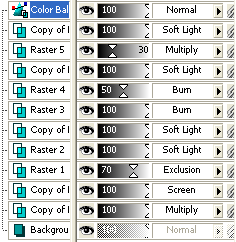
2. Duplicate the base twice. Set the top layer to Screen 100% and the bottom one to Multiply 100%. Then desaturate the Multiply layer. (Shift+H)
3. Then make a new layer and fill it with #1a4d82 and set to Exclusion 70%.
4. Make another new layer, fill it with #f6b8f2 and set that to Soft light 100%.
5. The duplicate the base layer, bring it to the top and set it to Soft Light 100%.
6. Make another new layer and fill it with #8fddf3 and set it to Burn 100%.
7. Make another layer and fill it with #c0c0c0 and set that to Burn 50%.
8. The duplicate the Soft light layer (pink one) bring it to the top and set it to Soft Light 100%.
9. Make another layer and fill it with #7f6435 and set that to Multiply 30%.
10. The duplicate the base layer, bring it to the top and set it to Soft Light 100%.
11. Go to Layers >> New Adjustment Layer >> Color Balence and set to these settings.
Finally merge the layers Layers >> Merge >> Merge All (flatten) and you're done!
Layers:

Remember, you can always mess around with the opacity, colors or order.
Make sure for best quality results, save as file .png.
Other icons using this tutorial:


Any questions, etc.? Just comment and I'll be glad to help you. I would love to see some of your end results.
For more tutorials, icons, etc., JOIN.

using PSP 9!
*A high quality image would show best results*
1. Crop your image and sharpen it Adjust >> Sharpness >> Sharpen.
2. Duplicate the base twice. Set the top layer to Screen 100% and the bottom one to Multiply 100%. Then desaturate the Multiply layer. (Shift+H)
3. Then make a new layer and fill it with #1a4d82 and set to Exclusion 70%.
4. Make another new layer, fill it with #f6b8f2 and set that to Soft light 100%.
5. The duplicate the base layer, bring it to the top and set it to Soft Light 100%.
6. Make another new layer and fill it with #8fddf3 and set it to Burn 100%.
7. Make another layer and fill it with #c0c0c0 and set that to Burn 50%.
8. The duplicate the Soft light layer (pink one) bring it to the top and set it to Soft Light 100%.
9. Make another layer and fill it with #7f6435 and set that to Multiply 30%.
10. The duplicate the base layer, bring it to the top and set it to Soft Light 100%.
11. Go to Layers >> New Adjustment Layer >> Color Balence and set to these settings.
Finally merge the layers Layers >> Merge >> Merge All (flatten) and you're done!
Layers:

Remember, you can always mess around with the opacity, colors or order.
Make sure for best quality results, save as file .png.
Other icons using this tutorial:
Any questions, etc.? Just comment and I'll be glad to help you. I would love to see some of your end results.
For more tutorials, icons, etc., JOIN.