Vibrant color tutorial
OMG I WROTE A TUTORIAL.
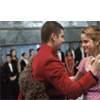
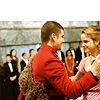
Go from
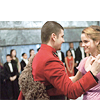
to

in 23092803 11 steps.
Since my journal has a white background, i'm just letting you know: THE TOP PORTION OF THIS ICON IS WHITE. Lol.
This formula will not work with all pictures. I use very bright pictures when I do icons, so this won't work with a really dark picture.
1. Get a base. I cropped a portion of this picture (from mugglenet) and pasted it onto a white background.
2. Duplicate the base and set it to "screen". Then sharpen it once. If the image is really dark, you may have to duplicate the screened layer several times.
3. Underneath the screened layer (or the top one if you have more than 1), create a new layer and fill it with a dark blue color. I used #011537. Set it to "exclusion". Be sure when you use gradients or colors you only fill the part with the picture in it, because if you fill the whole icon, you won't have a white top any more.
4. On top of the exclusion layer, but below the screen layer, create a new layer and fill with a light brown gradient. Set it to "multiply".

5. On top of the multiply layer, create a new layer and fill with a dark brownish-greyish gradient and set it to "hard light", 30% opacity.


6. FLATTEN THE IMAGE. Or merge all layers so you only have 1 layer.
7. Duplicate the base you now have and set it to "soft light".

8. In between your base and your soft light layer, fill with a light brown gradient and set it to "color burn".

9. On top of the color burn layer, but still below the soft light layer, fill with a light blue gradient and set to "color burn".


10. On top of the blue gradient, but still below the soft light layer, fill a new layer with a light brownish-yellowish-pinkish color and set to "multiply". I used #f3e7d1.
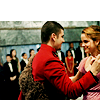
11. Put some text on the top. I used "bookman old style". I also put some tiny text under it.
You're done.
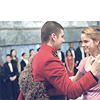
Go from
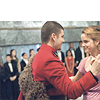
to
in 23092803 11 steps.
Since my journal has a white background, i'm just letting you know: THE TOP PORTION OF THIS ICON IS WHITE. Lol.
This formula will not work with all pictures. I use very bright pictures when I do icons, so this won't work with a really dark picture.
1. Get a base. I cropped a portion of this picture (from mugglenet) and pasted it onto a white background.
2. Duplicate the base and set it to "screen". Then sharpen it once. If the image is really dark, you may have to duplicate the screened layer several times.
3. Underneath the screened layer (or the top one if you have more than 1), create a new layer and fill it with a dark blue color. I used #011537. Set it to "exclusion". Be sure when you use gradients or colors you only fill the part with the picture in it, because if you fill the whole icon, you won't have a white top any more.
4. On top of the exclusion layer, but below the screen layer, create a new layer and fill with a light brown gradient. Set it to "multiply".
5. On top of the multiply layer, create a new layer and fill with a dark brownish-greyish gradient and set it to "hard light", 30% opacity.
6. FLATTEN THE IMAGE. Or merge all layers so you only have 1 layer.
7. Duplicate the base you now have and set it to "soft light".
8. In between your base and your soft light layer, fill with a light brown gradient and set it to "color burn".
9. On top of the color burn layer, but still below the soft light layer, fill with a light blue gradient and set to "color burn".
10. On top of the blue gradient, but still below the soft light layer, fill a new layer with a light brownish-yellowish-pinkish color and set to "multiply". I used #f3e7d1.
11. Put some text on the top. I used "bookman old style". I also put some tiny text under it.
You're done.