tutorial #4
This was made in Adobe Photoshop 7.0. It uses selective coloring, curves, and exclusion.

>>
1. Duplicate your base and set that to SOFT LIGHT 21%.
2. Go to Layer >> New Adjustment Layer >> Hue/Saturation, and up the Saturation to 31%.

3. Go to Layer >> New Adjustment Layer >> Selective Color, and input these values at 100%:
Reds
Cyan: -70
Magenta: -30
Yellow: -27
Black: +22
Yellows
Cyan: -60
Magenta: -27
Yellow: -27
Black: -28
Neutrals
Cyan: -16
Magenta: -4
Yellow: +21
Black: +3

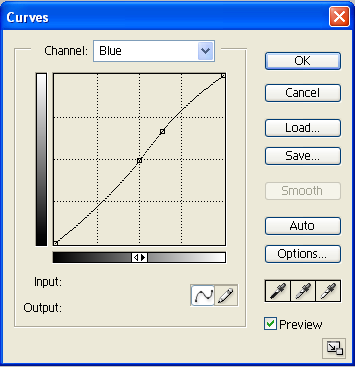
4. Go to Layer >> New Adjustment Layer >> Curves, and make it look something like this at 100%:


5. Make a new layer and fill it with #1E0606. Set that to EXCLUSION 100%.


6. Go to Layer >> New Adjustment Layer >> Selective Color, and input these values at 42%:
Reds
Cyan: -52
Magenta: +14
Yellow: +33
Black: -11
Yellows
Cyan: -100
Magenta: +14
Yellow: +57
Black: -17
Greens
Cyan: +14
Magenta: -38
Yellow: +100
Black: +100
Cyans
Cyan: +100
Magenta: +100
Yellow: -100
Black: +100
Blues
Cyan: +100
Magenta: +100
Yellow: -100
Black: -100
Magentas
Cyan: 0
Magenta: +100
Yellow: +58
Black: 0
Neutrals
Cyan: +9
Magenta: -9
Yellow: -14
Black: +2

And you're done! Obviously every picture is different, so play around with the settings. I hope this is helpful. :)
>>
1. Duplicate your base and set that to SOFT LIGHT 21%.
2. Go to Layer >> New Adjustment Layer >> Hue/Saturation, and up the Saturation to 31%.
3. Go to Layer >> New Adjustment Layer >> Selective Color, and input these values at 100%:
Reds
Cyan: -70
Magenta: -30
Yellow: -27
Black: +22
Yellows
Cyan: -60
Magenta: -27
Yellow: -27
Black: -28
Neutrals
Cyan: -16
Magenta: -4
Yellow: +21
Black: +3
4. Go to Layer >> New Adjustment Layer >> Curves, and make it look something like this at 100%:
5. Make a new layer and fill it with #1E0606. Set that to EXCLUSION 100%.
6. Go to Layer >> New Adjustment Layer >> Selective Color, and input these values at 42%:
Reds
Cyan: -52
Magenta: +14
Yellow: +33
Black: -11
Yellows
Cyan: -100
Magenta: +14
Yellow: +57
Black: -17
Greens
Cyan: +14
Magenta: -38
Yellow: +100
Black: +100
Cyans
Cyan: +100
Magenta: +100
Yellow: -100
Black: +100
Blues
Cyan: +100
Magenta: +100
Yellow: -100
Black: -100
Magentas
Cyan: 0
Magenta: +100
Yellow: +58
Black: 0
Neutrals
Cyan: +9
Magenta: -9
Yellow: -14
Black: +2
And you're done! Obviously every picture is different, so play around with the settings. I hope this is helpful. :)