truman
in
mintyapple
Custom metadata
I originally posted this here at ikoon but I figured I'd post it here too.
This is a tutorial on how to add little buttons to the end to your post that link to permalink, add to memories, track post and edit post respectively. You need a paid account to do this! The original code was written by kentucka so credit her, not me. I just edited it to my liking. The code was written for Flexible Squares.
1. Open your theme layer. If you have an entire theme layer already, find this code:
# Comments
"""
""";
if ($p.view != "entry" or $p.view != "reply")
{
$e.comments->print();
}
elseif ($e.comments.enabled)
{
$e.comments->print_postlink();
}
else
{
" ";
}
"""
""";}
Found it? Good. Replace it all with this code:
# Comments
"""
""";
### start custom code ###
# Set the basic order in which the links are supposed to appear, from left to right. Available links are:
# edit_entry = edit the entry
# edit_tags = edit the tags assigned to the entry
# mem_add = add to your memories (of the user currently logged in)
# mem_as_comm = add to memories of the community (the "authas"-link, can only be used by owner/moderators of community)
# watch_comments = track/untrack the post
# tell_friend = mail link to friend
# permalink = link to the entry
# comments = read/post comments link
# | = all links before this symbol are printed aligned to the left, all others aligned to the right (standard)
# to print all links aligned right (standard), set "|" first
var string[] link_order = ["permalink", "mem_add", "watch_comments", "edit_entry", "|", "|", "comments"];
# Set the urls to the images you want to use, or leave the quotes empty.
# read/post comment links can not be set to images here (see Step 7)
var string{} link_images = { "edit_entry" => "http://img.photobucket.com/albums/v510/mienkjen/pencil.gif",
"edit_tags" => "IMAGE URL",
"mem_add" => "http://img.photobucket.com/albums/v510/mienkjen/heart.gif",
"mem_as_comm" => "IMAGE URL",
"tell_friend" => "IMAGE URL",
"watch_comments" => "http://img.photobucket.com/albums/v510/mienkjen/thumbtack.gif",
"unwatch_comments" => "IMAGE URL",
"permalink" => "http://img.photobucket.com/albums/v510/mienkjen/house.gif",
};
# Set the separator that should appear between the individual links or images
# separator between read/post comment links can not be set here (see Step 6)
var string link_separator = " ";
# Set the name of the community that the "mem_as_comm" link should work for
var string community = "";
# link texts (in case there is no image specified)
var string{} link_text = { "edit_entry" => "",
"edit_tags" => "",
"mem_add" => "",
"mem_as_comm" => "+",
"tell_friend" => "",
"watch_comments" => "",
"unwatch_comments" => "",
"permalink" => "",
};
# helper var to decide if separator is printed before link or not
var bool i = false;
# Step through the links in the order the user wants
"""
""";
foreach var string link ($link_order)
{
if ($link == "") { continue; } # skip emtpy quotes
if ($link == "|") # close leftlinks div and open standard-aligned div
{
"""
""";
$i = false;
continue;
}
# special case comment links
if ($link == "comments")
{
if ($i == true) { """$link_separator""";}
if ($p.view != "entry" or $p.view != "reply") { $e.comments->print(); }
elseif ($e.comments.enabled) { $e.comments->print_postlink(); }
else { " "; }
}
else
{
# get the url of the link
var string url;
if ($link == "permalink") { $url = $e.permalink_url; }
else
{
var Link url_temp;
$url_temp = ($link == "mem_as_comm") ? $e->get_link("mem_add") : $e->get_link($link);
if (isnull $url_temp)
{
if ($link == "watch_comments")
{
$url_temp = $e->get_link("unwatch_comments");
$link = "unwatch_comments";
}
else { continue; }
}
$url = $url_temp.url;
if ($link == "mem_as_comm") { $url = """$url?authas=$community"""; }
}
# get the link image or text
var string text;
if (clean_url($link_images{$link}) == "") { $text = $link_text{$link}; }
else { $text = """
"""; }
# print separator, link and text/image
if ($i == true) { """$link_separator""";}
""" $text""";
}
$i = true;
}
"";
### end custom code ###
"""
""";
}
2. Skip this if you already have a theme layer. If you don't have a theme layer for your Flexible Squares already (i.e. you're only using an external stylesheet) you need to make a theme layer. Go here and create a theme layer. Then go to the Flexible Squares Layer Source and find the function function print_entry(Page p, Entry e, Color bgcolor, Color fgcolor). Copy and paste it in your new theme layer and follow step 1.
3. Click compile and well, you're pretty much done with the basics. We still have to make it a bit more pretty though! Go to your CSS and add this:
.leftlinks {
float: left;
position: relative;
}
This makes everything pretty aligned to the left.
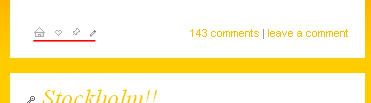
4. Now another important part, the images! As you can see in the example provided above, there are four images.

means "Permalink", which is a direct link to your entry.

means "Add to Memories".

means "Track this Post".

means "Edit Post".
Save those images to your website (you can directlink I guess but I change my links a lot which could result in broken images) and upload them to your website. Edit the links and you're all done!
The tiny icons I used were made by damnicons. Don't forget to credit her if you use her tiny icons!
This is a tutorial on how to add little buttons to the end to your post that link to permalink, add to memories, track post and edit post respectively. You need a paid account to do this! The original code was written by kentucka so credit her, not me. I just edited it to my liking. The code was written for Flexible Squares.
1. Open your theme layer. If you have an entire theme layer already, find this code:
# Comments
"""
""";
if ($p.view != "entry" or $p.view != "reply")
{
$e.comments->print();
}
elseif ($e.comments.enabled)
{
$e.comments->print_postlink();
}
else
{
" ";
}
"""
""";}
Found it? Good. Replace it all with this code:
# Comments
"""
""";
### start custom code ###
# Set the basic order in which the links are supposed to appear, from left to right. Available links are:
# edit_entry = edit the entry
# edit_tags = edit the tags assigned to the entry
# mem_add = add to your memories (of the user currently logged in)
# mem_as_comm = add to memories of the community (the "authas"-link, can only be used by owner/moderators of community)
# watch_comments = track/untrack the post
# tell_friend = mail link to friend
# permalink = link to the entry
# comments = read/post comments link
# | = all links before this symbol are printed aligned to the left, all others aligned to the right (standard)
# to print all links aligned right (standard), set "|" first
var string[] link_order = ["permalink", "mem_add", "watch_comments", "edit_entry", "|", "|", "comments"];
# Set the urls to the images you want to use, or leave the quotes empty.
# read/post comment links can not be set to images here (see Step 7)
var string{} link_images = { "edit_entry" => "http://img.photobucket.com/albums/v510/mienkjen/pencil.gif",
"edit_tags" => "IMAGE URL",
"mem_add" => "http://img.photobucket.com/albums/v510/mienkjen/heart.gif",
"mem_as_comm" => "IMAGE URL",
"tell_friend" => "IMAGE URL",
"watch_comments" => "http://img.photobucket.com/albums/v510/mienkjen/thumbtack.gif",
"unwatch_comments" => "IMAGE URL",
"permalink" => "http://img.photobucket.com/albums/v510/mienkjen/house.gif",
};
# Set the separator that should appear between the individual links or images
# separator between read/post comment links can not be set here (see Step 6)
var string link_separator = " ";
# Set the name of the community that the "mem_as_comm" link should work for
var string community = "";
# link texts (in case there is no image specified)
var string{} link_text = { "edit_entry" => "",
"edit_tags" => "",
"mem_add" => "",
"mem_as_comm" => "+",
"tell_friend" => "",
"watch_comments" => "",
"unwatch_comments" => "",
"permalink" => "",
};
# helper var to decide if separator is printed before link or not
var bool i = false;
# Step through the links in the order the user wants
"""
""";
foreach var string link ($link_order)
{
if ($link == "") { continue; } # skip emtpy quotes
if ($link == "|") # close leftlinks div and open standard-aligned div
{
"""
""";
$i = false;
continue;
}
# special case comment links
if ($link == "comments")
{
if ($i == true) { """$link_separator""";}
if ($p.view != "entry" or $p.view != "reply") { $e.comments->print(); }
elseif ($e.comments.enabled) { $e.comments->print_postlink(); }
else { " "; }
}
else
{
# get the url of the link
var string url;
if ($link == "permalink") { $url = $e.permalink_url; }
else
{
var Link url_temp;
$url_temp = ($link == "mem_as_comm") ? $e->get_link("mem_add") : $e->get_link($link);
if (isnull $url_temp)
{
if ($link == "watch_comments")
{
$url_temp = $e->get_link("unwatch_comments");
$link = "unwatch_comments";
}
else { continue; }
}
$url = $url_temp.url;
if ($link == "mem_as_comm") { $url = """$url?authas=$community"""; }
}
# get the link image or text
var string text;
if (clean_url($link_images{$link}) == "") { $text = $link_text{$link}; }
else { $text = """
"""; }
# print separator, link and text/image
if ($i == true) { """$link_separator""";}
""" $text""";
}
$i = true;
}
"";
### end custom code ###
"""
""";
}
2. Skip this if you already have a theme layer. If you don't have a theme layer for your Flexible Squares already (i.e. you're only using an external stylesheet) you need to make a theme layer. Go here and create a theme layer. Then go to the Flexible Squares Layer Source and find the function function print_entry(Page p, Entry e, Color bgcolor, Color fgcolor). Copy and paste it in your new theme layer and follow step 1.
3. Click compile and well, you're pretty much done with the basics. We still have to make it a bit more pretty though! Go to your CSS and add this:
.leftlinks {
float: left;
position: relative;
}
This makes everything pretty aligned to the left.
4. Now another important part, the images! As you can see in the example provided above, there are four images.
means "Permalink", which is a direct link to your entry.
means "Add to Memories".
means "Track this Post".
means "Edit Post".
Save those images to your website (you can directlink I guess but I change my links a lot which could result in broken images) and upload them to your website. Edit the links and you're all done!
The tiny icons I used were made by damnicons. Don't forget to credit her if you use her tiny icons!