Requested Tutorial
Requested by q_byrd03 Sorry it's taken so long.
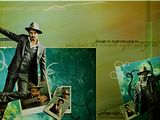
Make a wallpaper like this:
Alright, I first started with this texture from discolor

I flipped it horizontally right away because with the picture that I wanted to use, I wanted it to be over that blue cloud part. The picture didn't look right flipped so I did the texture. To unlock it, just double click on that little padlock symbol on the layers palette and then use edit>>flip horizontally.
Next I added my first picture.I went ahead and duplicated the layer, but hid it by clicking on the little eye thing because I knew that I'd probably need it for later. I then went back to the original picture layer. The picture was a little too yellow and clashed with the texture so the first thing I did was add a color balance adjustment layer. When I did this, I made sure to click the box to clip the adjustment layer to the picture layer as I only wanted the changed made to the picture and not the texture or anything that may go beneath the picture later on.
Here are my settings...I only changed the yellow/blue channel in Midtones. This will depend on you picture what your settings will be...or you may not even have to do it at all.

Next, I added a selective color adjustment layer, again making sure to clip it to previous layers. My settings looked like this.

The next adjustment layer that I added was a gradient map. And again I clipped it to the previous layers. The colors were black and white and the blend mode was Multiply 100%. I like to use that one because it adds some nice depth to pictures.

Next I wanted to place some text. So I chose 2 different fonts. One being Book Antiqua and the other is the King and Queen font(found on Dafont) The text using Book Antiqua, I place right on that line on the texture at 14pt. Blend mode normal 100%.The other one is underneath at 30pt. Blend mode is Softlight 62%.

I wanted to add another picture and wanted the same blue background for it as the first one so I clicked on the texture layer to make it the active layer and then with the rectangular marquee tool, I selected a portion of the texture. After pasting it on, I also rotated it a bit.

When I added this picture, I did the same as above with duplicating the layer and the coloring. Once I had the coloring done, I went back and set the image to Normal 100%. I then went to the duplicated image and put that at Normal 91%. I also desaturated it using and black and white gradient map adjustment layer.

Next I wanted to add some little polaroids. So I used a polaroid stock from Stock Xchange and added the pictures to them. Usually I just paste the polaroid over the picture and use the magic wand tool to cut out the black part. Then I merge the layers and copy/paste it onto the graphic. Once I have them on there, I do resizing and rotating. On a couple of them I used the warp tool to lift the edges to make the curled effect. I believe the warp tool is only available on PS CS2 and above.

Next I added some more text using the King and Queen font again and a tiny text brush from ownthesunshine and some twirl brushes from _iconographer
I applied the brushes underneath the pictures using black and white and Normal and Softlight at various opacities.

Next I took this texture, also from discolor and pasted it above everything. I have it a good morion blur and set the blend mode to Multiply 100%.

Then to finish it off, I I did alt/ctrl/shift/E to make a copy of the entire graphic. This I set to Softlight 100%.
