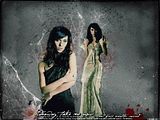
Requested Tutorial
Done in CS2, should translate pretty easily.

Okay, I started out with this texture from blooming_art

I like the grunginess of the texture, but I wasn't too crazy about the color so since I knew I wanted this to be a grungy sort of graphic, I went ahead and added a black and white gradient map adjustment layer to turn it black and white ((layer>>new adjustment layer>>gradient map...make sure your foreground color is white/background color is black))
To add my first picture, I used the pen tool to extract it from the background, but you can use what ever method suits you best. Then I drug it over to the texture. After playing around with the blend modes, I ended up, putting it on Multiply 100% and I drug the layer so that it was underneath the gradient map layer as well.

Doesn't look all that great, eh :p
Next I duplicated the Jennifer layer and drug it so that it was above the gradient map layer. I put the blend mode on Normal 70%.

Okay, that's a little better :)
I added my next picture. The blend mode is Multiply 100% and then duplicated and Normal 62% on the duplicate.

Now time to add some effect. FUN!
I added some text first using the Hannibal Lecter font and Times New Roman. I also added a drop shadow and a 1px stroke in black to make the text pop a bit more.

I took a flower cut that I had found...some where...sorry, I really can't recall. I added that by the text. It was pretty bright so to darken up just a bit, I added a black and white gradient map adjustment layer to it. Make sure that when you do this that the adjustment layer is clipped to this layer so that it is only added to this layer and not the whole graphic


Next I used some spider web brushes from http://inobscuro.com/. Actually all of the brushes that I used from here on on this are from there.
So I added a spider web brush in white in the lower left corner. I put it on a new layer just above the base texture. I also added a spider brush that was in that set as well. Then I took another of the spider web brushes and added it so that it was behind the two pictures. This was done in white as well. I made another new layer, but make sure that this one is above that gradient map adjustment layer that was used on the first picture as I want to do this brush application in color. I applied it in red this time. If any of the brushes go over your pictures, just take your eraser and get rid of those parts.

I took a spatter brush and used it in red down by the text. I also added some of the border brushes to make a frame around the graphic. I used just one of the brushes and duplicated the layers and flipped and rotated them to make the frame.
I also added a light texture from fangirls_inc and erased all but a small portion of it in the lower left corner and a bit on the right.
And that's it :)


Okay, I started out with this texture from blooming_art

I like the grunginess of the texture, but I wasn't too crazy about the color so since I knew I wanted this to be a grungy sort of graphic, I went ahead and added a black and white gradient map adjustment layer to turn it black and white ((layer>>new adjustment layer>>gradient map...make sure your foreground color is white/background color is black))
To add my first picture, I used the pen tool to extract it from the background, but you can use what ever method suits you best. Then I drug it over to the texture. After playing around with the blend modes, I ended up, putting it on Multiply 100% and I drug the layer so that it was underneath the gradient map layer as well.

Doesn't look all that great, eh :p
Next I duplicated the Jennifer layer and drug it so that it was above the gradient map layer. I put the blend mode on Normal 70%.

Okay, that's a little better :)
I added my next picture. The blend mode is Multiply 100% and then duplicated and Normal 62% on the duplicate.

Now time to add some effect. FUN!
I added some text first using the Hannibal Lecter font and Times New Roman. I also added a drop shadow and a 1px stroke in black to make the text pop a bit more.

I took a flower cut that I had found...some where...sorry, I really can't recall. I added that by the text. It was pretty bright so to darken up just a bit, I added a black and white gradient map adjustment layer to it. Make sure that when you do this that the adjustment layer is clipped to this layer so that it is only added to this layer and not the whole graphic


Next I used some spider web brushes from http://inobscuro.com/. Actually all of the brushes that I used from here on on this are from there.
So I added a spider web brush in white in the lower left corner. I put it on a new layer just above the base texture. I also added a spider brush that was in that set as well. Then I took another of the spider web brushes and added it so that it was behind the two pictures. This was done in white as well. I made another new layer, but make sure that this one is above that gradient map adjustment layer that was used on the first picture as I want to do this brush application in color. I applied it in red this time. If any of the brushes go over your pictures, just take your eraser and get rid of those parts.

I took a spatter brush and used it in red down by the text. I also added some of the border brushes to make a frame around the graphic. I used just one of the brushes and duplicated the layers and flipped and rotated them to make the frame.
I also added a light texture from fangirls_inc and erased all but a small portion of it in the lower left corner and a bit on the right.
And that's it :)
