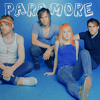
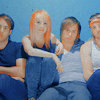
Tutorial #10

to

using Photoshop 7
Someone told me I should do a tutorial for this icon, so here it is...
1) Crop your image, ect..
2) Go to Layer> New Adjustment Layer> Curves
RGB
Input: 102
Output: 115
3) Go to Layer> New Adjustment Layer> Selective Color
REDS -100/0/0/0
CYANS 0/0/-100/0
NEUTRALS 0/-18/-17/0
4) Layer> New Adjustment Layer> Selective Color
REDS -100/-16/+100/0
YELLOWS 0/+10/-100/0
BLUES 0/+24/0/0
NEUTRALS 0/-10/-17/0
5) Layer> New Adjustment Layer> Selective Color
REDS -100/-19/+100/0
YELLOWS 0/+22/-100/0
CYANS 0/+12/-27/0
BLUES 0/30/0/0
NEUTRALS 0/+4/0/-10
6) Layer> New Adjustment Layer> Selective Color
REDS -100/+11/+100/0
YELLOWS 0/+20/-20/0
NEUTRALS 0/-14/-15/+5
7) Layer> New Adjustment Layer> Selective Color
REDS -100/-24/+60/0
YELLOWS 0/+14/-100/0
CYANS 0/+24/-33/0
BLUES 0/+19/-100/0
NEUTRALS 0/-14/-16/+10
8) Go to Layer> New Adjustment Layer> Color Balance
MIDTONES +10/+10/+10
SHADOWS +10/+10/+10
HIGHLIGHTS -9/-10/-10
Make sure Preserve Luminosity is checked.
9) Go to Layer> New Adjustment Layer> Channel Mixer
RED +114/-16/-6
GREEN 0/+106/-8
BLUE 0/-8/+108
10) You can brushes, textures or text. I pasted this texture (by peoplemachines)

and set it to multiply 100%.
That's it. If you need any help please let me know. Hope you like it. :)
PSD file-
http://www.box.net/shared/2zma4k8ysw
Other icons made with this tutorial:


