Blending Tutorial for Photoshop CS
This tutorial is supposed to bring some light into the world of blending with Photoshop CS. It's not the best tutorial but I hope you find it useful in some ways ;)
I choose this pic of Atlantis and this one of a desert to make the blending more visible. There are links to screenshots which are 1280 x 735 and show you an example of the blending as well as the layer palette, so that you can see what the gradient looks on the layer mask.
I) Right-Click on the Paint Bucket Tool and then click on the Gradient Tool
II) In the options bar you see now five different gradient tools
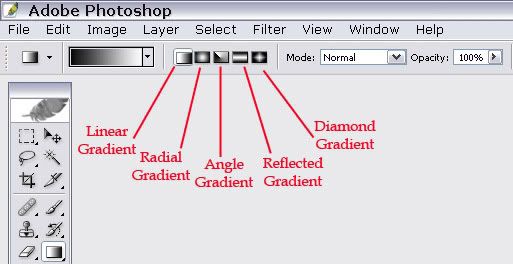
Linear gradient - to shade from the starting point to the ending point in a straight line
Radial gradient - to shade from the starting point to the ending point in a circular pattern
Angle gradient - to shade in a counterclockwise sweep around the starting point
Reflected gradient - to shade using symmetric linear gradients on either side of the starting point
Diamond gradient - to shade from the starting point outward in a diamond pattern. The ending point defines one corner of the diamond
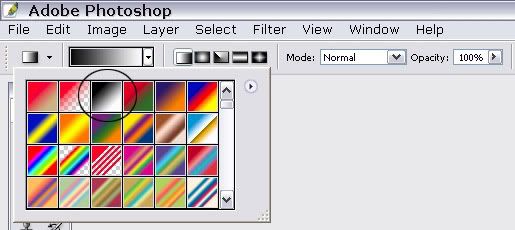
III) Click the triangle next to the gradient sample and pick the third gradient (it's important that your gradient is black/white because only that will work on a layer mask! Using black on the layer mask will reveal the second pic (here Atlantis), White will hide the second pic.)
IV) Next to Opacity, you see the Reverse box. If you select it, the gradient reverses and the result will be completely different. That's why you should always try both versions, the normal and the reversed one.

V) On your layer palette make sure you have your pics in the right order. Here I want to blend the desert, that's why it is on top.
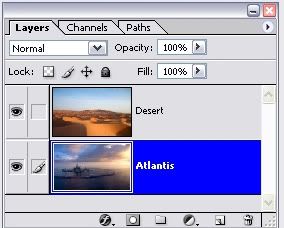
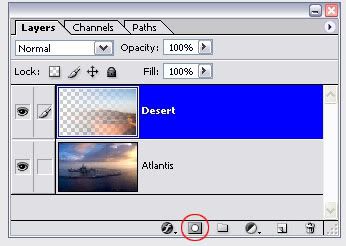
VI) Choose the desert and click on the little symbol to add a layer mask (vector mask).
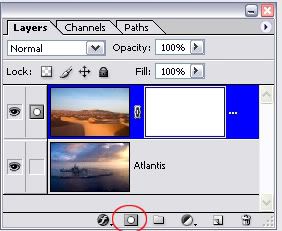
Now you can start to play with the different Gradient Tools ^-^
Linear gradient - to shade from the starting point to the ending point in a straight line
For beginners this is the easiest gradient.
- Left to Right
- Right to Left
- Top to bottom
- Bottom to top
- Left top to right bottom
- Right top to left bottom
- Right bottom to left top
- Left bottom to right top
Radial gradient - to shade from the starting point to the ending point in a circular pattern
- Ramdomly placed in the left corner, from left to right
- Randomly placed in the right top corner, from top to bottom
- Randomly placed on the left side, from left to right (Reverse selected)
- On the right side, from top to bottom (Reverse selected)
- Placed on the middle/left, from left to right (Reverse selected)
Angle gradient - to shade in a counterclockwise sweep around the starting point
- This happens if you use the gradient from left to right. Ugly!
- But if you use it from the middle to the right, it looks already better
- Again, ugly! If you just use it from to to bottom on the right side
- From middle to top looks better
- Or from the middle to the right bottom
- Again from the middle to the right bottom (Reverse selected)
But it looks really good if you use the gradient near the sides.
- (Very) near the bottom, from top to bottom
- (Very) near the bottom, from top to bottom (Reverse selected)
Reflected gradient - to shade using symmetric linear gradients on either side of the starting point
This gradient is gives you a nice result if you use it from the middle to any side/corner.
- From the middle to the right
- From the middle to the right (Reverse selected)
- From the middle to the top
- From the middle to the top (Reverse selected)
- From the middle to the right bottom corner
- From the middle to the right bottom corner (Reverse selected)
Diamond gradient - to shade from the starting point outward in a diamond pattern. The ending point defines one corner of the diamond
- From the left to the right
- From the left to the right (Reverse selected)
- From the right to the left
- From the right to the left (Reverse selected)
- From top to bottom
- From top to bottom (Reverse selected)
- From bottom to top
- From bottom to top (Reverse selected)
- From the middle to the right
- From the middle to the right (Reverse selected)
- From the middle to the bottom
- From the middle to the bottom (Reverse selected)
- From the middle to the top left corner
- From the middle to the top left corner Reverse selected)
- From the top left corner to the right bottom corner
- From the top left corner to the right bottom corner (Reverse selected)
Using two gardients (the same or two different)
You can use as much gradients on a layer as you want. We will do it with two. Therefore you have to apply the first layer mask and then add a new one.
I) First we use the Linear Gradient from the left to the right on the layer mask
II) The you right-click on the layer mask and select Apply Layer Mask
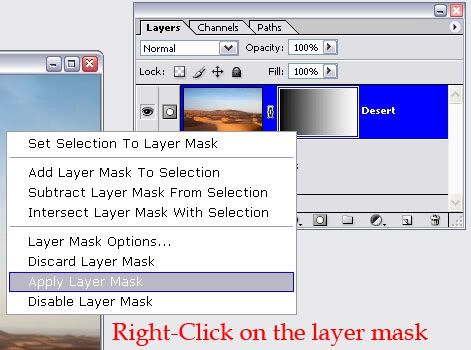
III) You will see that the layer adopts tha changes of the layer mask. The changes are now permanent.
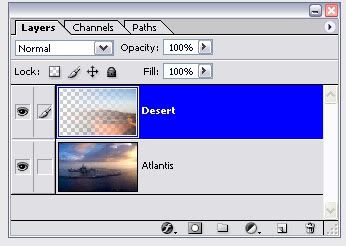
IV) Click again on the Add layer mask symbol
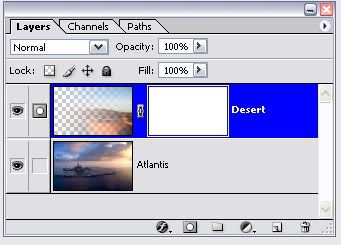
V) Now you can use any gradient you want on the new layer mask:
- The Linear Gradient from top to the middle
- The Radial Gradient from the right to the middle
- The Reflected Gardient from top to bottom (Reverse selected)
This is just a selection of possibilities on how to blend. You can use all these techniques for icons as well! If you have question, just ask ^-^ I hope you find this tutorial useful.
I choose this pic of Atlantis and this one of a desert to make the blending more visible. There are links to screenshots which are 1280 x 735 and show you an example of the blending as well as the layer palette, so that you can see what the gradient looks on the layer mask.
I) Right-Click on the Paint Bucket Tool and then click on the Gradient Tool
II) In the options bar you see now five different gradient tools

Linear gradient - to shade from the starting point to the ending point in a straight line
Radial gradient - to shade from the starting point to the ending point in a circular pattern
Angle gradient - to shade in a counterclockwise sweep around the starting point
Reflected gradient - to shade using symmetric linear gradients on either side of the starting point
Diamond gradient - to shade from the starting point outward in a diamond pattern. The ending point defines one corner of the diamond
III) Click the triangle next to the gradient sample and pick the third gradient (it's important that your gradient is black/white because only that will work on a layer mask! Using black on the layer mask will reveal the second pic (here Atlantis), White will hide the second pic.)

IV) Next to Opacity, you see the Reverse box. If you select it, the gradient reverses and the result will be completely different. That's why you should always try both versions, the normal and the reversed one.

V) On your layer palette make sure you have your pics in the right order. Here I want to blend the desert, that's why it is on top.

VI) Choose the desert and click on the little symbol to add a layer mask (vector mask).

Now you can start to play with the different Gradient Tools ^-^
Linear gradient - to shade from the starting point to the ending point in a straight line
For beginners this is the easiest gradient.
- Left to Right
- Right to Left
- Top to bottom
- Bottom to top
- Left top to right bottom
- Right top to left bottom
- Right bottom to left top
- Left bottom to right top
Radial gradient - to shade from the starting point to the ending point in a circular pattern
- Ramdomly placed in the left corner, from left to right
- Randomly placed in the right top corner, from top to bottom
- Randomly placed on the left side, from left to right (Reverse selected)
- On the right side, from top to bottom (Reverse selected)
- Placed on the middle/left, from left to right (Reverse selected)
Angle gradient - to shade in a counterclockwise sweep around the starting point
- This happens if you use the gradient from left to right. Ugly!
- But if you use it from the middle to the right, it looks already better
- Again, ugly! If you just use it from to to bottom on the right side
- From middle to top looks better
- Or from the middle to the right bottom
- Again from the middle to the right bottom (Reverse selected)
But it looks really good if you use the gradient near the sides.
- (Very) near the bottom, from top to bottom
- (Very) near the bottom, from top to bottom (Reverse selected)
Reflected gradient - to shade using symmetric linear gradients on either side of the starting point
This gradient is gives you a nice result if you use it from the middle to any side/corner.
- From the middle to the right
- From the middle to the right (Reverse selected)
- From the middle to the top
- From the middle to the top (Reverse selected)
- From the middle to the right bottom corner
- From the middle to the right bottom corner (Reverse selected)
Diamond gradient - to shade from the starting point outward in a diamond pattern. The ending point defines one corner of the diamond
- From the left to the right
- From the left to the right (Reverse selected)
- From the right to the left
- From the right to the left (Reverse selected)
- From top to bottom
- From top to bottom (Reverse selected)
- From bottom to top
- From bottom to top (Reverse selected)
- From the middle to the right
- From the middle to the right (Reverse selected)
- From the middle to the bottom
- From the middle to the bottom (Reverse selected)
- From the middle to the top left corner
- From the middle to the top left corner Reverse selected)
- From the top left corner to the right bottom corner
- From the top left corner to the right bottom corner (Reverse selected)
Using two gardients (the same or two different)
You can use as much gradients on a layer as you want. We will do it with two. Therefore you have to apply the first layer mask and then add a new one.
I) First we use the Linear Gradient from the left to the right on the layer mask
II) The you right-click on the layer mask and select Apply Layer Mask

III) You will see that the layer adopts tha changes of the layer mask. The changes are now permanent.

IV) Click again on the Add layer mask symbol


V) Now you can use any gradient you want on the new layer mask:
- The Linear Gradient from top to the middle
- The Radial Gradient from the right to the middle
- The Reflected Gardient from top to bottom (Reverse selected)
This is just a selection of possibilities on how to blend. You can use all these techniques for icons as well! If you have question, just ask ^-^ I hope you find this tutorial useful.