Tutorial: Casino Royale icon
QUEENPELADON asked me if I'd do a tutorial some time, so I guess it's time to reveal the secrets of one or two of the Bond icons...
From
to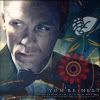
I'm using Photoshop CS, but it should translate easily to other programs.
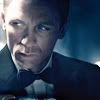
Step 1: Base cropped from movie poster.
Step 2: Duplicate that layer and set it to screen, 94% (by right-clicking the layer and selecting "blending options").
You now have:
Step 3: New layer, with a base/texture I made from the title credit sequence of the movie.
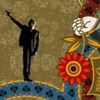
I set this at Hard Light 55% - generally I play around with the settings and levels until I like what I see. I erased the middle part with Bond and the gun on this layer.
This gives me:
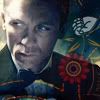
Step 4: Added some text from a brush (one I made). Gave it a drop shadow to make it stand out a little more.
I think I also played a little with the lighting (filter > render > lighting effects) on this one.
From
to
I'm using Photoshop CS, but it should translate easily to other programs.
Step 1: Base cropped from movie poster.
Step 2: Duplicate that layer and set it to screen, 94% (by right-clicking the layer and selecting "blending options").
You now have:
Step 3: New layer, with a base/texture I made from the title credit sequence of the movie.
I set this at Hard Light 55% - generally I play around with the settings and levels until I like what I see. I erased the middle part with Bond and the gun on this layer.
This gives me:
Step 4: Added some text from a brush (one I made). Gave it a drop shadow to make it stand out a little more.
I think I also played a little with the lighting (filter > render > lighting effects) on this one.