Icon Tutorial - Sepia-ish Effect
Skill Level: Easy
Program: GIMP
Translatable?: Maybe, if there's a pencil drawing feature in your program.
From This:
To This:
This tutorial tends to work better with red-ish images, however, this is due to the coloring; using a pencil sketch layer can be used in all kinds of situations.
Step 1: Start with you base image. Scale, crop, etc.
Step 2: Prep your base for coloring by duplicating the layer and setting to screen. However, keep the image a bit darker than you would typically for coloring. The pencil sketch layer (to be added later) with ensure that the final image isn't two dark. For this image I set only 1 duplicate layer to screen 100% opacity, whereas I typically might have set 2 layer to screen. There's also no need to sharpen, but you can if you want.
Step 3: Begin coloring. Add a new layer and fill it with #1b0c66. Set layer to Difference and 36% opacity.
Step 4: Add another new layer and fill with #530b2b. Set layer to Hard light and 20% opacity.
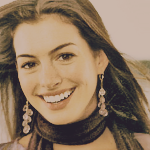
Step 5: Add a another new layer and fill with #fff092. Set the layer to Difference and 12% opacity. Now the image should look something like this:
. This is nice, but it's a bit dark, and perhaps a little too yellow. No fear, we're not done yet.
Step 6: Duplicate your base image. Keep the layer setting at normal. In GIMP, go to Script-Fu>Artistic>Quick sketch (In my limited expirience with Photoshop, I believe there's a similar feature but I'm unsure as to where you would find it...). Set the blurring between 20 and 30. This will add two new layers to your image, a desaturated copy of your base and a layer called Burn. Merge these two layers.
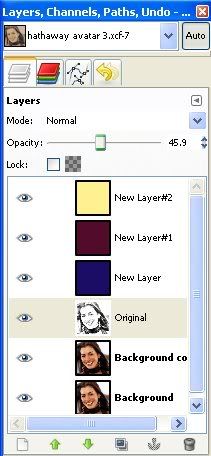
Step 7: Next, set the layer opacity to 45%, and move the penicl sketch layer so that is sits above the duplication(s) of the base, but below the color layers. Your layers should be in this order:

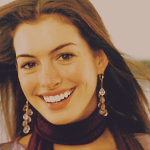
And... Your final image should look something like this:

Ta Da!! You're finished. The pencil sketch layer, with the coloring, gives an effect of an old sepia photograph, while also lightening the image and essentially sharpening it as well.
This tutorial doesn't work perfectly on every image, for some it may be too gray, or it will wash out the focus of the image. Play around with the coloring and opacities to find a combination that works.
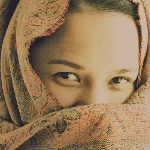
And just for grins, here's another example using this tutorial:

Thanks!! Feel free to post comments/questions/etc.
Program: GIMP
Translatable?: Maybe, if there's a pencil drawing feature in your program.
From This:
To This:
This tutorial tends to work better with red-ish images, however, this is due to the coloring; using a pencil sketch layer can be used in all kinds of situations.
Step 1: Start with you base image. Scale, crop, etc.
Step 2: Prep your base for coloring by duplicating the layer and setting to screen. However, keep the image a bit darker than you would typically for coloring. The pencil sketch layer (to be added later) with ensure that the final image isn't two dark. For this image I set only 1 duplicate layer to screen 100% opacity, whereas I typically might have set 2 layer to screen. There's also no need to sharpen, but you can if you want.
Step 3: Begin coloring. Add a new layer and fill it with #1b0c66. Set layer to Difference and 36% opacity.
Step 4: Add another new layer and fill with #530b2b. Set layer to Hard light and 20% opacity.
Step 5: Add a another new layer and fill with #fff092. Set the layer to Difference and 12% opacity. Now the image should look something like this:
. This is nice, but it's a bit dark, and perhaps a little too yellow. No fear, we're not done yet.
Step 6: Duplicate your base image. Keep the layer setting at normal. In GIMP, go to Script-Fu>Artistic>Quick sketch (In my limited expirience with Photoshop, I believe there's a similar feature but I'm unsure as to where you would find it...). Set the blurring between 20 and 30. This will add two new layers to your image, a desaturated copy of your base and a layer called Burn. Merge these two layers.
Step 7: Next, set the layer opacity to 45%, and move the penicl sketch layer so that is sits above the duplication(s) of the base, but below the color layers. Your layers should be in this order:
And... Your final image should look something like this:
Ta Da!! You're finished. The pencil sketch layer, with the coloring, gives an effect of an old sepia photograph, while also lightening the image and essentially sharpening it as well.
This tutorial doesn't work perfectly on every image, for some it may be too gray, or it will wash out the focus of the image. Play around with the coloring and opacities to find a combination that works.
And just for grins, here's another example using this tutorial:
Thanks!! Feel free to post comments/questions/etc.