(no subject)
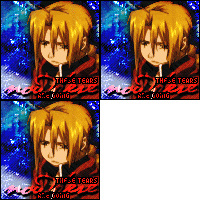
This is a tutorial for this icon. I posted this to icon_tutorial a while ago. But in case someone hasn't seen this yet, here it is again.

You will need PSP8 and AS3. I have PS, too. So if you are having problems in PS, I will see what I can do to help.
To begin, this is the image that I used.

Crop the image, and adjust the image. I adjusted the brightness/contrast and the automatic saturation enhancement settings as in the following screenshots.


On a new raster layer, blood fill with:

hex: #874805
Set the blend mode of that layer to overlay. With the lasso tool, set the feather to 10px, and select out Edward. Goto Select > Invert to invert the selection, and press the delete button. You may need to press it more than once. Paste this image as a new layer on top of the others.

Set the blend mode to screen, and repeat the selection process again. Next, paste this image as a new layer.

(design by ikkyu)
Set the blend mode to screen and the opacity to around 62. Duplicate that layer, and set the blend mode to burn. Duplicate that layer 3 more times. On the last duplicated layer, mirror the image. You will probably have to erase the right side where it obstructs Ed. On a new layer, use this brush.

Set the blend mode to overlay, and erase parts that you don't want the brush on. Next is the part on the rain effect. Create a new raster layer and name it rain1, or anything that you may understand. As soon as you have created the new layer, create a new group layer and name it rain.

Now select on layer rain1, blood fill it black. Then goto Adjust > Add/Remove Noise > Add Noise, and set the settings as follows.

Then motion blur it. Set the angle at about 140, and strength at about 30%, or anything you want depending on your icon. Repeat this process for 2 more layers, but make sure that the 2 new layers are within the group layer. Now select the group layer rain, and set the blend mode to screen. We will come back to this.
Now for the text. For nowhere, I used P22 Cezanne (I think Hannibal Lecter looks just like Cezanne) in white. Before you convert the vector to a raster layer, duplicate it. Select on the text of the duplicated layer (make sure you select that text only), and change the color to a dark red.

hex: #C00000
Now you may convert all vector layers. You could add drop shadow to all of the text layers if you want. Back to the first text layer, set the blend mode to darken and duplicate that layer. Select the first red text layer and set the blend mode to dodge. Duplicate that layer, and you could lower the opacity if it's too bright.
For the pixel fonts, write the texts and place them where you want them in the same color as "nowhere". Create a new layer and blood fill it black. Move the layer down one, and select the layer with the pixel font. With the magic wand tool and 0px feather, select anywhere on the layer. Then invert the selection, and expand the selection with 1px (Selection > Modify > Expand) for the outline. Invert the selection again, and select the black fill layer and press delete. Unselect that layer, and move back to the first pixel font layer. Select the texts, move back to the outline layer, and press delete. Now move back to the font layer, set the blend mode to dodge, and duplicate that layer. You can deselect all selections.
To add a 1px border, select the pen tool and make sure that you are using a solid 1px line. The foreground color is the stroke color, and make sure that you hide the background color. Now draw a border around the corner of the image.

I have not forgotten the rain effect. So now go back to the rain layers. Hide rain3 and rain2 layers. Flatten all layers, copy and paste as a new animation in AS. Undo merge and hide layers rain1 and rain3 while unhide rain2. Merge layers and paste the new frame behind the previous one in AS(the shortcut keys are ctrl/shift/L). Undo merge and hide layers rain1 and rain2 while unhide rain3. Merge layers and paste behind the previous frame. Now you can save it as an animated gif.
If anything's too vague, feel free to ask questions.
Edit: auctiongripes.com is down, so I have lost all of my tutorial images.

You will need PSP8 and AS3. I have PS, too. So if you are having problems in PS, I will see what I can do to help.
To begin, this is the image that I used.
Crop the image, and adjust the image. I adjusted the brightness/contrast and the automatic saturation enhancement settings as in the following screenshots.
On a new raster layer, blood fill with:
hex: #874805
Set the blend mode of that layer to overlay. With the lasso tool, set the feather to 10px, and select out Edward. Goto Select > Invert to invert the selection, and press the delete button. You may need to press it more than once. Paste this image as a new layer on top of the others.
Set the blend mode to screen, and repeat the selection process again. Next, paste this image as a new layer.
(design by ikkyu)
Set the blend mode to screen and the opacity to around 62. Duplicate that layer, and set the blend mode to burn. Duplicate that layer 3 more times. On the last duplicated layer, mirror the image. You will probably have to erase the right side where it obstructs Ed. On a new layer, use this brush.
Set the blend mode to overlay, and erase parts that you don't want the brush on. Next is the part on the rain effect. Create a new raster layer and name it rain1, or anything that you may understand. As soon as you have created the new layer, create a new group layer and name it rain.
Now select on layer rain1, blood fill it black. Then goto Adjust > Add/Remove Noise > Add Noise, and set the settings as follows.
Then motion blur it. Set the angle at about 140, and strength at about 30%, or anything you want depending on your icon. Repeat this process for 2 more layers, but make sure that the 2 new layers are within the group layer. Now select the group layer rain, and set the blend mode to screen. We will come back to this.
Now for the text. For nowhere, I used P22 Cezanne (I think Hannibal Lecter looks just like Cezanne) in white. Before you convert the vector to a raster layer, duplicate it. Select on the text of the duplicated layer (make sure you select that text only), and change the color to a dark red.
hex: #C00000
Now you may convert all vector layers. You could add drop shadow to all of the text layers if you want. Back to the first text layer, set the blend mode to darken and duplicate that layer. Select the first red text layer and set the blend mode to dodge. Duplicate that layer, and you could lower the opacity if it's too bright.
For the pixel fonts, write the texts and place them where you want them in the same color as "nowhere". Create a new layer and blood fill it black. Move the layer down one, and select the layer with the pixel font. With the magic wand tool and 0px feather, select anywhere on the layer. Then invert the selection, and expand the selection with 1px (Selection > Modify > Expand) for the outline. Invert the selection again, and select the black fill layer and press delete. Unselect that layer, and move back to the first pixel font layer. Select the texts, move back to the outline layer, and press delete. Now move back to the font layer, set the blend mode to dodge, and duplicate that layer. You can deselect all selections.
To add a 1px border, select the pen tool and make sure that you are using a solid 1px line. The foreground color is the stroke color, and make sure that you hide the background color. Now draw a border around the corner of the image.
I have not forgotten the rain effect. So now go back to the rain layers. Hide rain3 and rain2 layers. Flatten all layers, copy and paste as a new animation in AS. Undo merge and hide layers rain1 and rain3 while unhide rain2. Merge layers and paste the new frame behind the previous one in AS(the shortcut keys are ctrl/shift/L). Undo merge and hide layers rain1 and rain2 while unhide rain3. Merge layers and paste behind the previous frame. Now you can save it as an animated gif.
If anything's too vague, feel free to ask questions.
Edit: auctiongripes.com is down, so I have lost all of my tutorial images.