First Tutorial
Okay so I've never made a tutorial before but someone requested me on a forum how to make this:

Hey! This tutorial will show you how to make with animation and graphic included =3 This is my first tutorial so I hope it's helpful and easy to follow. Some ideas from yumei_k

You'll need:-
-two base picture
-photoshop
-imageready
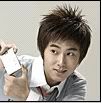
1. Open your two bases, crop them and sharpen them.


2. Duplicated the base, desaturate (Ctrl+Shift+U) then sharpen that layer too. Set it to around 30% opacity.

3. Take this texture and set it to screen above all layers on both pictures.

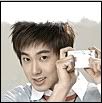
4. You should get something like this~
5. Create a new layer above all layers and fill it with #1800E7. Set this layer to Exclusion with the opacity 29%.
6. Add some tiny text and other text to both pictures.
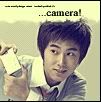

7. Take one of the pictures you've created and merge the layers together (Ctrl+Shift+E). Duplicated the merged layer.
8. Go to Filter -> Blur -> Motion Blur and fill in these settings:
Angle ~ -40
Distance ~ 20
9. Repeated steps 7-8 with the other picture.
10. Open a new document and paste the four pictures (the two non-blurred and the two blurred). Save as a PSD document and open up ImageReady!
11. Make all the layers hidden. Place the animation sequence as shown:
1. New Frame ~ Reveal Yunho "Smile for the" (2.0 sec)
2. New Frame ~ Reveal Yunho "Smile for the" blur (0.1 sec)
3. New Frame ~ Reveal Yunho "Camera" blur (0.1 sec)
4. New Frame ~ Reveal Yunho "Camera" (2.0 sec)
5. New Frame ~ Reveal Yunho "Camera" blur (0.1 sec)
6. New Frame ~ Reveal Yunho "Smile for the" blur (0.1 sec)

12. Save Optimised as .gif and voila you have it!


Hey! This tutorial will show you how to make with animation and graphic included =3 This is my first tutorial so I hope it's helpful and easy to follow. Some ideas from yumei_k

You'll need:-
-two base picture
-photoshop
-imageready
1. Open your two bases, crop them and sharpen them.


2. Duplicated the base, desaturate (Ctrl+Shift+U) then sharpen that layer too. Set it to around 30% opacity.


3. Take this texture and set it to screen above all layers on both pictures.

4. You should get something like this~

5. Create a new layer above all layers and fill it with #1800E7. Set this layer to Exclusion with the opacity 29%.
6. Add some tiny text and other text to both pictures.


7. Take one of the pictures you've created and merge the layers together (Ctrl+Shift+E). Duplicated the merged layer.
8. Go to Filter -> Blur -> Motion Blur and fill in these settings:
Angle ~ -40
Distance ~ 20
9. Repeated steps 7-8 with the other picture.
10. Open a new document and paste the four pictures (the two non-blurred and the two blurred). Save as a PSD document and open up ImageReady!
11. Make all the layers hidden. Place the animation sequence as shown:
1. New Frame ~ Reveal Yunho "Smile for the" (2.0 sec)
2. New Frame ~ Reveal Yunho "Smile for the" blur (0.1 sec)
3. New Frame ~ Reveal Yunho "Camera" blur (0.1 sec)
4. New Frame ~ Reveal Yunho "Camera" (2.0 sec)
5. New Frame ~ Reveal Yunho "Camera" blur (0.1 sec)
6. New Frame ~ Reveal Yunho "Smile for the" blur (0.1 sec)

12. Save Optimised as .gif and voila you have it!
