(no subject)
Requested by H. M. Swanwhite from NarniaWeb
Difficulty: Easy
Made in Gimp 2.6
Going from this:
to this:
Attempting to recreate this: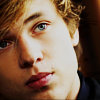
1. Before I did anything else, I cropped the picture and sharpened it as needed.
2. Once I had a base, I thought it needed brightening. So, I duplicated it twice. Set the top duplicate to to overlay 20% opacity and the other to screen 100% opacity. Merge the three layers and it should look something like this:

3. At this point, I thought the picture needed a little brightening up. I went to Colors>Hue-Saturation and set the saturation to 30. The saturation level depends on the picture.

4. Now the picture looks pretty decent, but I thought the eyes needed some sharpening to define them better. I took a very small circlular brush around the size of .1 and zoomed into the eyes. (This also depends on the picture.) Once they looked better, they should look something like this:

5. At this point, the picture looks good enough to be an icon, but I wanted to change the coloring to make the picture softer. This step is the real trick. First, I duplicated the current icon twice. I set the top duplicate to overlay 60% opacity and the other to difference 30%. I sharpened it a bit more and walla:
6. (optional) Now, after already finishing the icon, I played with it a bit more and came up with one more result. This is completely optional, but it adds to the overall smooth effect. Go to New layer>transparency and fill it with #890900 or just dark red. Duplicate it and set the top to overlay 60% opacity and the other to difference 20% opacity. Now it looks like this:

Difficulty: Easy
Made in Gimp 2.6
Going from this:
to this:
Attempting to recreate this:
1. Before I did anything else, I cropped the picture and sharpened it as needed.
2. Once I had a base, I thought it needed brightening. So, I duplicated it twice. Set the top duplicate to to overlay 20% opacity and the other to screen 100% opacity. Merge the three layers and it should look something like this:
3. At this point, I thought the picture needed a little brightening up. I went to Colors>Hue-Saturation and set the saturation to 30. The saturation level depends on the picture.
4. Now the picture looks pretty decent, but I thought the eyes needed some sharpening to define them better. I took a very small circlular brush around the size of .1 and zoomed into the eyes. (This also depends on the picture.) Once they looked better, they should look something like this:
5. At this point, the picture looks good enough to be an icon, but I wanted to change the coloring to make the picture softer. This step is the real trick. First, I duplicated the current icon twice. I set the top duplicate to overlay 60% opacity and the other to difference 30%. I sharpened it a bit more and walla:
6. (optional) Now, after already finishing the icon, I played with it a bit more and came up with one more result. This is completely optional, but it adds to the overall smooth effect. Go to New layer>transparency and fill it with #890900 or just dark red. Duplicate it and set the top to overlay 60% opacity and the other to difference 20% opacity. Now it looks like this: