Tutorial Three
Another tutorial requested by fight_luser
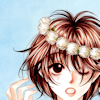
From This:

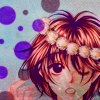
To This:

1. Crop the image how you want.
2. Duplicate the imagae and set to Soft Light 100%.
3. Duplicate the base image again and set it to Multiply 75%.
4. Merge all the layers (Layers--> Merge--> Merge All).
5. Add a Raster Layer, set it to Screen 25%.
6. Fill the raster layer with the color fill/bucket tool with 255, 128, 225 (#ff80ff) and then merge it down.
7. Go to Adjust--> Hue and Saturation--> Hue/Saturation/Lightness. In the window that pops up under Master- Hue:0, Saturation: 30, Lightness: 0
8. Adjust--> Brightness and Contrast--> Curves. In the window: Channel: Red 144>118, Blue: 116>128
9. Take this texture by lil_brokenangel and mirror it (Image--> Mirror).
10. Copy and paste the texture on the icon and set it to Mulitply 100%.
11. Since I thought the texture was too dull I went ahead and adjusted the saturation. Master: Hue:0, Saturation: 30, Lightness:0.
12. Merge all the layers and your done!
I didn't do the exact icon fight_luser requested since I couldn't remember all the things I did to it so I did a similar one using a similar texture.
From This:
To This:
1. Crop the image how you want.
2. Duplicate the imagae and set to Soft Light 100%.
3. Duplicate the base image again and set it to Multiply 75%.
4. Merge all the layers (Layers--> Merge--> Merge All).
5. Add a Raster Layer, set it to Screen 25%.
6. Fill the raster layer with the color fill/bucket tool with 255, 128, 225 (#ff80ff) and then merge it down.
7. Go to Adjust--> Hue and Saturation--> Hue/Saturation/Lightness. In the window that pops up under Master- Hue:0, Saturation: 30, Lightness: 0
8. Adjust--> Brightness and Contrast--> Curves. In the window: Channel: Red 144>118, Blue: 116>128
9. Take this texture by lil_brokenangel and mirror it (Image--> Mirror).
10. Copy and paste the texture on the icon and set it to Mulitply 100%.
11. Since I thought the texture was too dull I went ahead and adjusted the saturation. Master: Hue:0, Saturation: 30, Lightness:0.
12. Merge all the layers and your done!
I didn't do the exact icon fight_luser requested since I couldn't remember all the things I did to it so I did a similar one using a similar texture.