"Ghost Dog" Pattern
Find it
HERE
"Ghost Dog" Pattern
Please note this is not an official Disney pattern. Also, this pattern was made form memory/notes and is therefore UNTESTED!!! I'm sure theres a mistake here and there, please comment if you find any.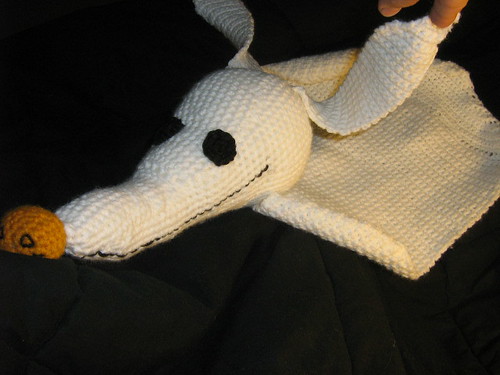
Yarn: Lion Brand "Pound of Love" probably about 1/3- 1/2 of a skien
Hook: F hook
Head
NOTE: At the end of each round, join and ch 1.
Ch 2
Round 1: Work 6 sc into 1st ch.
Round 2: Increase 6 times by working 2 sc in each stitch around - 12 sts.
Round 3: *Sc in next st, 2 sc in next st.* Repeat from * to * around - 18 sts.
Round 4: *Sc in next 2 st, 2 sc in next st.* Repeat from * to * around - sc 24 sts
Round 5: *Sc in next 3 st, 2 sc in next st.* Repeat from * to * around - 30 sts
Round 6: *Sc in next 4 st, 2 sc in next st.* Repeat from * to * around - 36 sts
Round 7: *Sc in next 5 st, 2 sc in next st.* Repeat from * to * around - 42 sts
Round 8: *Sc in next 6 st, 2 sc in next st.* Repeat from * to * around - 48 sts
Round 9: *Sc in next 7 st, 2 sc in next st.* Repeat from * to * around - 54 sts
Rounds 10-16: Sc in each stitch around - 54 sts.
Round 17: *Sc in each of the next 7 sts, work 2 sc together,.* Repeat from * to * around - 48 sts.
Round 18: Work 1 sc in each sc - 48 sts
Round 19: *Sc in each of the next 6 sts, work 2 sc together, * Repeat from * to * around - 42 sts
Round 20-22: Work 1 sc in each sc around - 42 sts
Round 23: *Sc in each of the next 5 sts, work 2 sc together* Repeat from * to * around - 36 sc
Round 24-26: Work 1 sc in each sc- 36 sts
(At this point, begin to stuff as you go. Stuff head fairly firmly, as we begin to shape nose, stuff lightly and shape as you go. Overstuffing will make a bulgy lumpy nose. :) )
Round 27: *Work 2 sc together;* repeat from * to * 5 times (Note: a total of 6 decreases in a row), work 1 sc in remaining 24 sts - 30 sts
Round 28-29: Sl St in 1st 6 sts, (try to make sl st’s fairly loose as it can be a tight squeeze to crochet into them again in the next round. At this point I began using a stitch marker to keep track of the beginning of each round) sc in remaining 24 sts
Round 30-32 SC in each st around- 30 sts
Round 33- *Work 2 sc together;* repeat from * to * 5 times (Note: a total of 6 decreases in a row) work 1 sc in remaining 18 sts - 24 sts
Round 34-36: Sl St in 1st 6 sts, (again, try to make sl st’s fairly loose) sc in remaining 18 sts- 24 sts
Round 37-39: sc in each st around- 24 sts
Round 40-42: Sl St in 1st 6 sts, (again, try to make sl st’s fairly loose) sc in remaining 18 sts- 24 sts
Round 43-45: sc in each st around- 24 sts
Round 46: *sc in next 6 sts, work 2 sc together* repeat from * to * twice- 21 sts
Round 47: sc in each st around- 21 sts
Round 48: *sc in next 5 sts, work 2 sc together* repeat from * to * twice- 18 sts
Round 49: sc in each st around- 18 sts
Round 50: *sc in next 4 sts, work 2 sc together* repeat from * to * twice- 15 sts
Round 51: Sc in each st around - 15 sts
Round 52: *sc in next 3 sts, work 2 sc together* repeat from * to * twice- 12 sts
Round 53: sc in each st around - 12 sts
Round 54: *sc in next 2 sts, work 2 sc together* repeat from * to * twice- 9 sts
Round 55: sc, *work 2 together, sc in next st* repeat twice. Fasten off.
It should look like this:

Body:
Note: At the end of each row, ch 1 and turn piece. This goes for body, arm points and tail points.
CH 52
Rows 1-50: SC in each st across. DO NOT FASTEN OFF.
Begin arm points:
Place a stitch marker in the middle of the body piece (I counted 26 sts, then placed a stitch marker on 27 to make sure I didn’t go past it)
Row 51: SC in next 26 sts
Row 52: Work 2 tog, sc in next 22 sts, work 2 tog- 24 sts
Row 53: Work 2 tog, sc in next 20 sts, work 2 tog- 22 sts
Row 54: Work 2 tog, sc in next 18 sts, work 2 tog- 20 sts
Row 55: sc in each st across - 20 sts
Row 56: Work 2 tog, sc in next 16 sts, work 2 tog- 18 sts
Row 57: Work 2 tog, sc in next 14 sts, work 2 tog- 16 sts
Row 58: Work 2 tog, sc in next 12 sts, work 2 tog- 14 sts
Row 59: Work 2 tog, sc in next 10 sts, work 2 tog- 12 sts
Row 60: Work 2 tog, sc in next 8 sts, work 2 tog- 10 sts
Row 61: Work 2 tog, sc in next 6 sts, work 2 tog- 8 sts
Row 62: Work 2 tog, sc in next 4 sts, work 2 tog- 6 sts
Row 63: Work 2 tog, sc in next 2 sts, work 2 tog- 4 sts
Row 64: Work 2 tog, twice - 2 sts
Row 65: Work 2 tog. Fasten off.
Reattach yarn at the stitch marker. Repeat Rows 51-64 for second arm point.
Tail point:
Attach yarn at bottom corner of body.
Row 1-2: sc in each st across - 52 sts
Work each row as follows: Work 2 tog twice, then sc until there are 4 sts remaining in the row, then work 2 tog twice again. Repeat until tail ends in a point.
Note: The tail and arms will curl upward. I like this effect because it looks “floaty” and not just flat.I have no idea if it can be blocked flat.
It should look like this:

Ears (make 2)
Ch 8
Row 1-34: Sc in each st across
Row 35: Work 2 tog, st 4, work 2 tog - 6 sts
Row 36 Work 2 tog, sc 2. work 2 tog- 4 sts
Row 37-38 Sc in each st across
Row 39: work 2 tog twice- 2 sts
Row 40: Work 2 tog. Fasten off
Pumpkin Nose
Ch 2
Row 1: Make 6 sc in 1st chain.
Row 2: Round 2: Increase 6 times by working 2 sc in each stitch around - 12 sts.
Round 3: *Sc in next st, 2 sc in next st.* Repeat from * to * around - 18 sts.
Row 4-6: Sc in each st around - 18 sts
Round 7: *Sc in next st, work 2 sts together.* Repeat from * to * around - 12 sts.
Stuff nose
Round 8: Work 2 sts together all the way through the round- 6 sts
Decrease until you can close off the nose and fasten off
Eyes (make 2)
Row 1: Make 6 sc in 1st chain.
Row 2: Round 2: Increase 6 times by working 2 sc in each stitch around - 12 sts. Fasten off, leaving long tail for sewing.
Finishing! FINALLY :) :) :)
Sew face onto pumpkin nose. Sew nose to head. Sew eyes onto head. Embroider/sew on smile with black yarn. Sew ears onto head. Sew head onto body, between arm points. Vow you will never single crochet again.
Questions and comments are welcome :) If you need clarification on anything, leave a comment and let me know
HERE
"Ghost Dog" Pattern
Please note this is not an official Disney pattern. Also, this pattern was made form memory/notes and is therefore UNTESTED!!! I'm sure theres a mistake here and there, please comment if you find any.
Yarn: Lion Brand "Pound of Love" probably about 1/3- 1/2 of a skien
Hook: F hook
Head
NOTE: At the end of each round, join and ch 1.
Ch 2
Round 1: Work 6 sc into 1st ch.
Round 2: Increase 6 times by working 2 sc in each stitch around - 12 sts.
Round 3: *Sc in next st, 2 sc in next st.* Repeat from * to * around - 18 sts.
Round 4: *Sc in next 2 st, 2 sc in next st.* Repeat from * to * around - sc 24 sts
Round 5: *Sc in next 3 st, 2 sc in next st.* Repeat from * to * around - 30 sts
Round 6: *Sc in next 4 st, 2 sc in next st.* Repeat from * to * around - 36 sts
Round 7: *Sc in next 5 st, 2 sc in next st.* Repeat from * to * around - 42 sts
Round 8: *Sc in next 6 st, 2 sc in next st.* Repeat from * to * around - 48 sts
Round 9: *Sc in next 7 st, 2 sc in next st.* Repeat from * to * around - 54 sts
Rounds 10-16: Sc in each stitch around - 54 sts.
Round 17: *Sc in each of the next 7 sts, work 2 sc together,.* Repeat from * to * around - 48 sts.
Round 18: Work 1 sc in each sc - 48 sts
Round 19: *Sc in each of the next 6 sts, work 2 sc together, * Repeat from * to * around - 42 sts
Round 20-22: Work 1 sc in each sc around - 42 sts
Round 23: *Sc in each of the next 5 sts, work 2 sc together* Repeat from * to * around - 36 sc
Round 24-26: Work 1 sc in each sc- 36 sts
(At this point, begin to stuff as you go. Stuff head fairly firmly, as we begin to shape nose, stuff lightly and shape as you go. Overstuffing will make a bulgy lumpy nose. :) )
Round 27: *Work 2 sc together;* repeat from * to * 5 times (Note: a total of 6 decreases in a row), work 1 sc in remaining 24 sts - 30 sts
Round 28-29: Sl St in 1st 6 sts, (try to make sl st’s fairly loose as it can be a tight squeeze to crochet into them again in the next round. At this point I began using a stitch marker to keep track of the beginning of each round) sc in remaining 24 sts
Round 30-32 SC in each st around- 30 sts
Round 33- *Work 2 sc together;* repeat from * to * 5 times (Note: a total of 6 decreases in a row) work 1 sc in remaining 18 sts - 24 sts
Round 34-36: Sl St in 1st 6 sts, (again, try to make sl st’s fairly loose) sc in remaining 18 sts- 24 sts
Round 37-39: sc in each st around- 24 sts
Round 40-42: Sl St in 1st 6 sts, (again, try to make sl st’s fairly loose) sc in remaining 18 sts- 24 sts
Round 43-45: sc in each st around- 24 sts
Round 46: *sc in next 6 sts, work 2 sc together* repeat from * to * twice- 21 sts
Round 47: sc in each st around- 21 sts
Round 48: *sc in next 5 sts, work 2 sc together* repeat from * to * twice- 18 sts
Round 49: sc in each st around- 18 sts
Round 50: *sc in next 4 sts, work 2 sc together* repeat from * to * twice- 15 sts
Round 51: Sc in each st around - 15 sts
Round 52: *sc in next 3 sts, work 2 sc together* repeat from * to * twice- 12 sts
Round 53: sc in each st around - 12 sts
Round 54: *sc in next 2 sts, work 2 sc together* repeat from * to * twice- 9 sts
Round 55: sc, *work 2 together, sc in next st* repeat twice. Fasten off.
It should look like this:
Body:
Note: At the end of each row, ch 1 and turn piece. This goes for body, arm points and tail points.
CH 52
Rows 1-50: SC in each st across. DO NOT FASTEN OFF.
Begin arm points:
Place a stitch marker in the middle of the body piece (I counted 26 sts, then placed a stitch marker on 27 to make sure I didn’t go past it)
Row 51: SC in next 26 sts
Row 52: Work 2 tog, sc in next 22 sts, work 2 tog- 24 sts
Row 53: Work 2 tog, sc in next 20 sts, work 2 tog- 22 sts
Row 54: Work 2 tog, sc in next 18 sts, work 2 tog- 20 sts
Row 55: sc in each st across - 20 sts
Row 56: Work 2 tog, sc in next 16 sts, work 2 tog- 18 sts
Row 57: Work 2 tog, sc in next 14 sts, work 2 tog- 16 sts
Row 58: Work 2 tog, sc in next 12 sts, work 2 tog- 14 sts
Row 59: Work 2 tog, sc in next 10 sts, work 2 tog- 12 sts
Row 60: Work 2 tog, sc in next 8 sts, work 2 tog- 10 sts
Row 61: Work 2 tog, sc in next 6 sts, work 2 tog- 8 sts
Row 62: Work 2 tog, sc in next 4 sts, work 2 tog- 6 sts
Row 63: Work 2 tog, sc in next 2 sts, work 2 tog- 4 sts
Row 64: Work 2 tog, twice - 2 sts
Row 65: Work 2 tog. Fasten off.
Reattach yarn at the stitch marker. Repeat Rows 51-64 for second arm point.
Tail point:
Attach yarn at bottom corner of body.
Row 1-2: sc in each st across - 52 sts
Work each row as follows: Work 2 tog twice, then sc until there are 4 sts remaining in the row, then work 2 tog twice again. Repeat until tail ends in a point.
Note: The tail and arms will curl upward. I like this effect because it looks “floaty” and not just flat.I have no idea if it can be blocked flat.
It should look like this:
Ears (make 2)
Ch 8
Row 1-34: Sc in each st across
Row 35: Work 2 tog, st 4, work 2 tog - 6 sts
Row 36 Work 2 tog, sc 2. work 2 tog- 4 sts
Row 37-38 Sc in each st across
Row 39: work 2 tog twice- 2 sts
Row 40: Work 2 tog. Fasten off
Pumpkin Nose
Ch 2
Row 1: Make 6 sc in 1st chain.
Row 2: Round 2: Increase 6 times by working 2 sc in each stitch around - 12 sts.
Round 3: *Sc in next st, 2 sc in next st.* Repeat from * to * around - 18 sts.
Row 4-6: Sc in each st around - 18 sts
Round 7: *Sc in next st, work 2 sts together.* Repeat from * to * around - 12 sts.
Stuff nose
Round 8: Work 2 sts together all the way through the round- 6 sts
Decrease until you can close off the nose and fasten off
Eyes (make 2)
Row 1: Make 6 sc in 1st chain.
Row 2: Round 2: Increase 6 times by working 2 sc in each stitch around - 12 sts. Fasten off, leaving long tail for sewing.
Finishing! FINALLY :) :) :)
Sew face onto pumpkin nose. Sew nose to head. Sew eyes onto head. Embroider/sew on smile with black yarn. Sew ears onto head. Sew head onto body, between arm points. Vow you will never single crochet again.
Questions and comments are welcome :) If you need clarification on anything, leave a comment and let me know