003/004 Tutorial: Rose McGowan/Holly Marie Combs
Two requested tutorials by russian_hotness and yummycherries.
I use PSP8, but this does translate I suppose.
Image Heavy-ish.
Beginner Friendly-ish.

TO
ROSE McGOWAN TUTORIAL;
..01 Grab you picture, make a 100x100 base. Feel free to use the one below to follow along.
..02 Grab your Dodge tool and 'white-out' any yucky stuff in the background. Settings don't really matter (100% Opacity though).

..03 Go to Image >> Greyscale (♥). And then go to, Adjust >> Brightness/Contrast >> Levels.
Put in the following settings:
Settings: RGB: Input: 30, 1.42, 234

..04 Duplicate your base, set it to Soft Light.

..05 Grab a stock image of Clouds, any will do. Set it as a new layer, and set it to Multiply.

>>
..06 Erase any parts on her face. It doesn't matter if it's on her hair, you can't notice it anyway.

..07 Duplicate your Multiplied layer twice. Set the middle one (the one closests to your first Multiplied Sky Layer), to Overlay. Leave the one above that on Muliply.

..08 Open a new canvas, 30x30. Paste a cloud stock on it. Duplicate it, and set it to Overlay. Go to Image >> Add Borders >> 3px White.

>>
..09 Copy it, and then go back to your main image and hit CTRL+L. It'll paste it as a new layer, right in the middle. Then you're done.
------------------

TO
HOLLY MARIE COMBS TUTORIAL;
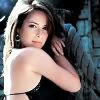
..01 Grab your picture, make a 100x100 base. Feel free to use the one below to follow along.
..02 Duplicate your base and set it to SOFT LIGHT.

..03 New Layer. Flood Fill with #F6F4D6, set to BURN (100%).

>>
..04 New Layer. Flood Fill with #A5BEF5, set it to BURN (100%).

>>
..05 Duplicate your background, bring it to the top and set it to SCREEN (100%).
..06 New Adjustment Layers. Layers >> New Adjusment Layer >> Levels. Put in the following settings (if it isn't mentioned, leave it alone):
RGB: Input: 34, 1, 235
Blue: Input: 0, 1, 255 Output: 44, 230

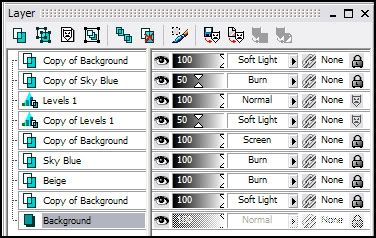
..07 Duplicate your Levels Adjusment layer. (This may sound confusing, so look at the Layer Palette below if you need it). Bring down the Copy Levels Layer, so it's below the Original Levels Layer and the Screen'd Background Layer. Set this to SOFT LIGHT, 50%.

..08 Duplicate your Burn Layer from STEP 04, bring it to the top and bring the Opacity to 50% (make sure it's still set to BURN.

..09 Duplicate your Base Layer, bring it to the top. Desaturate it (Shift+H or you can do it my nifty way which I discuss here!). Set this to SOFT LIGHT (100%).
Layers
That's it!
Love to see what people come up with.
Any questions, please ask.
TO
ROSE McGOWAN TUTORIAL;
..01 Grab you picture, make a 100x100 base. Feel free to use the one below to follow along.
..02 Grab your Dodge tool and 'white-out' any yucky stuff in the background. Settings don't really matter (100% Opacity though).
..03 Go to Image >> Greyscale (♥). And then go to, Adjust >> Brightness/Contrast >> Levels.
Put in the following settings:
Settings: RGB: Input: 30, 1.42, 234
..04 Duplicate your base, set it to Soft Light.
..05 Grab a stock image of Clouds, any will do. Set it as a new layer, and set it to Multiply.
>>
..06 Erase any parts on her face. It doesn't matter if it's on her hair, you can't notice it anyway.
..07 Duplicate your Multiplied layer twice. Set the middle one (the one closests to your first Multiplied Sky Layer), to Overlay. Leave the one above that on Muliply.
..08 Open a new canvas, 30x30. Paste a cloud stock on it. Duplicate it, and set it to Overlay. Go to Image >> Add Borders >> 3px White.
>>
..09 Copy it, and then go back to your main image and hit CTRL+L. It'll paste it as a new layer, right in the middle. Then you're done.
------------------
TO
HOLLY MARIE COMBS TUTORIAL;
..01 Grab your picture, make a 100x100 base. Feel free to use the one below to follow along.
..02 Duplicate your base and set it to SOFT LIGHT.
..03 New Layer. Flood Fill with #F6F4D6, set to BURN (100%).
>>
..04 New Layer. Flood Fill with #A5BEF5, set it to BURN (100%).
>>
..05 Duplicate your background, bring it to the top and set it to SCREEN (100%).
..06 New Adjustment Layers. Layers >> New Adjusment Layer >> Levels. Put in the following settings (if it isn't mentioned, leave it alone):
RGB: Input: 34, 1, 235
Blue: Input: 0, 1, 255 Output: 44, 230
..07 Duplicate your Levels Adjusment layer. (This may sound confusing, so look at the Layer Palette below if you need it). Bring down the Copy Levels Layer, so it's below the Original Levels Layer and the Screen'd Background Layer. Set this to SOFT LIGHT, 50%.
..08 Duplicate your Burn Layer from STEP 04, bring it to the top and bring the Opacity to 50% (make sure it's still set to BURN.
..09 Duplicate your Base Layer, bring it to the top. Desaturate it (Shift+H or you can do it my nifty way which I discuss here!). Set this to SOFT LIGHT (100%).
Layers
That's it!