006 Tutorial: Nelly Furtado
Why not, new tutorial. Two different outcomes, and it isn't as complicated as my last tutorial.
I use PSP8. However, it is translateable.
Not Image Heavy.
Beginner Friendly.

TO
OR
..01 Grab your picture. Make a 100x100 base.
Notes: Center crop your image. Also, leave some empty space above the head.
..02 Duplicate your base, and set it to Screen.

..03 New Layer. Floodfill with #034375 and set to Exclusion (100%).

>>
..04 New Layer. Floodfill with #9ECEDE and set to Soft Light (100%).

>>
..05 Hit CTRL+SHIFT+C, and then CTRL+L. This makes a copy of all the layers as is, and then makes it a new layer. (Or you can just Merge All and then Duplicate the Layer). Set this to Burn (100%).
>>
..06 New Layer. Floodfill with #000000 (Black) and set it to Multiply (100%). Now, you may need to lower the opacity to see where you want the circle to be.

..07 Grab your Eraser Tool. Put in the following settings (if it isn't mentioned, ignore it):
Shape: Circle
Size: 90
Hardness: 90
Opacity: 100
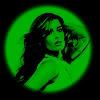
Now make a click in the middle of the icon on your Multiply layer. If you don't like it, CTRL+Z, and keep going until you get it where you want it. If you want more blurred edges, lower the Hardness even more. Eventually you'll end up with this. DONE!
- - - - - - - - -
Now, to snazzy-it up even more. These steps all take place UNDER the last layer you made (the Multiplied circle layer).
..08 New Layer. Floodfill with #BAF692 and set it to Burn (100%).

>>
..09 New Layer. Floodfill with #00CC00 and set it to Burn (100%).

>>
..10 Repeat step 7. Put in the following settings (if it isn't mentioned, ignore it):
Shape: Circle
Size: 82
Hardness: 90
Opacity: 100
Now make a click in the middle (lower the opacity to see what you're doing). Don't do it smack-dab in the middle, do it a little off to the edge. Just mess around with it, this step and the following one, there's no wrong way to do it.

..11 New Layer. Floodfill with #DA0290 and set it to Burn. (100%).

>>
..12 Repeat step 10.

..13 Now that's it. Just mess around and see what you like. You may need to zoom in and use the Move Tool to move the two colored Burn Layers to where you want them.
TIPS:
Try different colors for the two Burn Layers (step 09/12).
Try different colors for the first Burn Layer (step 08).
Try different modes instead of Burn, maybe Hardlight? Screen? Overlay?
HAVE FUN; USE YOUR IMAGINATION!
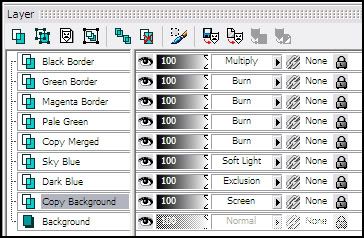
ETA: Layers for those who need it.
TO
OR
..01 Grab your picture. Make a 100x100 base.
Notes: Center crop your image. Also, leave some empty space above the head.
..02 Duplicate your base, and set it to Screen.
..03 New Layer. Floodfill with #034375 and set to Exclusion (100%).
>>
..04 New Layer. Floodfill with #9ECEDE and set to Soft Light (100%).
>>
..05 Hit CTRL+SHIFT+C, and then CTRL+L. This makes a copy of all the layers as is, and then makes it a new layer. (Or you can just Merge All and then Duplicate the Layer). Set this to Burn (100%).
>>
..06 New Layer. Floodfill with #000000 (Black) and set it to Multiply (100%). Now, you may need to lower the opacity to see where you want the circle to be.
..07 Grab your Eraser Tool. Put in the following settings (if it isn't mentioned, ignore it):
Shape: Circle
Size: 90
Hardness: 90
Opacity: 100
Now make a click in the middle of the icon on your Multiply layer. If you don't like it, CTRL+Z, and keep going until you get it where you want it. If you want more blurred edges, lower the Hardness even more. Eventually you'll end up with this. DONE!
- - - - - - - - -
Now, to snazzy-it up even more. These steps all take place UNDER the last layer you made (the Multiplied circle layer).
..08 New Layer. Floodfill with #BAF692 and set it to Burn (100%).
>>
..09 New Layer. Floodfill with #00CC00 and set it to Burn (100%).
>>
..10 Repeat step 7. Put in the following settings (if it isn't mentioned, ignore it):
Shape: Circle
Size: 82
Hardness: 90
Opacity: 100
Now make a click in the middle (lower the opacity to see what you're doing). Don't do it smack-dab in the middle, do it a little off to the edge. Just mess around with it, this step and the following one, there's no wrong way to do it.
..11 New Layer. Floodfill with #DA0290 and set it to Burn. (100%).
>>
..12 Repeat step 10.
..13 Now that's it. Just mess around and see what you like. You may need to zoom in and use the Move Tool to move the two colored Burn Layers to where you want them.
TIPS:
ETA: Layers for those who need it.