Icon Tutorial 004 --> Vmars Running
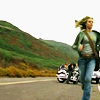
Go from this base: 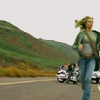
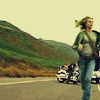
to this icon: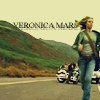
++Beginner Friendly++
Made in PS7, but probably easy to translate. Do not make this exact icon!
Step 1
I cropped my base. And here is my base:
Step 2
I duplicated my base. This copy I made black and white (Ctrl+U --> Saturation: -100) and set it at Soft Light 100%. This is what my icon looks like so far:
Step 3
I duplicated my base again and set it to the TOP of the layers. I then set this to Soft Light 100% as well. My icon now looks like this:
Step 4
Now I duplicate my base AGAIN and set this one to the very top. I then set this layer to Screen 50%. My icon now:
Step 5
I made a new layer and left it at the top of the layers. I filled it with this color:

(#110F43)
I set this layer to Exclusion 72%. My icon looks like this now:

Step 6
I then used the same blue color and filled another new layer. I set it to Difference 44%. This is what my icon looks like with this layer:
Step 7
So now I get to font. For this icon, I used Times New Roman, size 8, at Crisp. It says "VERONICA MARS" as you can easily see. I set it with just a small amount of overlap with the corner of the V over the hill and a little bit of the S over her hair. I then deleted those parts. So this is what my icon looks like with just that.
Step 8
For the final icon, I made a duplicate of my "VERONICA MARS" text. I wanted it to have a somewhat shadowed effect but am too lazy to find the thing on the toolbar or whatever. So, instead, I clicked the moving arrow and Nudged this duplicate. You do that just by using the arrow keys. I nudged it 2 pixels down and 2 pixels over. So this is my final icon:
And then you're done! :)
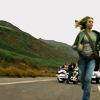
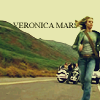
to this icon:
++Beginner Friendly++
Made in PS7, but probably easy to translate. Do not make this exact icon!
Step 1
I cropped my base. And here is my base:
Step 2
I duplicated my base. This copy I made black and white (Ctrl+U --> Saturation: -100) and set it at Soft Light 100%. This is what my icon looks like so far:
Step 3
I duplicated my base again and set it to the TOP of the layers. I then set this to Soft Light 100% as well. My icon now looks like this:
Step 4
Now I duplicate my base AGAIN and set this one to the very top. I then set this layer to Screen 50%. My icon now:
Step 5
I made a new layer and left it at the top of the layers. I filled it with this color:
(#110F43)
I set this layer to Exclusion 72%. My icon looks like this now:
Step 6
I then used the same blue color and filled another new layer. I set it to Difference 44%. This is what my icon looks like with this layer:
Step 7
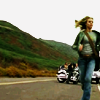
So now I get to font. For this icon, I used Times New Roman, size 8, at Crisp. It says "VERONICA MARS" as you can easily see. I set it with just a small amount of overlap with the corner of the V over the hill and a little bit of the S over her hair. I then deleted those parts. So this is what my icon looks like with just that.
Step 8
For the final icon, I made a duplicate of my "VERONICA MARS" text. I wanted it to have a somewhat shadowed effect but am too lazy to find the thing on the toolbar or whatever. So, instead, I clicked the moving arrow and Nudged this duplicate. You do that just by using the arrow keys. I nudged it 2 pixels down and 2 pixels over. So this is my final icon:
And then you're done! :)