"Gypsy" icon tutorial.
Go from this base: 
to this icon:
in only a few simple steps!
Made in PS7, but probably easy to translate.
Okay, Step One. You want to have the base.
. I changed some of the color settings to get more blue in the background, etc. by going to Image -> Adjustments -> Color Balance.
For Step Two I have a pretty little box to show you.

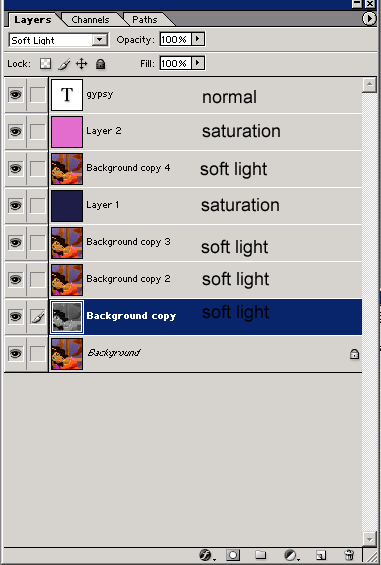
I made a b&w copy and two color copies of my base, setting them all to soft light.
In Step Three I placed a dark blue layer over the others with Saturation.
The color is 1B1D4A.
For Step Four I made another copy of the base and set it over the saturation layer at soft light. Then I made another color layer and set it at saturation also.
. The color is E070CF.
To finish the icon, I added the text "gypsy" in Carpenter ICG, which I downloaded from DaFont.

And voila! You're done!
-The Carmen

to this icon:

in only a few simple steps!
Made in PS7, but probably easy to translate.
Okay, Step One. You want to have the base.

. I changed some of the color settings to get more blue in the background, etc. by going to Image -> Adjustments -> Color Balance.
For Step Two I have a pretty little box to show you.

I made a b&w copy and two color copies of my base, setting them all to soft light.
In Step Three I placed a dark blue layer over the others with Saturation.

The color is 1B1D4A.
For Step Four I made another copy of the base and set it over the saturation layer at soft light. Then I made another color layer and set it at saturation also.

. The color is E070CF.
To finish the icon, I added the text "gypsy" in Carpenter ICG, which I downloaded from DaFont.

And voila! You're done!
-The Carmen