Tutorial #1: The Freshman
This is my first tutorial, so hopefully it's not too hard to understand.
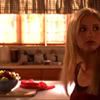
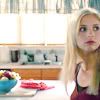
to: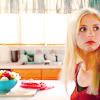
(based on: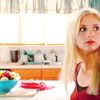
Using Photoshop 7 (I don't think it's translatable because of selective colors, sorry)
Okay, so to start off, resize and crop your base however you want it and then duplicate it twice and set both layers to screen. Reduce the opacity of the second screen layer to 70%.

Create a new layer and fill it with #84C3EF. Set it to softlight, opacity 80%.
Create another layer and fill it with #A3CEA2. Set it to softlight, opacity 43%.
One more layer, this time fill it with #FFD6E3 and set it to color burn, opacity 70%

Add a selective color adjustment layer with these settings:
Reds:
Cyan -30
Magenta -3
Yellow -16
Black -3
Yellows:
Cyan -26
Magenta +3
Yellow -10
Black 0
Cyans:
Cyan +90
Magenta -43
Yellow +84
Black 0
Neutrals:
Cyan +47
Magenta -10
Yellow -29
Black -3

Add a color balance adjustment layer with these settings:
Midtones: -19, +40, +14
Shadows: +19, -7, -5
Highlights: -8, +6, +14
Now duplicate this adjustment layer and set it to softlight, fill 50%
Add another selective color adjustment layer with this setting:
Reds:
Cyan -55

Add a Hue/Saturation adjustment layer and up the saturation by 11.
Now for a curves adjustment layer...
RGB:
1. input: 67 output: 59
2. input: 127 output: 137
(Unfortunately, this is the point at which my psd file ends, so I'm going to have to make up the rest as I go along.)
Add a selective color adjustment layer with these settings:
Reds:
Cyan -68
Magenta +5
Yellow +14
Black 0
Yellows:
Cyan -3
Magenta -3
Yellow +2
Black 0
Cyans:
Cyan +79
Magenta -10
Yellow +29
Black 0
Neutrals:
Cyan -16
Magenta 0
Yellow +3
Black 0

Add a curves adjustment layer with these settings:
RGB:
input: 132 output: 136
Red:
input: 115 output: 137
Green:
input: 143 output: 145
Blue:
input: 133 output: 133
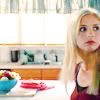
And that's it. It's not identical to the original icon, but it's as close as I could get it.
I hope someone finds this helpful somehow. lol
(I'm 99.9% sure that this tutorial doesn't borrow anything from other tutorials, but if you feel like any of the steps are exact copies of another tutorial, please let me know)
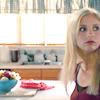
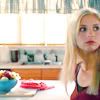
to:
(based on:
Using Photoshop 7 (I don't think it's translatable because of selective colors, sorry)
Okay, so to start off, resize and crop your base however you want it and then duplicate it twice and set both layers to screen. Reduce the opacity of the second screen layer to 70%.
Create a new layer and fill it with #84C3EF. Set it to softlight, opacity 80%.
Create another layer and fill it with #A3CEA2. Set it to softlight, opacity 43%.
One more layer, this time fill it with #FFD6E3 and set it to color burn, opacity 70%
Add a selective color adjustment layer with these settings:
Reds:
Cyan -30
Magenta -3
Yellow -16
Black -3
Yellows:
Cyan -26
Magenta +3
Yellow -10
Black 0
Cyans:
Cyan +90
Magenta -43
Yellow +84
Black 0
Neutrals:
Cyan +47
Magenta -10
Yellow -29
Black -3
Add a color balance adjustment layer with these settings:
Midtones: -19, +40, +14
Shadows: +19, -7, -5
Highlights: -8, +6, +14
Now duplicate this adjustment layer and set it to softlight, fill 50%
Add another selective color adjustment layer with this setting:
Reds:
Cyan -55
Add a Hue/Saturation adjustment layer and up the saturation by 11.
Now for a curves adjustment layer...
RGB:
1. input: 67 output: 59
2. input: 127 output: 137
(Unfortunately, this is the point at which my psd file ends, so I'm going to have to make up the rest as I go along.)
Add a selective color adjustment layer with these settings:
Reds:
Cyan -68
Magenta +5
Yellow +14
Black 0
Yellows:
Cyan -3
Magenta -3
Yellow +2
Black 0
Cyans:
Cyan +79
Magenta -10
Yellow +29
Black 0
Neutrals:
Cyan -16
Magenta 0
Yellow +3
Black 0
Add a curves adjustment layer with these settings:
RGB:
input: 132 output: 136
Red:
input: 115 output: 137
Green:
input: 143 output: 145
Blue:
input: 133 output: 133
And that's it. It's not identical to the original icon, but it's as close as I could get it.
I hope someone finds this helpful somehow. lol
(I'm 99.9% sure that this tutorial doesn't borrow anything from other tutorials, but if you feel like any of the steps are exact copies of another tutorial, please let me know)