Project: Soaphead Church's Top Hat
For our current mainstage production, The Bluest Eye, i had a unique problem with millinery for the costume of the character Soaphead Church.
In the context of the play, Church is a mystic, a former holy man who has lost his faith, and implied former child molestor and possible convict. Our designer's imagery for him was steeped in itenerant tinker imagery, trickster imagery, and the iconic silhouette of the top-hatted voudoun loa Baron Samedi.
My problem became, how to make a brand-new top hat that looks wrecked and ancient, in a very particular fashion...
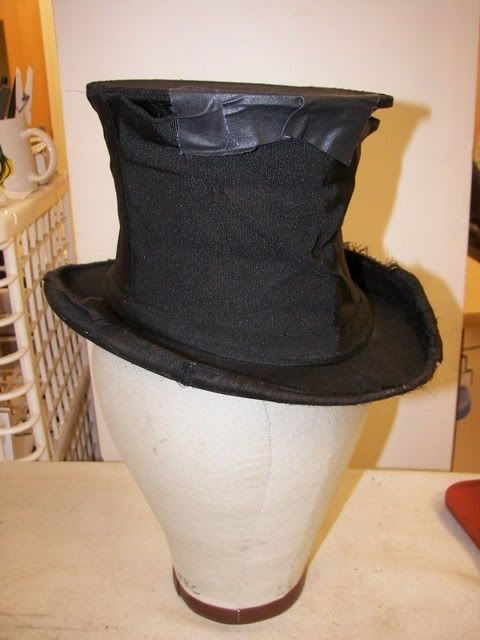
This was the collapsible silk faille top hat from our stock that the designer liked. However, it is an antique piece, badly in need of refurbishment, and of so small a headsize that i can only assume it was built for a teenage boy or small woman. There was no way it was going to fit on the 23.5" head of actor Lou Ferguson.
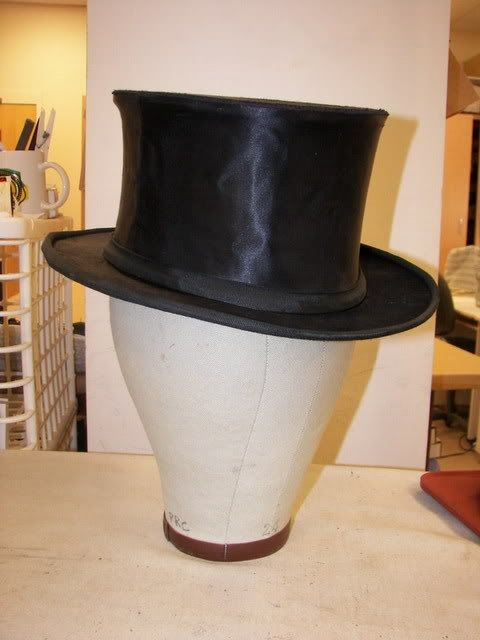
This beautiful collapsible satin top hat from our stock fit Mr. Ferguson perfectly. However, it too is an antique, recently refurbished, and thus it was not an option for extensive distressing. The designer, Anne Kennedy, also preferred that Soaphead Church's top hat be made of faille, not satin; the decision was made to build a top hat from scratch that looked like the wrecked antique but fit our actor.
Scroll back up to the first image, the source image for the hat i was going to build. There are a few things that i found to be stylistically definitive about that hat from a structural and aesthetic perspective, that i needed to incorporate into the hat i was building.
First, note at the top on the right side of the photo: the tip of the crown is separated from the sideband. In the left front, it's held on with black duct tape, but you can still see it bagging away on the right. Part of what makes that SO visually obvious is the fact that the source hat is collapsible. This means it has a stiff faille-covered cardboard tip, and a stiff faille-covered cardboard brim, but that the sideband is naught but a sprung wire framework, over which the sideband cover faille is lain and stitched. Thus, when the seam attaching the sideband to the tip comes free, you see empty space in there, instead of a buckram or willow understructure as you would with a non-collapsible faille top hat.
Second, note the shape of the crown, the concave cylindrical swoop of the sideband. (Being a huge dork about vocabulary, i looked this up and discovered that the proper name for it is a quadric hyperboloid!) Part of that is due to the sideband faille being cut on the bias and flared at top and bottom, and part of it is exacerbated by, again, the absence of any understructure beyond a wire frame.
Third, check out the most noticeable elements of aging: the frayed and browned-out grosgrain hatband and binding at the brim edge, the waddy tape holding the sideband to the tip in the front, and the crushed and wrinkled nature of the sideband fabric.
These were all visual elements i KNEW had to be present in my brand-new-but-haggard-looking Soaphead Church top hat.

Here is a fitting photo from my first mockup. The mockup is a wire frame crown (wire oval for the tip, four wire struts for the sideband) and a taped-wired cardboard brim, with a piece of black scrap fabric for a sideband cover. This mockup allowed me to see what i needed to see in the fitting--was the headsize opening a good shape for his head, would it fit comfortably, etc--and also allowed the designer to experiment with crushing the crown in various places, bending it in or out, etc.
Once we all agreed upon what the final hat needed to be, something that was good for the actor fitwise, and that i had a clearer picture of the dimensions and scale of the various elements, i built the real thing much on the same plan.
The tips of collapsible top hats are usually extremely stiff, thick, unmulled cardboard to which the cover fabric is adhered with a thin application of glue. I wanted my tip to be a bit more forgiving, due to the nature of the fabric and the possibility that it would get bent along an edge. Mine was black heavy buckram mulled with thin black felt, and backed with two layers of Bristol board for stiffness. With this construction, if it got bent, it wouldn't drastically weaken the understructure, and the felt would have a little "give" for the application of the cover fabric. I made the tip a self-contained unit, covered with fabric and lined with black lining--it was a finished black faille lined oval when i was done, and i referred to it as "the floating pancake," since it needed structurally to float over the brim supported only by the sideband wires.
I made the sideband as a wired structure, from a tempered black oxide wire that i found in the wire stock. This wire was superior to black millinery wire in that it could be bent more without breaking--millinery wire can break after 3 or 4 bends in the same place, but this wire i used could be bent sometimes as many as 15 times. The idea was, even if the crown got crushed, it wouldn't need its infrastructure replaced.
The brim was heavy black buckram, unmulled, to which i adhered the faille with spray adhesive and wired and bound the edge in black millinery grosgrain.
I wound up making a bias tube for both the sideband and the sideband lining, and stitching them in at the same time, so that i could allow for gaps for the wire frame to come through. This way, one side could be unattached to the tip and bag down like on the original hat, but the interior would still be lined and the seams and structures largely remain unexposed to the actor's head or the audience's potential view.
When the whole thing was done, a serious amount of sanding and roughing frayed out the faille and grosgrain quite a bit, and i used a steam iron to set crush-creases into the sideband. The last thing i did was to create some antiquing effects by rubbing watered-down paint into areas of the hat with my fingers. It's a good thing we decided to build the hat from scratch, too, because the final hat wound up even MORE destroyed, dirty, and wrecked than the source hat!
Here's the finished product:
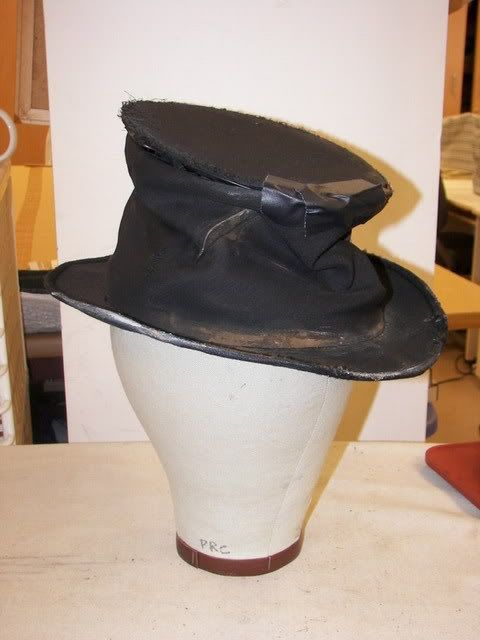
front view
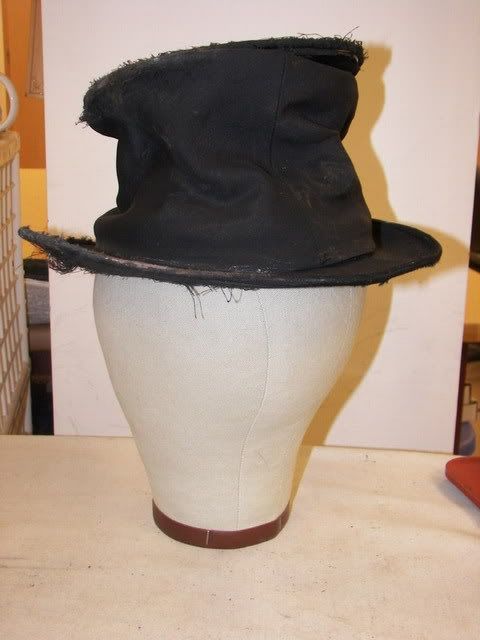
back view
I apologize for not having any more extensive process pictures on this--production to tech was extremely high-stress and involved a lot of long hours at maximum efficiency, so taking time to document the interior creation wasn't possible.
Hope you enjoyed reading about how it was done, and that my descriptions are clear enough to make sense!
In the context of the play, Church is a mystic, a former holy man who has lost his faith, and implied former child molestor and possible convict. Our designer's imagery for him was steeped in itenerant tinker imagery, trickster imagery, and the iconic silhouette of the top-hatted voudoun loa Baron Samedi.
My problem became, how to make a brand-new top hat that looks wrecked and ancient, in a very particular fashion...
This was the collapsible silk faille top hat from our stock that the designer liked. However, it is an antique piece, badly in need of refurbishment, and of so small a headsize that i can only assume it was built for a teenage boy or small woman. There was no way it was going to fit on the 23.5" head of actor Lou Ferguson.
This beautiful collapsible satin top hat from our stock fit Mr. Ferguson perfectly. However, it too is an antique, recently refurbished, and thus it was not an option for extensive distressing. The designer, Anne Kennedy, also preferred that Soaphead Church's top hat be made of faille, not satin; the decision was made to build a top hat from scratch that looked like the wrecked antique but fit our actor.
Scroll back up to the first image, the source image for the hat i was going to build. There are a few things that i found to be stylistically definitive about that hat from a structural and aesthetic perspective, that i needed to incorporate into the hat i was building.
First, note at the top on the right side of the photo: the tip of the crown is separated from the sideband. In the left front, it's held on with black duct tape, but you can still see it bagging away on the right. Part of what makes that SO visually obvious is the fact that the source hat is collapsible. This means it has a stiff faille-covered cardboard tip, and a stiff faille-covered cardboard brim, but that the sideband is naught but a sprung wire framework, over which the sideband cover faille is lain and stitched. Thus, when the seam attaching the sideband to the tip comes free, you see empty space in there, instead of a buckram or willow understructure as you would with a non-collapsible faille top hat.
Second, note the shape of the crown, the concave cylindrical swoop of the sideband. (Being a huge dork about vocabulary, i looked this up and discovered that the proper name for it is a quadric hyperboloid!) Part of that is due to the sideband faille being cut on the bias and flared at top and bottom, and part of it is exacerbated by, again, the absence of any understructure beyond a wire frame.
Third, check out the most noticeable elements of aging: the frayed and browned-out grosgrain hatband and binding at the brim edge, the waddy tape holding the sideband to the tip in the front, and the crushed and wrinkled nature of the sideband fabric.
These were all visual elements i KNEW had to be present in my brand-new-but-haggard-looking Soaphead Church top hat.
Here is a fitting photo from my first mockup. The mockup is a wire frame crown (wire oval for the tip, four wire struts for the sideband) and a taped-wired cardboard brim, with a piece of black scrap fabric for a sideband cover. This mockup allowed me to see what i needed to see in the fitting--was the headsize opening a good shape for his head, would it fit comfortably, etc--and also allowed the designer to experiment with crushing the crown in various places, bending it in or out, etc.
Once we all agreed upon what the final hat needed to be, something that was good for the actor fitwise, and that i had a clearer picture of the dimensions and scale of the various elements, i built the real thing much on the same plan.
The tips of collapsible top hats are usually extremely stiff, thick, unmulled cardboard to which the cover fabric is adhered with a thin application of glue. I wanted my tip to be a bit more forgiving, due to the nature of the fabric and the possibility that it would get bent along an edge. Mine was black heavy buckram mulled with thin black felt, and backed with two layers of Bristol board for stiffness. With this construction, if it got bent, it wouldn't drastically weaken the understructure, and the felt would have a little "give" for the application of the cover fabric. I made the tip a self-contained unit, covered with fabric and lined with black lining--it was a finished black faille lined oval when i was done, and i referred to it as "the floating pancake," since it needed structurally to float over the brim supported only by the sideband wires.
I made the sideband as a wired structure, from a tempered black oxide wire that i found in the wire stock. This wire was superior to black millinery wire in that it could be bent more without breaking--millinery wire can break after 3 or 4 bends in the same place, but this wire i used could be bent sometimes as many as 15 times. The idea was, even if the crown got crushed, it wouldn't need its infrastructure replaced.
The brim was heavy black buckram, unmulled, to which i adhered the faille with spray adhesive and wired and bound the edge in black millinery grosgrain.
I wound up making a bias tube for both the sideband and the sideband lining, and stitching them in at the same time, so that i could allow for gaps for the wire frame to come through. This way, one side could be unattached to the tip and bag down like on the original hat, but the interior would still be lined and the seams and structures largely remain unexposed to the actor's head or the audience's potential view.
When the whole thing was done, a serious amount of sanding and roughing frayed out the faille and grosgrain quite a bit, and i used a steam iron to set crush-creases into the sideband. The last thing i did was to create some antiquing effects by rubbing watered-down paint into areas of the hat with my fingers. It's a good thing we decided to build the hat from scratch, too, because the final hat wound up even MORE destroyed, dirty, and wrecked than the source hat!
Here's the finished product:
front view
back view
I apologize for not having any more extensive process pictures on this--production to tech was extremely high-stress and involved a lot of long hours at maximum efficiency, so taking time to document the interior creation wasn't possible.
Hope you enjoyed reading about how it was done, and that my descriptions are clear enough to make sense!