1844 meets 2012: Conformateur repair with a 3D printer
Some time ago, i had the incredible good fortune to obtain that most coveted of custom hatter's tools, a conformateur. Mine is handmade of ebony and brass with mother-of-pearl carved fittings; it's a very early model, the Allie Aine invented in France in 1844 (mine has a date stamp of 1846). This conformateur is in amazing condition, with only minimal repairs required.
If you are unfamiliar with exactly what a conformateur is, does, and looks like, check out this great post by Tricia Roush of House of Nines Design about her recent conformateur acquisition, an Argentinian model by a maker named Vega.
But this post is not about the conformateur itself, rather it's about a recent minor repair which definitely makes me feel like i'm living in the future.
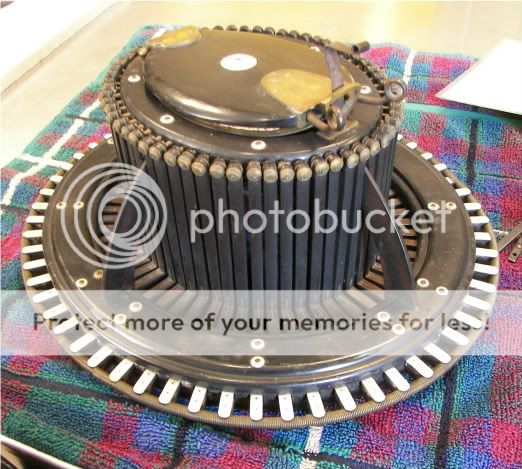
Conformateur with tip press ("lid") closed.
(Why did i display it on this hideous towel?)

Conformateur with tip press open.

Detail view of the pins beneath the tip press.
As i said, it's in great condition, but one small thing wrong with mine pertained to its feet. My conformateur is designed such that it stands on four small wooden feet, but one was missing and another one had been lost and replaced with a poorly-whittled stub of wood stuck in place with what looked like spit and goat hair. (No really.)
I could have replaced the feet with new wooden ones, and i did consider that possibility, but then i had the mad idea to try drafting feet in 3D CAD and having them made on a rapid prototyper, otherwise known as a 3D printer. I became really taken with the idea of using utterly modern 21st century engineering to repair this incredible example of 19th century technology.
As a member of TechShop RDU, i had originally planned to draft the part there using Autodesk Inventor, then use their Dimension rapid prototyper to print the feet. Unfortunately, the machine was damaged and down for the count until it could be repaired. I had my draft but no way to print it.
Enter Dara McGinn of Li Sashay, and RepRap, an open-source 3D printer concept which you can basically make yourself. Dara hosts a weekly Etsy meetup, and it was just my luck that last week she invited engineer and maker Luis Freeman to bring his RepRaps and demonstrate them for attendees. Exciting!
Luis was able to take my foot design and help me convert it to a format the RepRap could process and produce. We used a plastic called PLA (polylactic acid) to print our 3D shapes.
The printing of the foot involved a learning curve. The shape of the first attempt involved some instability in the design and resulted in a weird "poop" of plastic at the top peg. The second attempt, we misjudged the correct height of the foot and it was too tall. It also developed stability problems in the peg, because the small surface area did not provide enough time between levels of printing for the PLA material to solidify. The peg looked like a Slinky when you stand it on end but then poke the side with a finger, so it's askew. On the third try, Luis realized that if we were to print two simultaneously, the issue with the peg stability would be resolved in the time it took to shift position from one peg to another.

Detail of original foot and missing foot.
(I should have put it on something besides a hotrod-flame blanket, eh?
I am failing at backdrops easy on the eyes in this post.)

I am only partly kidding about the goat hair. That is FUZZY. Eww.

Luis' machine which printed my feet!

Another of Luis' machines with a laser-cut CAD drafted wood housing.

Printing area of the second machine pictured previously.
Video of my two conformateur feet being printed!

1. Original conformateur wood foot.
2. First prototype with poopy peg failure.
3. Second prototype with height error and crooked peg.
4. and 5. Successfully formed feet!

Four legs good! Stability has been restored!
In my studio, i conducted some further experiments on my reject feet.
First, I hit the askew peg of the too-tall foot with a hair dryer on a high setting and the PLA softened enough for me to straighten and smooth the peg into its desired shape with a pair of needle-nose pliers. So, minor adjustments of these 3D printed parts are possible, in ways familiar to artisans who frequently work with other thermoplastic media like Varaform and Wonderflex and Fosshape.
I also did a couple preliminary paint tests on the rejects, just to see what kind of media adheres to the print material. I discovered that acrylic doesn't form a good bond with the PLA and scraped off easily. Spray paint adhered to it great and had good coverage after just one coat. I was able to use Sculpt-or-Coat as a kind of spackle to smooth the ridges of the surface created by the toolpaths of the RepRap as it produces a prototype, so if you were to 3D print something and it needed to be smooth, you could probably smooth it that way.
All in all, this was such an exciting experience, for something so elementary as replacing two tiny pegs on the bottom of an old hatter's tool. If you're local to the area and want to learn more about the RepRap, Dara and Luis are hosting a "Build your own 3D Printer" class in March! Read more about it on Dara's company blog.