prototype CAD/CAM hat blocks at TechShop RDU!
One of the biggest stumbling blocks for theatrical milliners in terms of creating a wide array of historical shapes is, well, literally the blocks! If you want to do a blocked felt or straw hat, you must have something on which to block the material, so you're limited by the blocks you own or can readily make or rig.
In the past i've posted about a range of options for addressing this issue, from conscripting everyday objects to serve as makeshift blocks, to hand-carving a block in stacked foam, to experiments with the rare blockmaking medium esparterie.
All of these methods are problematic, though. Blocking on a rigid object like a clay pot or ceramic vase is difficult because you can't pin into the base and there's no grooves for ropes to hold the felt in place. Hand-carving a foam block is extremely time-consuming, messy, and sculpturally challenging, not to mention that it means being in a particulate respirator for as long as it takes. And esparterie, well, if you find any for sale, you have lucked out at any price, and if--like me--you own a precious few sheets, you don't just use them up willy-nilly.
Because i'm always on the hunt for new approaches to traditional craftwork, I've begun a journey of experimentation with a new (or new to me, at least) way of creating block shapes using 3D CAD/CAM technology. CAD stands for Computer-Aided Design, and CAM stands for Computer-Aided Machining, so when you see that abbreviation of CAD/CAM, that really just means using computers to help you design and make something cool!
It first occurred to me that CAD/CAM hatblock production was possible back when i took some CAD classes through the College of Textiles at North Carolina State University--we were manipulating 2D pattern shapes for apparel, and 3D renderings of designs, and i found myself thinking about the possibilities for millinery in these technologies, the programs and the robots used to produce the patterns.
I'd begun talking about these possibilities with one of my professors there, but we needed funding for research and both of us had 203948 other responsibilities and besides the machines and software we would need to use were also in use by 34985 students in legitimate classes, and then the economy imploded and a lot of the kind of grants we would have wanted disappeared... My 3D CAD hat blocks went back into the realm of the someday, when i could get my hands on the right technology to begin to work on it.
Then, along came TechShop RDU. The short version is, they're kind of like a think-tank super-tech workshop-studio and inventors' social club, that you buy a membership to the way you do a gym. You can then have access to an enormous quantity of equipment and tools and software (provided you go through the proper Safety and Basic Use (SBU) class for each thing), and also plug into an incredibly creative and skilled group of fellow members. They've got everything from sets of standard screwdrivers and tape measures up to welding stations, woodworking powertools, screenprinting stations, a blacksmith forge, and a full computer lab with 3D software like Autodesk Inventor. They even have a sewing shop with industrial machines and computerized embroidery capabilities. I've posted about it before, and this December i finally had the chance (meaning, the time) to activate my membership and begin taking some classes specific to this hatblocking project.
One of the incredible benefits of membership at a TechShop is that you can take up to 12 hours of Autodesk Inventor software classes completely for free, no extra charge. (Many of the SBU classes have nominal tuition charges, presumably to pay the instructors and cover the materials used.) So, the first thing i did with my membership was to take 9 hours worth of those classes--enough to grasp the basics of 3D part drafting in Inventor. I have some long-term plans to do a series of block designs by this means, probably over the first 6 months of 2012.
But, you may be wondering, how do you go from a 3D design for a hat block, to the block itself?
That's where the ShopBot comes in. Basically, a ShopBot is like a robot assistant in the wood shop--if you can tell it what you want cut and carved, it'll do it. TechShop offers an 8-hour class which combines some CAD/CAM software instruction and guided drafting help with the standard ShopBot SBU certification.
ShopBot uses a kind of software called PartWorks, though you can import files from other drafting programs like Inventor, AutoCAD, Inkscape, Illustrator, etc. If you have any kind of familiarity with vector-based drawing programs, you can probably pick up PartWorks quickly. It was clear to me when i began fiddling with it, i could be prototyping very simple block shapes by the end of the night.
I decided to start as basic as basic can be: band blocks and maybe a brim or two. I went down to the scrap pile in the wood shop and found a likely-looking piece of 1.5"-thick medium-density fiberboard (MDF)--since this was to be my very first try at such a thing, i wasn't about to try using a more traditional blockmaker's wood like poplar, that i'd be heartbroken (and broke) if i messed up. Looking at the MDF in the scrap pile, i figured it was a great thickness for a band block if my attempt worked, and could be shellacked and covered in foil to stand up to the steam of a test blocking run. I don't know, longterm, whether MDF makes much sense for non-prototype blocks, since it's basically like some super dense cardboard; it would probably warp and lose its structural integrity with the steam and pressure involved in heavy hatblock use.
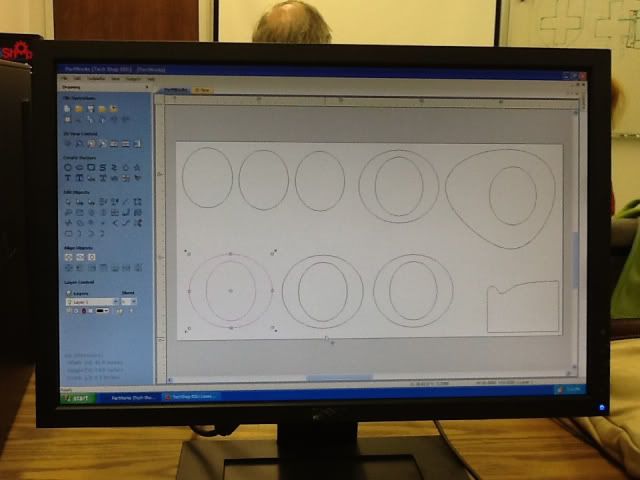
My first foray: band block ovals, symmetrical brims, and odd brims, all still in 2D.
Drawing these simple shapes took no time at all, literally a couple minutes. I had to tell the program what the dimensions of my material were, so after i did these doodles, i found my MDF and had to resize my canvas to fit its jankity dimensions (36.5 x 41 x 1.5, it was in a trash pile so nothing standard!).
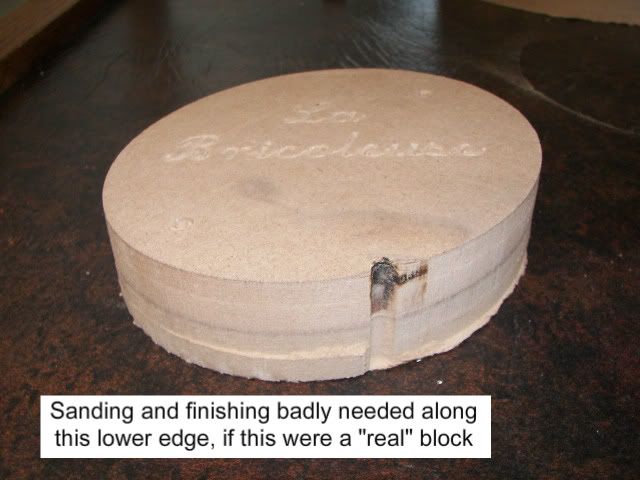
I decided ultimately to cut three band blocks--one standard oval, and two warped ovals to accommodate more egg-like head conforms. In the interest of experimenting with techniques and bits, i also elected to engrave "La Bricoleuse" in script in the center of each, using a V-shaped bit. I wanted to see how much extra time the addition of, say, a logo element to a product might add. I also decided to do three SUPER-RUDIMENTARY brim shapes, straight-up shapes which i could sand curvature into manually later if they turned out okay. (The ShopBot will sculpt curvatures and dome shapes and such into your product, but this was an intro class so that'll be something i check out in a future installment!)
We had to set the file up in 3D and tell it what toolpaths to use to cut the various elements: first, a hold-down run drilling pilot holes to screw down our material to the ShopBot's table surface, then my V-bit path for the lettering, then a third path for the actual cutting of the media. Since mine was so thick, it needed four passes to get through it!
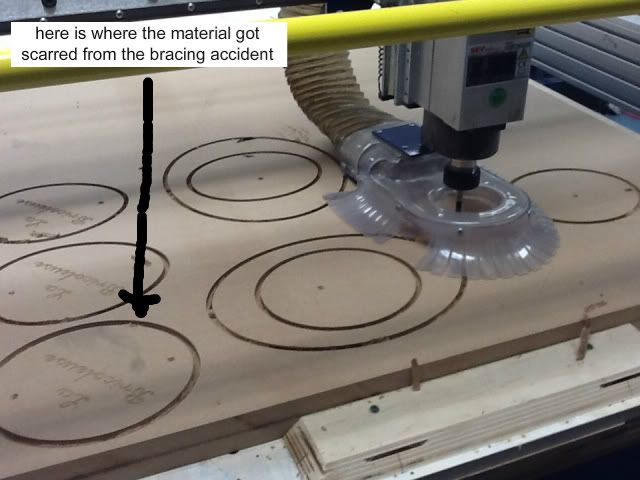
I wound up providing a learning moment for my classmates, when my anchor screws didn't make it deep enough into the table to hold my material, and partway through my first band block the ShopBot flipped out and dragged my media across the table. It was scary, but i was glad that i learned the "oh-shit" process well enough to stop the machine quickly and save my material and the bit itself. They say that you learn more from your screwups than your successes, and i definitely can say that i will now always use bracing boards to secure media as thick as mine when using that equipment!
Go ShopBot go!
I should say also, one of the things i find so inspiring about TechShop in general is the spirit of collaboration and learning and community inherent in its membership. Maybe there are some douchebags there but if so, i have yet to meet them. Every time i have been, in every class, people have been genuinely excited about one another's projects, and all of the instructors have encouraged students to contact them any time about any questions on future projects.
Even situations where i would imagine people ordinarily would not be terribly enthusiastic--like last night's class, which ran an hour and a half overtime and cut into this one guy's time using the ShopBot--they surprise me. Instead of just standing around waiting for us to finish up the class, the guy who was in line after us began contributing to the class, helping us with our projects and asking his own questions of the instructor. He said it was an opportunity to learn new things, not an irritation. What a great outlook!
Scar from the poorly-anchored media jumping the table.
I kept this one as a reminder of the learning moment.
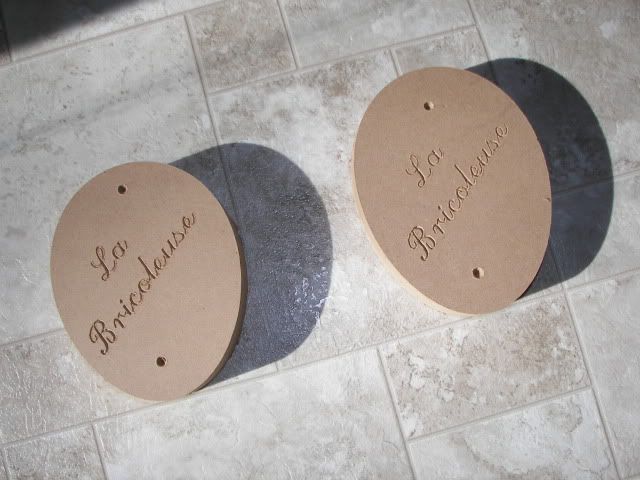
Band block prototypes from manipulated ovals.
Left: standard narrow-front "egg" conform.
Right: elongated slim conform.

Left: prototype for a top-hat brim flange.
Right: prototype for a 1920s cloche-crowned sun hat brim.
Prototype for a distorted wide brim.
It's clear to me from this first round of prototypes that where i really need to devote my time is in the design phase--pushing myself to learn more about how to get Inventor and PartWorks to do more sophisticated shaping from the get-go. The prototypes i've got could be sanded and shaped and finished, but they're rudimentary. They're embryonic hat blocks, possibility blocks.

Antique brim block on my flange stand by Mark DeCou.
Note the curvature along the edge which is absent from my first prototypes.
Sure, i could turn these prototypes into blocks like this one pictured above with a little elbow grease. But, the eventual goal is for ShopBot to turn these out for me based on CAD/CAM files i create, resulting in some nearly-finished blocks which just need a light finishing pass of sanding.
More as it happens, but for now, it's winter break. Happy holidays!
In the past i've posted about a range of options for addressing this issue, from conscripting everyday objects to serve as makeshift blocks, to hand-carving a block in stacked foam, to experiments with the rare blockmaking medium esparterie.
All of these methods are problematic, though. Blocking on a rigid object like a clay pot or ceramic vase is difficult because you can't pin into the base and there's no grooves for ropes to hold the felt in place. Hand-carving a foam block is extremely time-consuming, messy, and sculpturally challenging, not to mention that it means being in a particulate respirator for as long as it takes. And esparterie, well, if you find any for sale, you have lucked out at any price, and if--like me--you own a precious few sheets, you don't just use them up willy-nilly.
Because i'm always on the hunt for new approaches to traditional craftwork, I've begun a journey of experimentation with a new (or new to me, at least) way of creating block shapes using 3D CAD/CAM technology. CAD stands for Computer-Aided Design, and CAM stands for Computer-Aided Machining, so when you see that abbreviation of CAD/CAM, that really just means using computers to help you design and make something cool!
It first occurred to me that CAD/CAM hatblock production was possible back when i took some CAD classes through the College of Textiles at North Carolina State University--we were manipulating 2D pattern shapes for apparel, and 3D renderings of designs, and i found myself thinking about the possibilities for millinery in these technologies, the programs and the robots used to produce the patterns.
I'd begun talking about these possibilities with one of my professors there, but we needed funding for research and both of us had 203948 other responsibilities and besides the machines and software we would need to use were also in use by 34985 students in legitimate classes, and then the economy imploded and a lot of the kind of grants we would have wanted disappeared... My 3D CAD hat blocks went back into the realm of the someday, when i could get my hands on the right technology to begin to work on it.
Then, along came TechShop RDU. The short version is, they're kind of like a think-tank super-tech workshop-studio and inventors' social club, that you buy a membership to the way you do a gym. You can then have access to an enormous quantity of equipment and tools and software (provided you go through the proper Safety and Basic Use (SBU) class for each thing), and also plug into an incredibly creative and skilled group of fellow members. They've got everything from sets of standard screwdrivers and tape measures up to welding stations, woodworking powertools, screenprinting stations, a blacksmith forge, and a full computer lab with 3D software like Autodesk Inventor. They even have a sewing shop with industrial machines and computerized embroidery capabilities. I've posted about it before, and this December i finally had the chance (meaning, the time) to activate my membership and begin taking some classes specific to this hatblocking project.
One of the incredible benefits of membership at a TechShop is that you can take up to 12 hours of Autodesk Inventor software classes completely for free, no extra charge. (Many of the SBU classes have nominal tuition charges, presumably to pay the instructors and cover the materials used.) So, the first thing i did with my membership was to take 9 hours worth of those classes--enough to grasp the basics of 3D part drafting in Inventor. I have some long-term plans to do a series of block designs by this means, probably over the first 6 months of 2012.
But, you may be wondering, how do you go from a 3D design for a hat block, to the block itself?
That's where the ShopBot comes in. Basically, a ShopBot is like a robot assistant in the wood shop--if you can tell it what you want cut and carved, it'll do it. TechShop offers an 8-hour class which combines some CAD/CAM software instruction and guided drafting help with the standard ShopBot SBU certification.
ShopBot uses a kind of software called PartWorks, though you can import files from other drafting programs like Inventor, AutoCAD, Inkscape, Illustrator, etc. If you have any kind of familiarity with vector-based drawing programs, you can probably pick up PartWorks quickly. It was clear to me when i began fiddling with it, i could be prototyping very simple block shapes by the end of the night.
I decided to start as basic as basic can be: band blocks and maybe a brim or two. I went down to the scrap pile in the wood shop and found a likely-looking piece of 1.5"-thick medium-density fiberboard (MDF)--since this was to be my very first try at such a thing, i wasn't about to try using a more traditional blockmaker's wood like poplar, that i'd be heartbroken (and broke) if i messed up. Looking at the MDF in the scrap pile, i figured it was a great thickness for a band block if my attempt worked, and could be shellacked and covered in foil to stand up to the steam of a test blocking run. I don't know, longterm, whether MDF makes much sense for non-prototype blocks, since it's basically like some super dense cardboard; it would probably warp and lose its structural integrity with the steam and pressure involved in heavy hatblock use.

My first foray: band block ovals, symmetrical brims, and odd brims, all still in 2D.
Drawing these simple shapes took no time at all, literally a couple minutes. I had to tell the program what the dimensions of my material were, so after i did these doodles, i found my MDF and had to resize my canvas to fit its jankity dimensions (36.5 x 41 x 1.5, it was in a trash pile so nothing standard!).
I decided ultimately to cut three band blocks--one standard oval, and two warped ovals to accommodate more egg-like head conforms. In the interest of experimenting with techniques and bits, i also elected to engrave "La Bricoleuse" in script in the center of each, using a V-shaped bit. I wanted to see how much extra time the addition of, say, a logo element to a product might add. I also decided to do three SUPER-RUDIMENTARY brim shapes, straight-up shapes which i could sand curvature into manually later if they turned out okay. (The ShopBot will sculpt curvatures and dome shapes and such into your product, but this was an intro class so that'll be something i check out in a future installment!)
We had to set the file up in 3D and tell it what toolpaths to use to cut the various elements: first, a hold-down run drilling pilot holes to screw down our material to the ShopBot's table surface, then my V-bit path for the lettering, then a third path for the actual cutting of the media. Since mine was so thick, it needed four passes to get through it!
I wound up providing a learning moment for my classmates, when my anchor screws didn't make it deep enough into the table to hold my material, and partway through my first band block the ShopBot flipped out and dragged my media across the table. It was scary, but i was glad that i learned the "oh-shit" process well enough to stop the machine quickly and save my material and the bit itself. They say that you learn more from your screwups than your successes, and i definitely can say that i will now always use bracing boards to secure media as thick as mine when using that equipment!

Go ShopBot go!
I should say also, one of the things i find so inspiring about TechShop in general is the spirit of collaboration and learning and community inherent in its membership. Maybe there are some douchebags there but if so, i have yet to meet them. Every time i have been, in every class, people have been genuinely excited about one another's projects, and all of the instructors have encouraged students to contact them any time about any questions on future projects.
Even situations where i would imagine people ordinarily would not be terribly enthusiastic--like last night's class, which ran an hour and a half overtime and cut into this one guy's time using the ShopBot--they surprise me. Instead of just standing around waiting for us to finish up the class, the guy who was in line after us began contributing to the class, helping us with our projects and asking his own questions of the instructor. He said it was an opportunity to learn new things, not an irritation. What a great outlook!

Scar from the poorly-anchored media jumping the table.
I kept this one as a reminder of the learning moment.

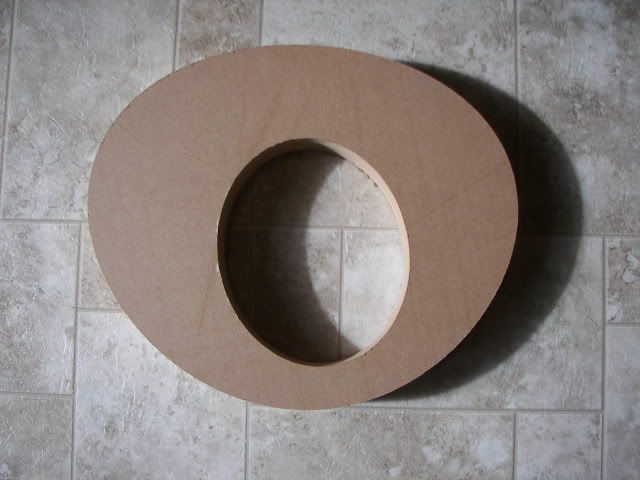
Band block prototypes from manipulated ovals.
Left: standard narrow-front "egg" conform.
Right: elongated slim conform.

Left: prototype for a top-hat brim flange.
Right: prototype for a 1920s cloche-crowned sun hat brim.

Prototype for a distorted wide brim.
It's clear to me from this first round of prototypes that where i really need to devote my time is in the design phase--pushing myself to learn more about how to get Inventor and PartWorks to do more sophisticated shaping from the get-go. The prototypes i've got could be sanded and shaped and finished, but they're rudimentary. They're embryonic hat blocks, possibility blocks.

Antique brim block on my flange stand by Mark DeCou.
Note the curvature along the edge which is absent from my first prototypes.
Sure, i could turn these prototypes into blocks like this one pictured above with a little elbow grease. But, the eventual goal is for ShopBot to turn these out for me based on CAD/CAM files i create, resulting in some nearly-finished blocks which just need a light finishing pass of sanding.
More as it happens, but for now, it's winter break. Happy holidays!