WTF Millinery, part two: Mrs. Ritter's costume hat w/kinetic bird ornament
I've just heard that the hat colloquially referred to as "the Big Mamajama" has landed in Williamstown, which means that i can post about it now. (Even when everyone gives me permission to write about a job, i consider it a courtesy to the designer and the rest of the creative team to wait until they've seen the work--i cringe when i hear about designers seeing their costumes for the first time via say, a forwarded Facebook link.)
For a refresher from my previous post on the topic, i have been acting as a long-distance milliner for the Williamstown Theatre Festival's upcoming production of The Torch-Bearers, with costumes designed by Ilona Somogyi. The hat in question is depicted in this costume rendering and accompanying research image:
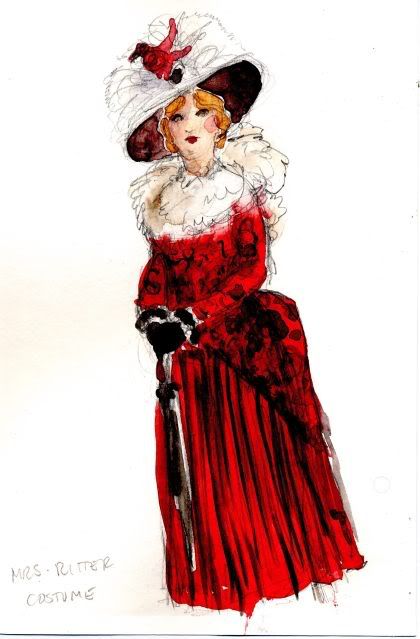
Costume rendering for "Mrs. Ritter" by Ilona Somogyi
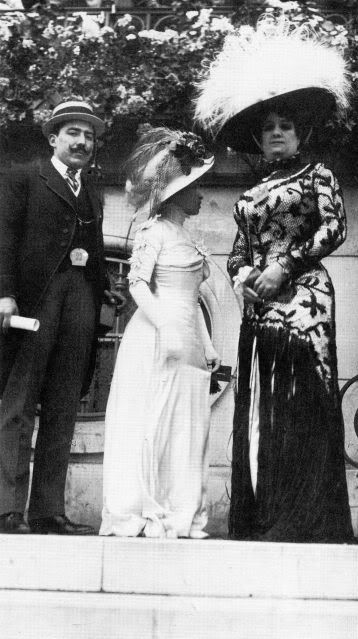
Period photo research image for "Mrs. Ritter" hat
The folks at WTF received my wired oaktag mockup for their first round of fittings and made some notations on it for me before shipping it back--they marked a new perimeter shape for the brim, bringing it in a bit so that the actress could fit through the needed doorways onstage (ha!), and adjusting the shape of the headsize opening by drawing the new needed shape on the tip of the crown. They also requested that i make the crown a dome rather than a cylinder.
With all that in mind, i began making the actual hat. The turnaround was quite fast on these, but i did still manage to get a few process shots to share and discuss.
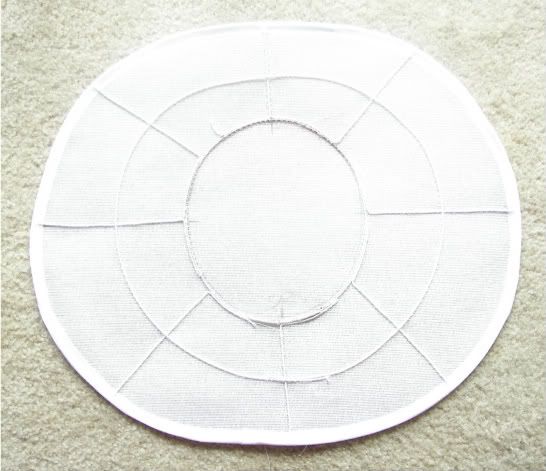
The first issue to consider was the support for a brim that size. The hat needed to remain as lightweight as possible, due to the amount of activity the actress wearing it is required to perform. I knew that none of the trim was going to be supported by the brim--it's all anchored to the crown--so the brim only needed to bear its own weight. I went with a heavy buckram reinforced with a "spiderweb" foundation structure of millinery wire.
If you look closely, you can also see that the edge is bound in French elastic, which is basically no-fold bias. By binding the edge this way before putting any fabric on, it gives the milliner some fabric to stitch into that's more delicate than buckram when attaching the cover, and serves as a buffer between the fashion fabric and the wired edge; it helps prevent a hard wire ridge being visible under the cover fabric at the brim's perimeter. It takes a hot second or two to zip some French-e on there, and wow, does it save you some trouble later.
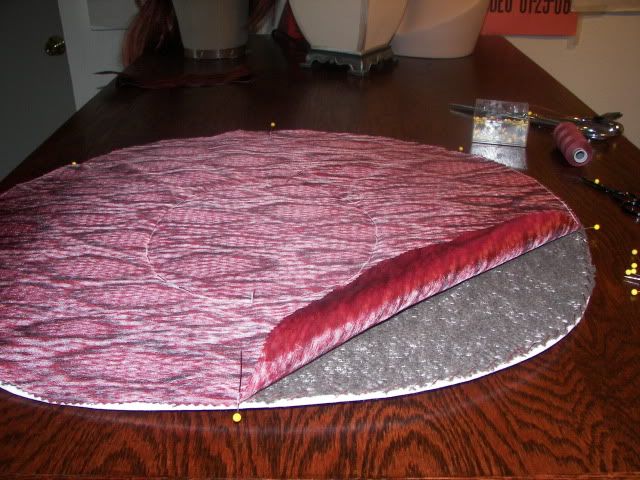
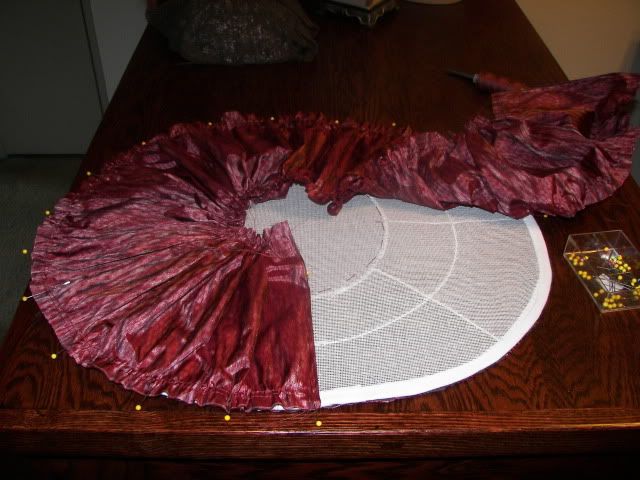
This image above shows the overbrim (the part of the brim that faces upward) after it has been covered in icewool (the grey stuff) but midway through being covered in the taffeta ikat which Ms. Somogyi chose for the hat. The icewool serves kind of the same function in millinery that flannel and haircanvas do in tailoring--it buffers between the lumpiness of the wired buckram and the smoothness of the cover fabric the way padstitched structure buffers between the lumpiness of the body and the smoothness of a fine tailored suitcoat's style lines. Kind of like French elastic for the rest of the hatbody!
Even though for this hat, no one would see any lumpiness of the wiring on the overbrim with that explosion of frippery, again it's a matter of a couple minutes' time to whip some icewool in, and allows for the potentiality of, say, a designer making a decision like "lose all the trim, i just want the hat bare with one feather." By putting the icewool in from the get-go, if the hat's trimming changes drastically in tech, it won't reveal a giant flaw in the hat's construction from cutting a corner that "no one will see." I always try to do hats for theatre with that idea in mind: some day, someone may have to take this mostly apart and "make it work," so everything should ideally be finished in such a way that that future milliner will go, "oh, thank EVERY TWINKLY STAR for whomever made this hat right in the first place!"
(Incidentally, i used dark icewool because it's what i had on-hand, not because it matters one way or the other on this hat--it comes in "black" and white, and you might choose to use the black (grey) with black buckram and black millinery wire for a black hat, especially if it was likely to be seen in UV lighting, but it doesn't matter really on a hat like this. It could have easily been white if that'd been what i pulled out of my stash in a big enough chunk.)
Above you can see the underbrim, which is the part of the brim that will be seen by the audience, and which i chose to do with a ruched covering. There's no icewool on the underbrim because the ruching is so dimensional i didn't think it needed any extra buffer in there, and i was trying to minimize brim weight wherever possible.
I always use those long yellow-headed pins so that i can see where they are to remove them. Don't want to accidentally leave a pin in a hat and hurt an actor or wardrobe staff member! It's a concern, too; i don't know how many older stage hats i've been in the process of retrimming and found ancient rusty pins inside of from ages past. (The smart milliner stays up to date on tetanus shots!)

Here's the underbrim all pinned into place, partly stitched down, but before i've trimmed and bias-bound the edge. You can see there in the center that what i did was gather a long rectangle of the widest needed width, and just let the ruching take care of itself when i secured it all around the headsize opening, rather than something like, trying to figure out what shape piece i would need to do a ruched brim that varied in width from front to side to back.
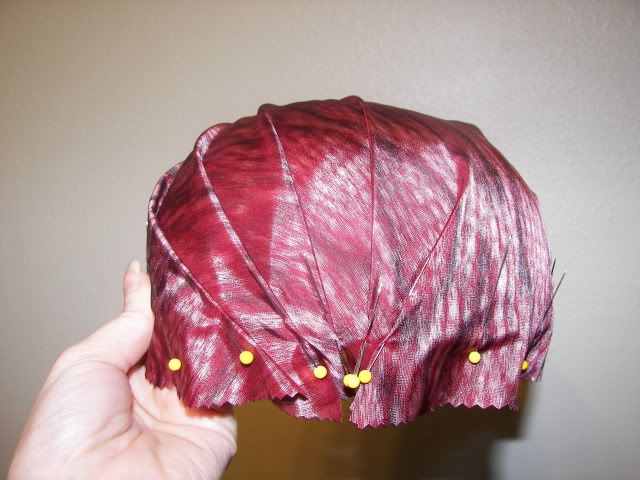
I'm a stickler for detail, so even though i knew no one would see the crown cover fabric on this hat, i still put these radiating pleats into it. They're a fairly easy and attractive way to cover a rounded crown, and then if in future anyone takes all the trim off this hat to retrim it, there's a nice base to start from, instead of some fugly poorly-done cover fabric hiding in there.
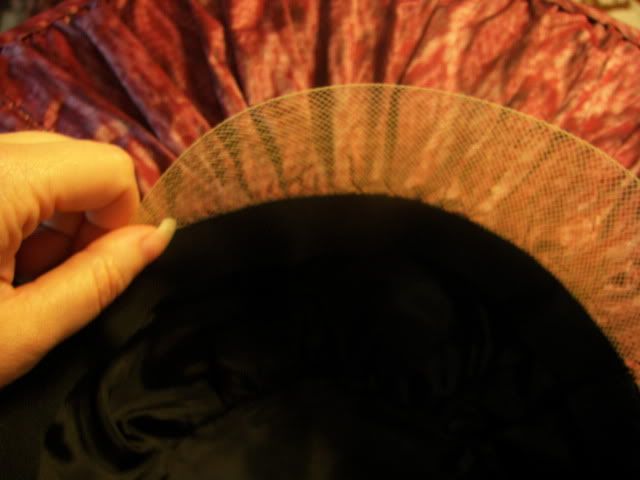
Above you can see the wide crescent of horsehair (sprayed to match the wig) that i've inserted between the hat and the lining, so that the hat can be secured to the actress' wig. A good dresser or wig tech can use that big flange of horsehair and a fistful of hairpins to make sure even a hat this giant isn't coming off, by pinning down through the wig into the pincurls under the wig cap. I always put a crescent like this one (or two, or three), rather than loops or "bowties" of horsehair, because these crescents are more stable than a loop or "bowtie" tacked in one or two places.
Okay, here's where it gets crazy: the design, clearly, has a huge bird on it. This hat is a "costume" hat for a play-within-a-play, and is supposed to be a comedy hat, a sight-gag. We talked about what that bird was, and determined that it should not look like a real bird, by any stretch of the imagination. It was, rather, a bird that was perhaps "made" by the character in the play, to trim out some crazy hat she found to look like a 1920s woman's idea of an 1890s woman's hat.
I found a period hat-trim resource from the 1920s which showed how to make "wings" from ribbon for just such a purpose, which you can download as a PDF here: http://www.savefile.com/files/2165990
I followed those "Mercury Wings" directions basically, to create two wings on wired buckram foundations (which i backed with the same taffeta ikat the hat's covered in), and mounted each wing on a separate single-wire "stand," thus:
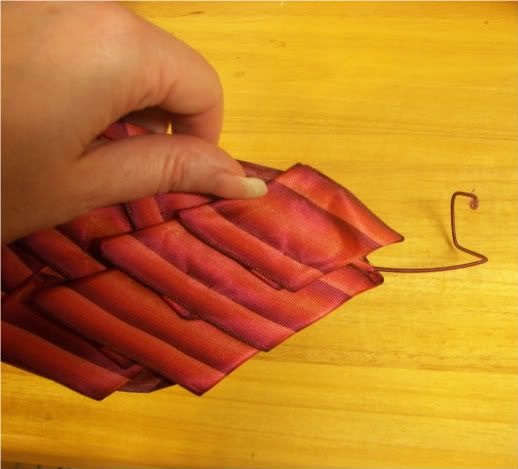
So, the little squarish part at the bottom is the base by which i stitched each wing to the hat, and which gave them a sturdy foundation from which to "flap." Whenever the actress takes a step, the wings, each on their own wire support, "flutter."
Here's the finished hat:
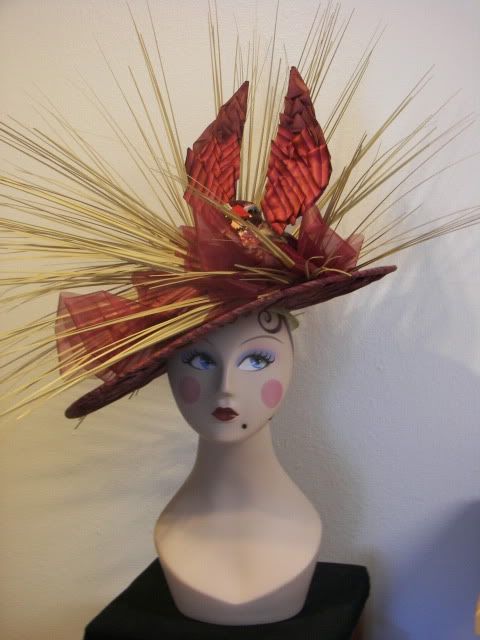
The bird's body is one of those cheesy little birds that you can get at a craft store to perch on a grapevine wreath or wire to the branch of a silk tree or whatever. Luckily, they had one in the perfect size and color scheme, and in the interest of weight-minimizing, i figured i couldn't get much lighter-weight than a styrofoam bird body. I did have to stick a long staple-shaped length of millinery wire through him to give him some "legs" so i could sew him onto the hat, and i tinted those leg-wires and the wing support wires burgundy to match the hat fabric, as you can see in the previous detail photo. In addition to the bird, there's about 2 lbs of fake oniongrass on there, and 10 yards of 5" wide organza ribbon.
Doesn't my mannequin gal look sassy in this concoction? I can only imagine how much sassier even it looks on the performer with her full costume!
For a refresher from my previous post on the topic, i have been acting as a long-distance milliner for the Williamstown Theatre Festival's upcoming production of The Torch-Bearers, with costumes designed by Ilona Somogyi. The hat in question is depicted in this costume rendering and accompanying research image:

Costume rendering for "Mrs. Ritter" by Ilona Somogyi

Period photo research image for "Mrs. Ritter" hat
The folks at WTF received my wired oaktag mockup for their first round of fittings and made some notations on it for me before shipping it back--they marked a new perimeter shape for the brim, bringing it in a bit so that the actress could fit through the needed doorways onstage (ha!), and adjusting the shape of the headsize opening by drawing the new needed shape on the tip of the crown. They also requested that i make the crown a dome rather than a cylinder.
With all that in mind, i began making the actual hat. The turnaround was quite fast on these, but i did still manage to get a few process shots to share and discuss.

The first issue to consider was the support for a brim that size. The hat needed to remain as lightweight as possible, due to the amount of activity the actress wearing it is required to perform. I knew that none of the trim was going to be supported by the brim--it's all anchored to the crown--so the brim only needed to bear its own weight. I went with a heavy buckram reinforced with a "spiderweb" foundation structure of millinery wire.
If you look closely, you can also see that the edge is bound in French elastic, which is basically no-fold bias. By binding the edge this way before putting any fabric on, it gives the milliner some fabric to stitch into that's more delicate than buckram when attaching the cover, and serves as a buffer between the fashion fabric and the wired edge; it helps prevent a hard wire ridge being visible under the cover fabric at the brim's perimeter. It takes a hot second or two to zip some French-e on there, and wow, does it save you some trouble later.

This image above shows the overbrim (the part of the brim that faces upward) after it has been covered in icewool (the grey stuff) but midway through being covered in the taffeta ikat which Ms. Somogyi chose for the hat. The icewool serves kind of the same function in millinery that flannel and haircanvas do in tailoring--it buffers between the lumpiness of the wired buckram and the smoothness of the cover fabric the way padstitched structure buffers between the lumpiness of the body and the smoothness of a fine tailored suitcoat's style lines. Kind of like French elastic for the rest of the hatbody!
Even though for this hat, no one would see any lumpiness of the wiring on the overbrim with that explosion of frippery, again it's a matter of a couple minutes' time to whip some icewool in, and allows for the potentiality of, say, a designer making a decision like "lose all the trim, i just want the hat bare with one feather." By putting the icewool in from the get-go, if the hat's trimming changes drastically in tech, it won't reveal a giant flaw in the hat's construction from cutting a corner that "no one will see." I always try to do hats for theatre with that idea in mind: some day, someone may have to take this mostly apart and "make it work," so everything should ideally be finished in such a way that that future milliner will go, "oh, thank EVERY TWINKLY STAR for whomever made this hat right in the first place!"
(Incidentally, i used dark icewool because it's what i had on-hand, not because it matters one way or the other on this hat--it comes in "black" and white, and you might choose to use the black (grey) with black buckram and black millinery wire for a black hat, especially if it was likely to be seen in UV lighting, but it doesn't matter really on a hat like this. It could have easily been white if that'd been what i pulled out of my stash in a big enough chunk.)

Above you can see the underbrim, which is the part of the brim that will be seen by the audience, and which i chose to do with a ruched covering. There's no icewool on the underbrim because the ruching is so dimensional i didn't think it needed any extra buffer in there, and i was trying to minimize brim weight wherever possible.
I always use those long yellow-headed pins so that i can see where they are to remove them. Don't want to accidentally leave a pin in a hat and hurt an actor or wardrobe staff member! It's a concern, too; i don't know how many older stage hats i've been in the process of retrimming and found ancient rusty pins inside of from ages past. (The smart milliner stays up to date on tetanus shots!)

Here's the underbrim all pinned into place, partly stitched down, but before i've trimmed and bias-bound the edge. You can see there in the center that what i did was gather a long rectangle of the widest needed width, and just let the ruching take care of itself when i secured it all around the headsize opening, rather than something like, trying to figure out what shape piece i would need to do a ruched brim that varied in width from front to side to back.

I'm a stickler for detail, so even though i knew no one would see the crown cover fabric on this hat, i still put these radiating pleats into it. They're a fairly easy and attractive way to cover a rounded crown, and then if in future anyone takes all the trim off this hat to retrim it, there's a nice base to start from, instead of some fugly poorly-done cover fabric hiding in there.

Above you can see the wide crescent of horsehair (sprayed to match the wig) that i've inserted between the hat and the lining, so that the hat can be secured to the actress' wig. A good dresser or wig tech can use that big flange of horsehair and a fistful of hairpins to make sure even a hat this giant isn't coming off, by pinning down through the wig into the pincurls under the wig cap. I always put a crescent like this one (or two, or three), rather than loops or "bowties" of horsehair, because these crescents are more stable than a loop or "bowtie" tacked in one or two places.
Okay, here's where it gets crazy: the design, clearly, has a huge bird on it. This hat is a "costume" hat for a play-within-a-play, and is supposed to be a comedy hat, a sight-gag. We talked about what that bird was, and determined that it should not look like a real bird, by any stretch of the imagination. It was, rather, a bird that was perhaps "made" by the character in the play, to trim out some crazy hat she found to look like a 1920s woman's idea of an 1890s woman's hat.
I found a period hat-trim resource from the 1920s which showed how to make "wings" from ribbon for just such a purpose, which you can download as a PDF here: http://www.savefile.com/files/2165990
I followed those "Mercury Wings" directions basically, to create two wings on wired buckram foundations (which i backed with the same taffeta ikat the hat's covered in), and mounted each wing on a separate single-wire "stand," thus:

So, the little squarish part at the bottom is the base by which i stitched each wing to the hat, and which gave them a sturdy foundation from which to "flap." Whenever the actress takes a step, the wings, each on their own wire support, "flutter."
Here's the finished hat:

The bird's body is one of those cheesy little birds that you can get at a craft store to perch on a grapevine wreath or wire to the branch of a silk tree or whatever. Luckily, they had one in the perfect size and color scheme, and in the interest of weight-minimizing, i figured i couldn't get much lighter-weight than a styrofoam bird body. I did have to stick a long staple-shaped length of millinery wire through him to give him some "legs" so i could sew him onto the hat, and i tinted those leg-wires and the wing support wires burgundy to match the hat fabric, as you can see in the previous detail photo. In addition to the bird, there's about 2 lbs of fake oniongrass on there, and 10 yards of 5" wide organza ribbon.
Doesn't my mannequin gal look sassy in this concoction? I can only imagine how much sassier even it looks on the performer with her full costume!