Making a textless icon
Yeah, making an icon with no text can be easy.. so those nifty little designs you see done on icons -- such as this one -- how is it done? The key word is "brushes". Its easy to click them onto a base and voila! But how do you turn an image INTO a brush?

For brushes made my others, you can download a large variety of them from 100x100_brushes. Good resource.. almost all my brushes are downloaded from that community. Its best if you use the imagepacks since it works with all types of programs.
For this icon, I used a brush by sugarplumkitten.

Open the brush image in PSP. Go to File > Export > Custom Brush. (Or Alt+F+T+C for keyboard shortcut.)
Fill in the spaces as followed. You can write in any name you`d like. I just chose the file name. The blank spaces are optional.

After you click OK, select the paint brush tool on the left panel, and search the drop-down menu on the tool options pallete for the filename you saved the brush as.

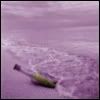
You are ready to use that image as a brush. For the icon, I used the following icon from my purple bases, but I cropped out the border so the image is 98x98. The border will be added later.
...
To achieve the grid effect into the icon, I made a new raster layer on the icon -- Layers > New Raster Layer. It should be filled in as followed, with the exception of the name that should be anything you want it to be.

You should have another layer on your original icon that could be labelled as "Raster 1" or "Background". Ermm.. my layers palette is sorta stuck to the right side so I couldn`t detach it. =P But this is how it should look.

Fill in the new layer completely black. Then click Effects > Texture Effects > Blinds...
Your icon which was black should look like this in the preview box and after you click OK. Make sure the settings are as followed:

Repeat the blinds effect, but this time, check the "horizontal" selection so it creates a grid. After clicking OK, your icon should look like the image in the box to the right.

On the layers palette, click the drop-down menu for the second raster layer (or whichever contains the just-made grid) and select "Soft Light".

The bar next to the menu is known as the opacity of the layer, play around with it till you get your desired effect. For my icon, I changed it to 30% and got this effect:

Repeat the raster layer step by clicking Layers > New Raster Layer on the same icon for a third layer. Now, you are ready to apply your brush. Select the paintbrush tool and the correct brush (as explained earlier in this tutorial). In the color palette, fill in the HTML box with #613663, and make sure its the "foreground and stroke color".

Remember to have the size at 100 so it won`t come out distorted. Line your cursor so the brush is even on all sides, and click once for the brush to appear.

And now.. to add the final touch: the border. Click Image > Add Border. Click OK in the Auto Actions box, and place the settings as followed for the icon.

Click OK and ta-da! You have your textless icon!
For brushes made my others, you can download a large variety of them from 100x100_brushes. Good resource.. almost all my brushes are downloaded from that community. Its best if you use the imagepacks since it works with all types of programs.
For this icon, I used a brush by sugarplumkitten.
Open the brush image in PSP. Go to File > Export > Custom Brush. (Or Alt+F+T+C for keyboard shortcut.)
Fill in the spaces as followed. You can write in any name you`d like. I just chose the file name. The blank spaces are optional.
After you click OK, select the paint brush tool on the left panel, and search the drop-down menu on the tool options pallete for the filename you saved the brush as.
You are ready to use that image as a brush. For the icon, I used the following icon from my purple bases, but I cropped out the border so the image is 98x98. The border will be added later.
...
To achieve the grid effect into the icon, I made a new raster layer on the icon -- Layers > New Raster Layer. It should be filled in as followed, with the exception of the name that should be anything you want it to be.
You should have another layer on your original icon that could be labelled as "Raster 1" or "Background". Ermm.. my layers palette is sorta stuck to the right side so I couldn`t detach it. =P But this is how it should look.
Fill in the new layer completely black. Then click Effects > Texture Effects > Blinds...
Your icon which was black should look like this in the preview box and after you click OK. Make sure the settings are as followed:
Repeat the blinds effect, but this time, check the "horizontal" selection so it creates a grid. After clicking OK, your icon should look like the image in the box to the right.
On the layers palette, click the drop-down menu for the second raster layer (or whichever contains the just-made grid) and select "Soft Light".
The bar next to the menu is known as the opacity of the layer, play around with it till you get your desired effect. For my icon, I changed it to 30% and got this effect:
Repeat the raster layer step by clicking Layers > New Raster Layer on the same icon for a third layer. Now, you are ready to apply your brush. Select the paintbrush tool and the correct brush (as explained earlier in this tutorial). In the color palette, fill in the HTML box with #613663, and make sure its the "foreground and stroke color".
Remember to have the size at 100 so it won`t come out distorted. Line your cursor so the brush is even on all sides, and click once for the brush to appear.
And now.. to add the final touch: the border. Click Image > Add Border. Click OK in the Auto Actions box, and place the settings as followed for the icon.
Click OK and ta-da! You have your textless icon!