Tutorial #1
From this 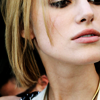
to this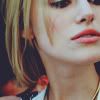
in Photoshop 6.0
~ Contains selective colouring and channel mixer.
~ .PSD available
~ Comments appreciated (:
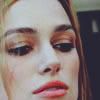
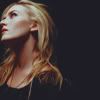
Other examples with varied settings:
1. Get your base and sharpen, blur etc. Whatever you want.
2. Add a new layer and fill with #582547 and set to Exclusion at 55%.
3. Duplicate your base, drag to the top and set to Darken 100%.
4. Add a new selective colouring layer and use the following settings:
REDS: -100 / +27 / +35 / 0
YELLOWS: +100 / 0 / -24 / 0
WHITES: 0 / 0 / 0 / -44
NEUTRALS: +1 / 0 / -6 / 0
BLACKS: 0 / 0 / 0 / +23
5. Add a new colour balance layer and use the following settings:
MIDTONES: +23 / +6 / -14
SHADOWS: -25 / -11 / -15
HIGHLIGHTS: -20 / -10 / +9
Make sure the Preserve Luminosity box is checked.
6. Add a new layer and fill with #181517 and set to Screen 100%.
7. Duplicate your base, drag to the top and set to Multiply 52%.
8. Add a new Hue/Saturation layer and up the Master saturation to +34.
9. Add a new layer and fill with #312D4F and set to Exclusion and FILL 38%.
10. Add a new Brightness/Contrast layer and set Brightness to +7 and Contrast to -7.
11. Finally add a Channel Mixer layer and use the following settings:
RED: +90 / +8 / -10
GREEN: +12 / +88 / -10
BLUE: +2 / +12 / +88
Set this layer to FILL 37%.
That's it! Remember to play around with the opacity a bit.
.PSD here. Please comment if you take!
to this
in Photoshop 6.0
~ Contains selective colouring and channel mixer.
~ .PSD available
~ Comments appreciated (:
Other examples with varied settings:
1. Get your base and sharpen, blur etc. Whatever you want.
2. Add a new layer and fill with #582547 and set to Exclusion at 55%.
3. Duplicate your base, drag to the top and set to Darken 100%.
4. Add a new selective colouring layer and use the following settings:
REDS: -100 / +27 / +35 / 0
YELLOWS: +100 / 0 / -24 / 0
WHITES: 0 / 0 / 0 / -44
NEUTRALS: +1 / 0 / -6 / 0
BLACKS: 0 / 0 / 0 / +23
5. Add a new colour balance layer and use the following settings:
MIDTONES: +23 / +6 / -14
SHADOWS: -25 / -11 / -15
HIGHLIGHTS: -20 / -10 / +9
Make sure the Preserve Luminosity box is checked.
6. Add a new layer and fill with #181517 and set to Screen 100%.
7. Duplicate your base, drag to the top and set to Multiply 52%.
8. Add a new Hue/Saturation layer and up the Master saturation to +34.
9. Add a new layer and fill with #312D4F and set to Exclusion and FILL 38%.
10. Add a new Brightness/Contrast layer and set Brightness to +7 and Contrast to -7.
11. Finally add a Channel Mixer layer and use the following settings:
RED: +90 / +8 / -10
GREEN: +12 / +88 / -10
BLUE: +2 / +12 / +88
Set this layer to FILL 37%.
That's it! Remember to play around with the opacity a bit.
.PSD here. Please comment if you take!