Tutorial 001: Dashed lines in GIMP
My first tutorial, so let me know if I make any mistakes! I don't know if this'll work in any program other than GIMP. You can try, though!
Warning: A bit image heavy.
This tutorial uses the Paths tool.
Step 1. Create a blank 100x100 canvas, filled with white.
Step 2. Click the Paths tool. It should be the first one in the second row.
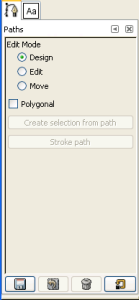
Step 3. Make sure "Design" is selected (see the picture at left).
Step 4. Click anywhere on your canvas.
Step 5. Move your mouse a little ways away from the first dot, and click again.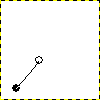
Step 6. Keep doing that until you have the line you want. The empty circle is the currently selected anchor. The black dot are the other anchors, unselected. If you want to make a new anchor, coming out from one of the black dots, simply click the black dot to select it. Then proceed as usual. Also, if you want to move an anchor, simply click and drag to the place you want the anchor to be. Then release. =)
Step 7. Ready to curve your line? (You can skip this step if you don't want a curvy line.) Place your cursor between two of the anchors and drag it out a little ways (example shown on another path I made). Play with it by moving it around until you like what you see.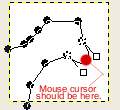
There's only one curve in my path here, but you can do more.
Step 8. Click Edit > Stroke Path.
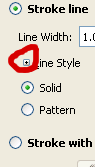
Step 9. In the window that pops up, click the little plus sign next to "Line Style." (I've circled it in red in the picture below.) The plus sign should turn into a minus sign once you click it, and then you'll see a whole bunch of other settings in the same window.
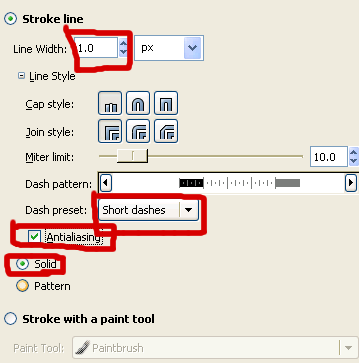
Step 10. Make sure your settings are now like that in the picture. More important settings are outlined in red. Line Width: 1 px. Dash preset: Short dashes. Antialiasing: checked. Solid or Pattern: Solid. You can play around with the settings if you want.
Step 11. Click Stroke. There you have it!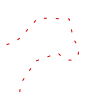
Optional steps below:
Let's say you want the dashes to be closer together. Undo your "Stroke Path" and follow steps 8, 9, and 10 again. But wait! See the dash pattern?
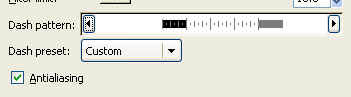
You can change your dash pattern in that little box. I'm going to make another little line of equal length right between that black dash and that gray dash. I've placed a couple of red dots in the picture as a guideline for you. Click a tiny bit to the right where the first red dot is. Then drag the mouse to the side, stopping when the black reaches the second red dot.

Your dash pattern should now look like this:

Your dash preset should have changed to "Custom," too.
Click Stroke.
Ta-da! (On another path I made.)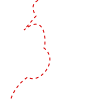
Play around with the settings and have fun! The dashed lines can also be used as a border for icons. When you go to stroke your icon, as usual, simply click the little plus sign and set your settings to whatever you want--the settings shown here will work fine, too!
Hope this makes sense and helps! Enjoy!
Warning: A bit image heavy.
This tutorial uses the Paths tool.
Step 1. Create a blank 100x100 canvas, filled with white.
Step 2. Click the Paths tool. It should be the first one in the second row.
Step 3. Make sure "Design" is selected (see the picture at left).
Step 4. Click anywhere on your canvas.
Step 5. Move your mouse a little ways away from the first dot, and click again.
Step 6. Keep doing that until you have the line you want. The empty circle is the currently selected anchor. The black dot are the other anchors, unselected. If you want to make a new anchor, coming out from one of the black dots, simply click the black dot to select it. Then proceed as usual. Also, if you want to move an anchor, simply click and drag to the place you want the anchor to be. Then release. =)
Step 7. Ready to curve your line? (You can skip this step if you don't want a curvy line.) Place your cursor between two of the anchors and drag it out a little ways (example shown on another path I made). Play with it by moving it around until you like what you see.
There's only one curve in my path here, but you can do more.
Step 8. Click Edit > Stroke Path.
Step 9. In the window that pops up, click the little plus sign next to "Line Style." (I've circled it in red in the picture below.) The plus sign should turn into a minus sign once you click it, and then you'll see a whole bunch of other settings in the same window.
Step 10. Make sure your settings are now like that in the picture. More important settings are outlined in red. Line Width: 1 px. Dash preset: Short dashes. Antialiasing: checked. Solid or Pattern: Solid. You can play around with the settings if you want.
Step 11. Click Stroke. There you have it!
Optional steps below:
Let's say you want the dashes to be closer together. Undo your "Stroke Path" and follow steps 8, 9, and 10 again. But wait! See the dash pattern?
You can change your dash pattern in that little box. I'm going to make another little line of equal length right between that black dash and that gray dash. I've placed a couple of red dots in the picture as a guideline for you. Click a tiny bit to the right where the first red dot is. Then drag the mouse to the side, stopping when the black reaches the second red dot.
Your dash pattern should now look like this:
Your dash preset should have changed to "Custom," too.
Click Stroke.
Ta-da! (On another path I made.)
Play around with the settings and have fun! The dashed lines can also be used as a border for icons. When you go to stroke your icon, as usual, simply click the little plus sign and set your settings to whatever you want--the settings shown here will work fine, too!
Hope this makes sense and helps! Enjoy!