Making chainmail
After the August LARP event, I decided to make my own armour. It took a while, but I think it turned out quite well. I took a lot of photos as I went along, to document the process; this is partly for my own future reference, and partly as a way to give something back, since I got a lot of useful guidance from other people on the internet.
Just to warn you, this is a long blog post, even by my standards!
Starting with terminology, there are various forms of metal armour. If you think about jousting knights (e.g. in A Knight's Tale), they wore plate armour: basically a big sheet of solid metal. Another option is scale armour, which is pretty much what it sounds like: lots of tiny plates which overlap each other. When I was little, I used to collect badges, and I wanted to try wearing all of them at once; if I'd pinned them to the same jumper, that would have approximated scale armour. (My mother vetoed this because it would have stretched out the jumper and made it unwearable afterwards; it probably works better if you have a more sturdy garment underneath, e.g. leather.)
Looking at Robin of Sherwood, the second Robin wore ringmail: a few big metal rings attached to a leather shirt, but not attached to each other. Meanwhile, the Sheriff of Nottingham's minions typically wore chainmail: lots of small metal rings attached to each other. In fact, "chainmail" is apparently the wrong term, and there are a lot of people who prefer to say "chain" or "mail" for historical accuracy. Unfortunately, that can get a bit confusing, e.g. my bike also has a chain and mail sounds as if someone's posting letters. So, I personally switch between terms depending on context.
At the Curious Pastimes LARP events, I belong to the Lions faction. Our background page says: "Early Crusades appearance - chainmail and leather armour rather than full plate". However, it is possible to mix and match between different types of armour. For instance, this discussion has some photos from the recent Narnia films: Peter and Caspian are wearing chainmail shirts but the pauldrons (shoulder pieces) are plate armour. I've seen a few of the Lions doing that. As a side note, Peter is also wearing a cloth tabard over the top of his metal shirt, and that's quite common: the tabard doesn't offer any extra protection, but it's an easy way to identify who's on which side.
There are various companies who sell pre-made shirts; Cap-à-pie seems to have the best reputation for quality amongst people I know, although they're also one of the more expensive companies. So, nobody needs to make their own armour, but there are a couple of advantages. Firstly, you can design it to be an exact fit, rather than S/M/L; if it's made out of metal then a snug fit means that it will be lighter, which is a significant consideration if you're wearing it all day! Also, it's a bit like bike maintenance: if you know how to build it then you can make repairs when you're out and about, e.g. if it gets damaged on a battlefield. (Even in LARP, you can get holes after a few days of fighting, so people who wear armour often keep pliers in their tent.) Beyond that, I think it's interesting, and I got a sense of achievement when I'd finished it. Quoting one of my favourite cards from Magic the Gathering (Improvised Armor): "I trust what I make for myself. Do you trust more what is made for you by another?"
Historically, mail would have been made of steel: this is strong, but it's also heavy. In LARP, a lot of people use aluminium, which is lighter but weaker; since we use latex weapons, the armour doesn't actually need to protect us from killing blows. I've seen a couple of people using titanium: as with aluminium, this isn't historically accurate, and it's the most expensive option, but it's both strong and light. (Again, it's surprising how much armour has in common with cycling!) In the Lord of the Rings films, they used plastic rings, but one of the guys who made that said that it was never intended to stand up to stuntmen fighting in it. Steel can rust, but there are ways to clean it, e.g. putting the shirt inside a sack full of sand and rolling it around. Aluminium tends to leave a grey residue on your hands/clothing, unless you get it blackened.
Looking at the CP rules, if you want your chainmail armour to count as "extra heavy" (able to withstand 4 hits) then it has to be made out of metal, but they don't specify which kind. Over on the forum, the referees clarified that: "A weave of 4 in 1 with 10 - 12mm rings is sufficient for ex heavy."
There are different weaves; this method means that each ring is connected to 4 others. Typically this would be European 4-in-1.
Each ring has a diameter and a gauge. If you imagine a big stack of rings with a rod through the middle of them, the inside diameter of each ring is the diameter of that rod. The smaller the diameter, the more rings you need to cover the same area, so the armour is stronger but it takes more work to make it. The gauge is related to the cross-sectional diameter, i.e. the thickness of the original metal wire before it was turned into rings. Looking at the ruling above, 10-12mm applies to the diameter rather than the gauge, and it's a maximum rather than a minimum.
Quoting from one guide (How to Make Chain Mail Armor from Start to Finish):
"The higher the gauge, the thinner and weaker the wire. In general, anything 16 gauge and lower is quality armor. 18 to 20 works but is weaker. Anything 22 or higher is very thin and really only good for costume strength chainmail and jewelry. The higher the gauge, the less expensive the wire becomes."
Looking at The Ring Lord, they list various gauges and wire thicknesses:
Gauge (ga)Diameter (mm)Diameter (inches)
122.40.09375
142.00.08
161.60.0625
181.20.048
191.00.04
200.80.032
I'm not sure what the formula is; there doesn't seem to be any obvious linear relationship.
If you want to make something from scratch, you have to decide how far back you're willing to go. For instance, I've baked my own bread using flour and butter that I bought from a supermarket, but I haven't tried grinding my own flour from wheat or churning my own butter. For armour, you can either buy pre-made rings or buy wire and turn it into rings yourself. This video explains how to make your own rings; he recommends 14ga steel wire, which would normally be used for electric fences:
However, if you go too far down that road then you wind up shaving a yak; in my case, I was a bit dubious about drilling a hole through a cylindrical metal rod without something going wrong. Since this was my first attempt at making armour, I decided to buy pre-made rings.
There are different ways to join rings together. Butted means that you pull the ends of the ring apart, then bend them back together again. Riveted means that the ends overlap, then you hammer a rivet (a triangular wedge) through both ends to join them together. I get the impression that people would typically use butted aluminium rings or riveted steel rings. Another option is welding: this is the strongest method, but it's also a lot more expensive. (The cheapest welding machine at The Ring Lord costs $450.) Riveting is the most historically accurate approach.
I found a discussion on the Diatribe forum (for New Zealand LARPers), where someone said:
"Yes, the rivets help massively. Several years ago I tested butted vs riveted mail and the strength difference is massive. With butted mail, you only have to apply enough force to wire to bend it. With riveted mail, you have to apply enough force to tear out the rivet, break or cut through the wire. Riveted is probably 20x stronger."
My current LARP character can't wear armour at all, so it's only useful to me if I'm "monstering" or if/when Cox dies. So, I decided to start out with a shirt for my nephew. Since he's a lot smaller than me, it's quicker to make a shirt that will fit him; I started in September, with a self-imposed deadline of December so that I could give him this shirt as a Christmas present. (I also wanted to show the finished shirt to other people at our faction banquet in early December.) I figured that if the project went well, I could then make my own shirt later, although that may have to wait until next winter. I chose butted aluminium for his shirt, but I'm tempted to use riveted steel for my own shirt. There were a few occasions where I had to backtrack after a mistake, i.e. separate rings that I'd joined together, and I think it's much easier to re-open butted rings than it would be to remove rivets.
Following a friend's example, I bought 10,000 rings from Armchair Armoury (aluminium alloy, round section). Each ring had an 8mm inside diameter and the wire was 1.6mm thick (16ga). So, the diameter matched the referee's ruling, and the gauge matched the advice on strength. The total mass of this bag was 1.7kg, so each ring is about 0.17g. Some people have made armour (and dresses!) out of ringpull tabs from canned drinks. If you have access to a large supply (e.g. recycling bins) then that could work well, but it would take me ages to get hold of thousands of those. As a happy side-effect, the alloy rings that I bought don't have the normal aluminium problem of leaving grey dust everywhere. (I'm not sure what the other metal in the alloy is.)
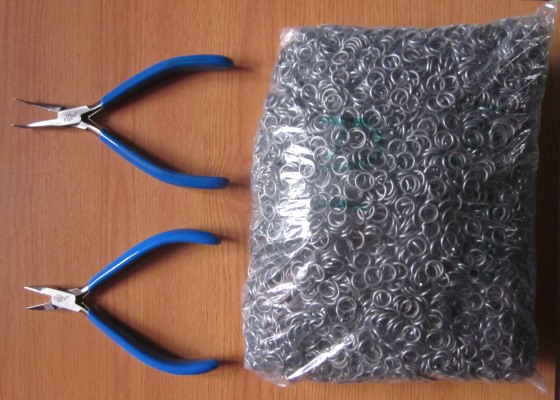
Soon after I bought the rings, I also bought 2 new pairs of pliers from Palmer Metals: Ultra Ergo Bent Nose and Ultra Ergo Flat Nose. I did have some pliers already, but none of them had springs. With these new pliers, I can squeeze to grip and then relax my hand to release, rather than needing both hands to open the pliers; that's particularly useful when I have a pair of pliers in each hand. Also, my existing pliers have "teeth" (a slightly serrated edge) where they grip other objects, so that would have left marks in the rings. I followed the advice in the UK Jewellers Collective Jewellery Forums: these were the budget option.
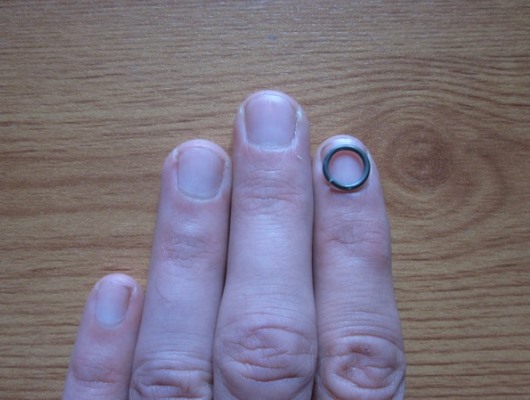
Here's the bag of rings along with both pairs of pliers; a single ring is about the size of my fingernail:
Think about how many rings it will take to cover an entire torso!
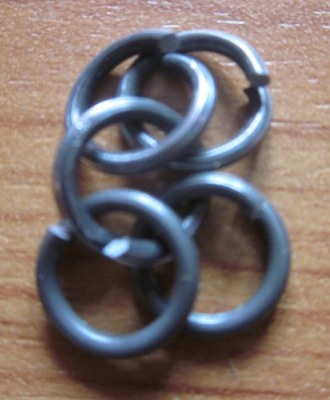
I mentioned the 4-in-1 weave, so my first step was to join 5 rings together with 1 ring in the centre. It's not quite obvious in the previous photo, but when I took the rings out of the bag the ends overlapped. I bent the ends away from each other to fit another ring inside, then bent the ends back together again, but it didn't look very neat:
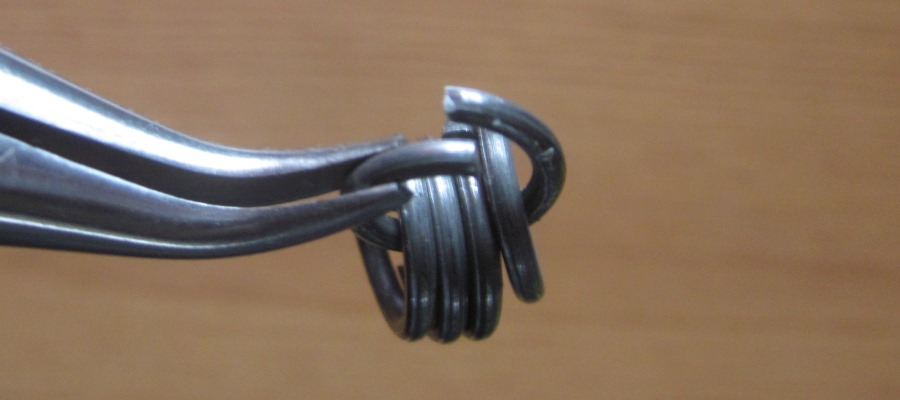
Incidentally, my original plan was to use the bent nose pliers the way I have them in that photo, i.e. running parallel to the ring so that I have as much metal in contact as possible. However, it turned out that this isn't very stable, and it's easy for the ring to slip out. Instead, I'd hold these pliers perpendicular to the ring (typically in my left hand), just keeping one end still, and then I'd use the flat nose pliers in my right hand to pull the other end back and forth. Unfortunately I don't have a photo of that, since I lacked a third hand to hold the camera!
Anyway, these rings obviously didn't look right. I wondered whether I was supposed to pull the ends apart (a bit like opening handcuffs) and then pull them back together. However, the correct approach is to bend one end of the ring past the other end: they're a bit springy, so it will try to go back where it started, and with practice I could get it to end up touching the other end. Since the ends "want" to overlap, this puts them under pressure, and that gives the ring its strength. It's not too hard to pull the ends apart with pliers (perpendicular to the circle), but it's a lot harder to pull them apart if you're going "in line" with the circle, so the weight of the connecting rings isn't going to make the whole thing fall apart.
This video (from Neural Culture) shows how to close a ring:
Edit: For some reason the start time isn't working properly for that video. The relevant section is 8m14s to 8m35s.
Here's the improved version of the 5-ring bunch, with a single ring off to the side to make it a bit clearer:
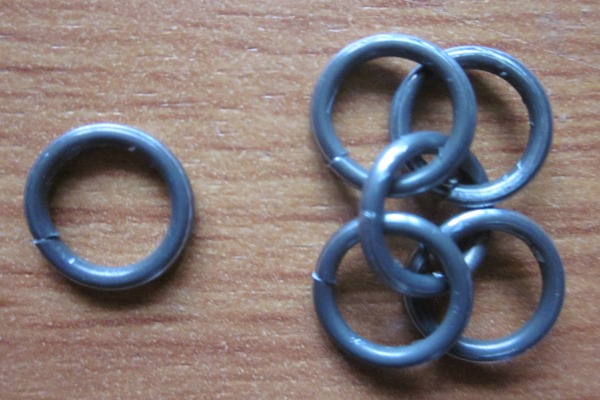
There's a slight "Pringle" effect to the closed rings, since I'm now trying to fit extra metal into the same space, but it's barely noticeable.
Once I'd done that, I made several more of these bunches. For each bunch, I closed 4 rings (so that they resembled washers), then opened a 5th ring and threaded the other 4 onto it (as in the pliers photo above), then closed that 5th ring. This "keyring" method is easier than trying to join the 5 rings together in their final position, because I can let 4 of them dangle out of the way while I focus on the 5th.
I suspect that people with Maths degrees may have an advantage here: they'd probably use phrases like "isomorphic topology". Basically, when you've joined rings together, there are several different patterns that you can arrange them in without actually breaking the links. So, you can swap between the keyring pattern and the pattern where all the rings are (mostly) flat and overlapping each other. However, you can't get the Olympic logo from this: you'd need to separate the rings and rejoin them.
Next, I had to join 2 bunches together, using an 11th ring. Here's the basic idea, showing before and after:
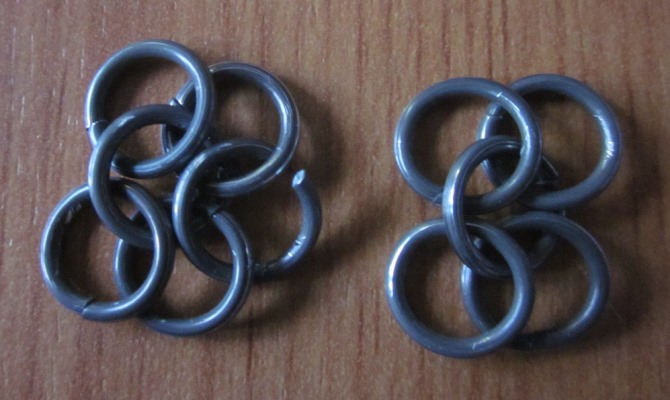
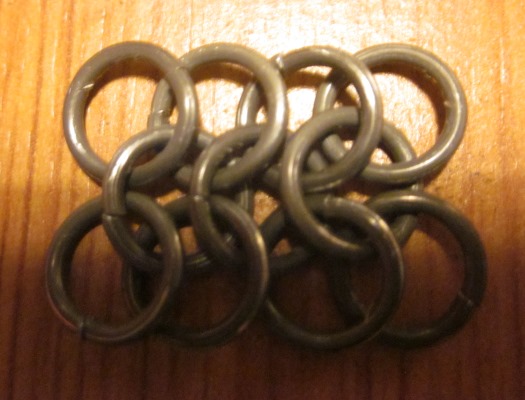
NB When the bunches are joined together, all the rings overlap in the same direction, giving a "grain". This is deliberate, and important. The idea is that if a sword hits the armour then it will slide along the surface rather than getting caught. (It also looks neater.)
The easiest approach would be to take 2 adjacent rings from the outside of each keyring, then join them together. Unfortunately, that doesn't work; it leads to a completely different shape.
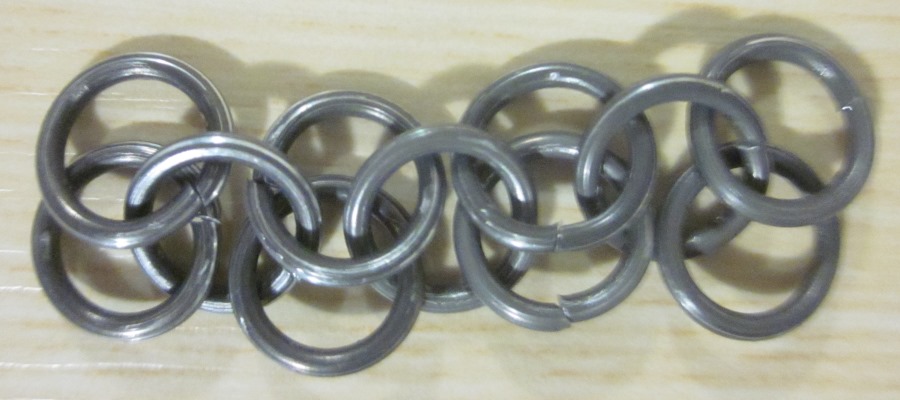
The best approach I found is to arrange each keyring with all the rings on the same side, and the 2 outer rings sticking out further than the inner 2; the inner 2 have to be pushed into the centre ring as far as they'll go. It's a bit snug, but that does leave enough space to put the 11th ring through the 4 outer rings:
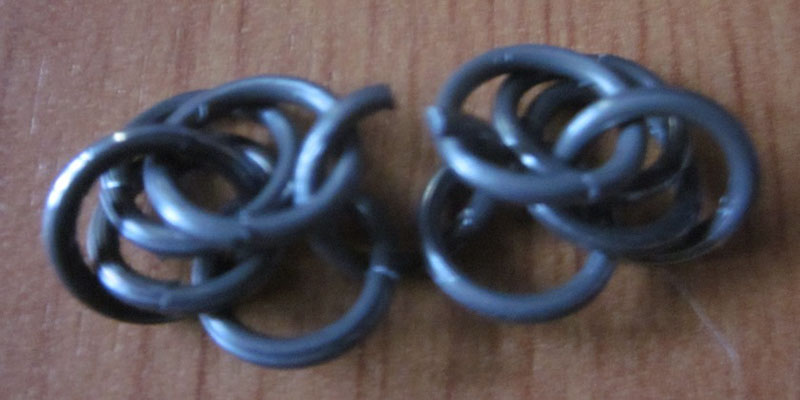
However, I got a bit confused when I ended up with a pattern like this:
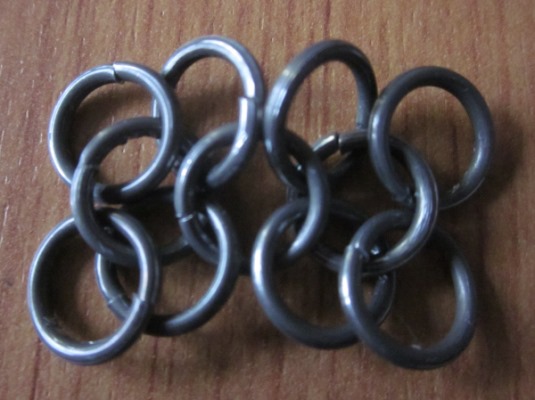
This looks wrong, because the rings are overlapping in opposite directions. When I saw this, I took out the middle ring, repositioned all the others, then tried again. Sometimes it worked, but sometimes I encountered the same problem again. I eventually realised that this pattern is correct, or rather the rings can be rearranged into the correct pattern without separating them. However, it's not quite as simple as just tilting some of the pairs, because the whole set will naturally "hang" a particular way if you hold it from the end. I'm sure there's an elegant solution, but my approach is to rattle the whole thing around between my hands as if I was shaking dice. I do that for about 10 seconds, then check to see whether it's fixed the problem; if not, I try again, and repeat as necessary. Once extra rings are joined to the end, the middle rings will stay put, i.e. they won't change alignment, so I only need to get it right once.
After I'd figured out how to join 2 bunches together, I moved up to 10:
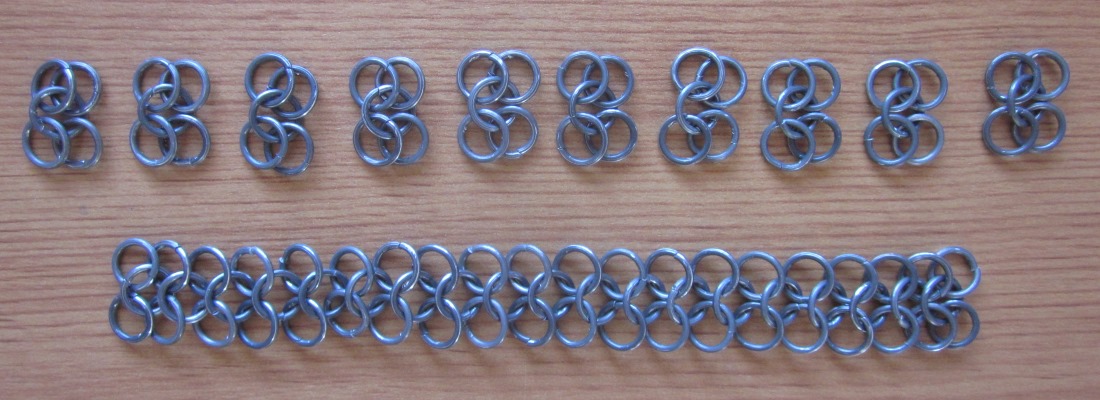
I'm not sure whether there's any standard terminology, but I refer to this combined set as a strip.
The top row has 10 bunches of 5 rings (50 in total).
The bottom row has 10 bunches of 5 with another 9 centre rings to join them together (59 total).
The next step is to join 2 strips (10 bunches of 5 rings) into a double width strip, using an extra line of rings in between.
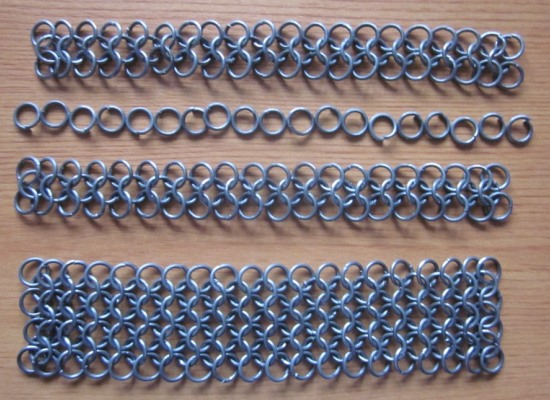
The combined strip at the bottom has 137 rings: (2 x 59) + 19.
On the whole, this was easier than joining 2 bunches of 5, because the rings were already hanging in the correct positions. However, as the sections get bigger, I need somewhere to put them. Some people set up knitting boards for this, i.e. a wooden frame with a line of pins along the top: that way, you can hang the end of a strip off the pins, and they'll stay put while you work on them. I think that would be easier than laying it out on my lap, but it also requires a suitable workspace, e.g. a workbench where you can lean the board against a wall. I don't have anywhere like that at the moment, so I just had to stick with what I've got. It worked ok, but I did have to move the strips around as I went.
Sometimes when I put on a (normal) shirt, I do up the buttons then get to the bottom and realise that I've run out on one side, i.e. there was a mismatch further up. So, I then have to undo all the subsequent buttons and do them up again. This is a minor inconvenience, but it's a lot more hassle if you make the same mistake with rings! I didn't have quite the same problem, i.e. I didn't get all the way to the bottom, but I did have to remove 2 rings and reattach them during my first attempt at joining 2 strips. So, I got into the habit of lifting up the chainmail after I'd joined each new ring to make sure that it looked correct; if it seemed to "clump" anywhere then that was a warning sign, and I'd look at each row carefully to see what doesn't match.
Taking the photo above as an example, I found that it was easiest to work from the right towards the left, so that each new centre ring would lie on top of the previous ring. I also turned the strips around so that they were vertical rather than horizontal as I worked on them, although I wanted the strips to eventually be horizontal. The basic idea is that if I made the strip long enough then it would go all the way around the body and then form a circle.
Looking online, Butted Mail: A Mailmaker's Guide says:
"It is extremely important that mail hangs correctly. If mail is hung incorrectly the links spread apart defeating the purpose of the armour. The diagram to the right shows how mail consists of rows of links (the arrows show the rows and the way the links in a given row lie). For mail to hang correctly the rows must be horizontal."
Similarly, Tyrail Goodman's Chain Mail Intro has a couple of diagrams, and says:
"Note in Fig.2 that the rings have a lip that can catch the tip of a sword in a downward stroke allowing the attacker to shove the sword into the fighter. This is not something that I would what to happen to me, how about you?"
However, Lindybeige has made a video to show the effect of hanging the chainmail in different directions:
According to him, it's better to hang the strips vertically so that it bunches together at the bottom. So, I may do it differently in my next shirt, but I kept the strips horizontal for this one.
Anyway, after I'd joined 2 strips together, I repeated this process, until I'd joined 8 strips together:
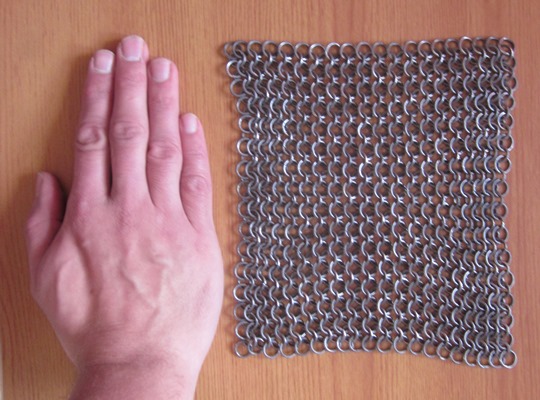
This has 605 rings: (8 x 59) + (7 x 19)
This is about 17-18cm wide and 19-20cm tall. There was a bit of "give" in it, particularly at the corners, so the width/height varied depending on where I measured it.
Each strip has 10 bunches, so I originally thought that I'd need 10 strips to form a square, but I stopped after 8 when I realised that it was already taller than it was wide.
I included my hand in that photo as a basis for comparison, but the eventual shirt was intended for a 6 year old child (i.e. the same amount of mail would cover a larger portion of his body). There are some sizes here for a 5-10 year old:
Chest Size: 65 cm.
Length from Shoulder: 50 cm.
That chest size is the overall circumference, i.e. the front and back should each be about 37cm wide. So, I predicted that I would need to join 4 of these sections together for the front, then add some extra bits for the "shoulder straps", then duplicate it all at the back.
I then made sections in a few different sizes so that I could compare them:
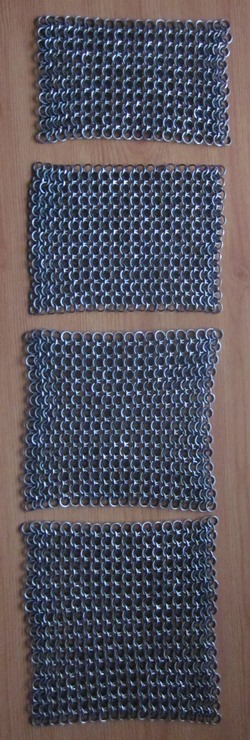
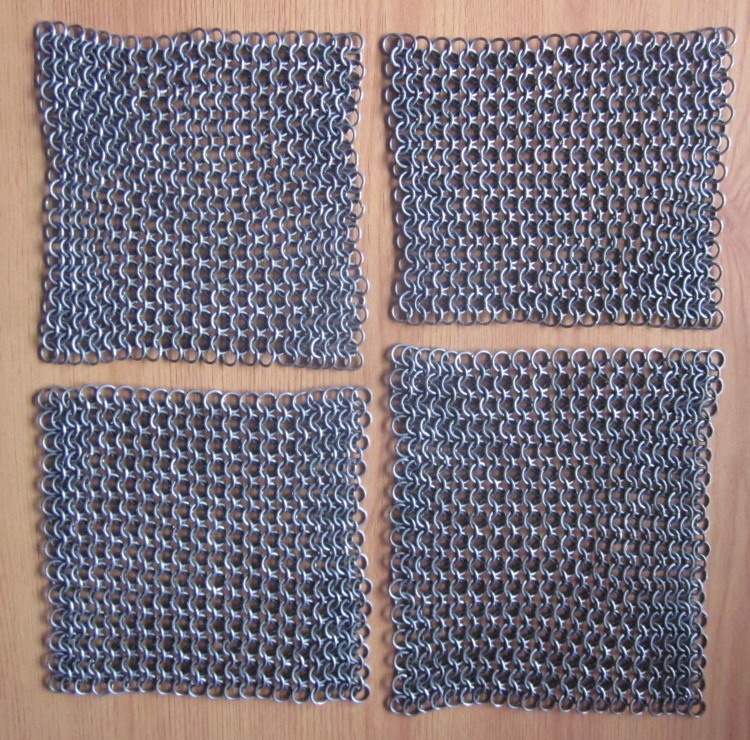
Every section is the same width (~= 17.5cm), since they all use strips of 10 bunches. However, they vary in height, depending on the number of strips. The left photo is based on a Steps song: 5 6 7 8! Measuring the heights:
* 5 strips ~= 12.0cm.
* 6 strips ~= 14.0cm.
* 7 strips ~= 16.5cm.
* 8 strips ~= 19.0cm.
Based on that, I'd say that the 7 strip section (2nd from bottom) is closest to a square.
The next step was to join 4 sections together into a bigger square. Looking at the right photo, the left side has 2 sections with 7 strips each, while the right side has 1 section with 6 strips (at the top) and 1 section with 8 strips (at the bottom). So, this is equivalent to 4 sections with 7 strips each.
I then joined the left/right sections together to make big rectangles, and joined those rectangles together to make a big square:
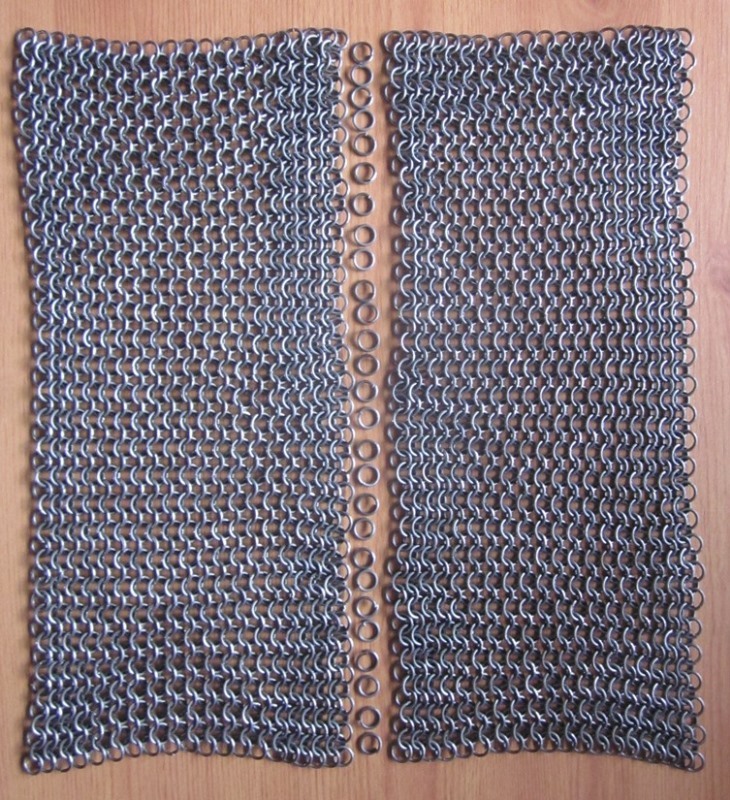
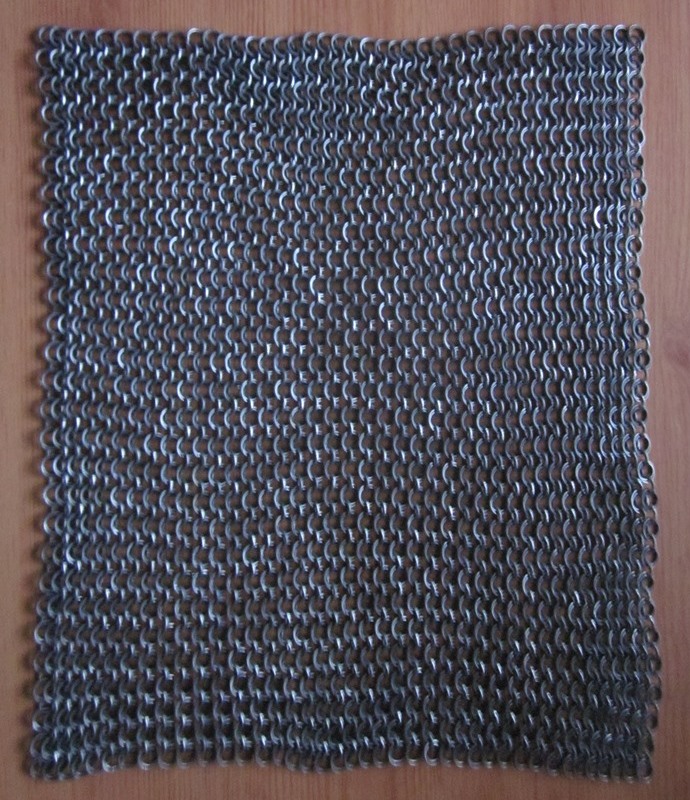
Each rectangle contained 14 strips, which is 1073 rings: (14 x 59) + (13 x 19).
I needed 27 rings to join these together: each strip was 2 rings thick, so each rectangle was 28 rings tall, and there were 27 gaps between these 28 rings.
So, the combined section contained 2173 rings: (2 x 1073) + 27.
It's about 36.5cm tall (top to bottom in this photo) and 31.0cm wide. So, it's not quite a square, but near enough for my purposes.
Joining the smaller sections into rectangles was fairly straightforward: it was the same technique that I used to join strips into sections. However, joining the rectangles into the big square was different, because I was working on a different axis. As I mentioned above, I rotated these sections around when I worked on them, so in this case I was joining sections top-to-bottom rather than left-to-right.
In fact, it was similar to creating a strip of 10 bunches. I hooked the new ring through the bottom 2 rings in the top rectangle, then through the top 2 rings in the bottom rectangle. For the bottom rectangle, it's equivalent to squeezing that strip together (folding in half) although I can't normally do that while it's attached to neighbouring strips. The key point is to put the new ring through the 2 rings in each rectangle in opposite direction: down through 1, up through the other, pinching them together.
As I worked across the rectangles (a bit like closing a zip), I found that it was best to roll up the joined section. Otherwise, if it draped down, it was heavier than the unjoined section that was still on my leg, and the whole lot would slide off onto the floor. (Again, a knitting board would presumably avoid this problem.)
Here's cuddly Cthulhu on top of the big square, just to give an idea of size:

This covered the main area for one side of the mail (front or back), but I now needed to decide exactly how big it was going to be. If I was making this for myself then I could simply try it on, to see whether it fit, but that's a bit more tricky for someone else (especially for a surprise gift). Looking at the photo of the Lance in my August LARP post, the red/blue thing they're wearing is called a gambeson. This is padded, so people normally wear this underneath chainmail. (Despite the cliché of a chainmail bikini, I think that wearing chainmail next to bare skin would be very uncomfortable, because it could pinch you when you move.) Within CP, the gambeson acts as light armour when you're not wearing chainmail, so you can get some protection without clanking around all day. In my nephew's case, I figured that his anorak would be a good substitute for a gambeson, so I measured that when he wasn't looking to get a rough idea of size.
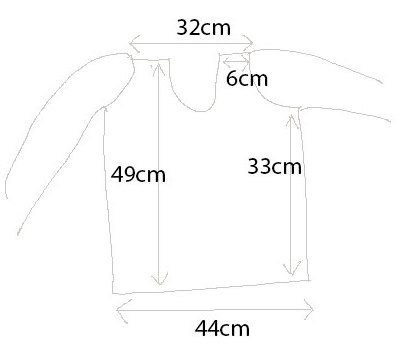
That's the back of the coat, so the bit in the top middle is the hood hanging down. The key measurements were:
* 32cm across shoulders, consisting of 6cm from each edge to the head and 20cm for the hood section.
* 44cm across lower back.
* 49cm top to bottom of coat.
* 16cm top to bottom of arm holes.
* 33cm bottom of arm holes to bottom of coat.
As a related issue, you need to consider overall body shape. The simplest approach (which I followed here) is to make the entire torso section a big tube, i.e. the same width from top to bottom. If your chest is bigger than your waist then it's a bit more tricky, because you will need to get your chest through the waist section when you pull it on. Unlike clothing, chainmail doesn't really stretch; there's a bit of "give", but not much. You may be able to get round that if you breathe out before you put it on, and make an effort to squeeze through. Another option is to design the shirt like a corset and tie it together at the back. If your waist is bigger than your chest then it should be easier. It is also possible to add/remove rings later, if your body changes shape.
Also, if you ignore the hood in the picture above, it's basically solid all the way across the back (between the shoulders). That's fine for a coat which zips up at the front, but I needed to allow space to actually fit the head through! Looking at some hat size charts, a child aged 3-10 has a head circumference of 20" (~= 51cm); this implies that the diameter is 16cm.
My big square was 31cm wide, and I wanted the main body of the shirt to be 44cm wide, so I needed to extend it by 13cm. At this point, I was still thinking in terms of my original sections (and rectangles), so I wanted to add 6cm on each side. 10 bunches of 5 rings (my original strips) are about 17.5cm long. 3 bunches ~= 5cm long, so I tried adding 3 bunches to each side of the bottom row. That came out at about 46-47cm wide, although it's hard to be certain because the corners can always stretch out a little bit and I didn't want to distort the shape. I tried 2 bunches on each side, which worked better; I then realised that I could simply add 4 bunches to the same side. That means that each row in the base section will have 24 bunches, i.e. 48 rings.
Looking back at the coat diagram, imagine that the hood is actually a dropped neck; that's basically the effect that I was aiming for. However, since the arm holes are 16cm tall, putting that dip in the front and the back would be a 32cm diameter, which is far bigger than I need for the head. So, I actually needed an asymmetric design, with a shallower dip in the middle than at the sides. Going 10cm down in the middle would be 20cm total, so that would match the "side to side" gap, and produce a circle. 10cm corresponds to 4 strips, i.e. 8 rows of rings with 7 connecting rows.
One complication here is that I have to have an integral number of rings in each row, so the head hole could actually end up with a jagged line rather than a smooth curve. (No sharp edges, I hasten to add, just not entirely neat.) I wound up drawing several diagrams, trying to work out the best number of rings in each row. I did this in Notepad, since it's fixed width, so I could represent rows like this: "xxxxxx". Graph paper might also be a good choice, so that you can shade in the relevant squares.
Here's my first shoulder strap:
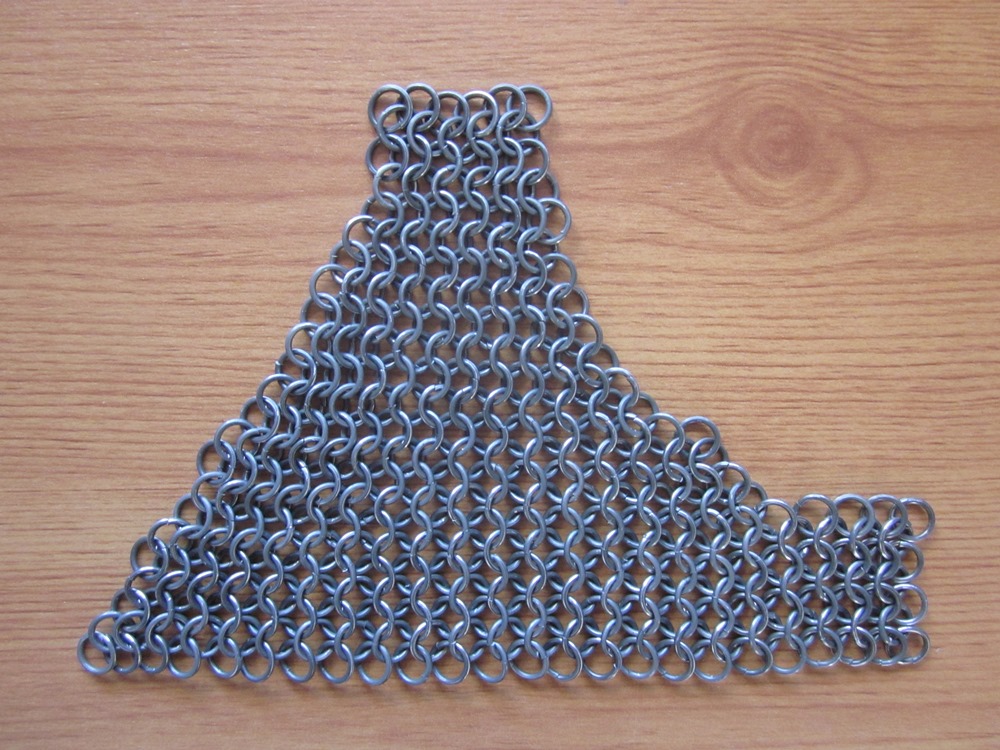
Comparing this to the coat diagram above, it would be on the left, i.e. the left of this photo is for the arm hole and the right is for the head gap. Since the rows are different widths, I can't use a 4-in-1 weave for all the rings. I need each ring to be connected to at least 2 others; ideally 3, but there's 1 ring on the right (6 rows from the bottom) which is flopping around a bit. However, if I removed it then that would create the same problem for the next ring along, etc.
This strap contains 324 rings. It's 24 rings wide at the base, and 6 rings wide at the top. That means that when the 2 straps join together, they will be 48 rings wide at the base, matching the lower section of the shirt.
Measuring this strap, here are the approximate dimensions:
* Base width = 21cm
* Top width = 5cm
* Total height = 15cm
* Right height = 11cm
That doesn't quite match the coat, but it's pretty close. Overall, this is slightly smaller, but the head hole is slightly deeper than I'd intended.
I made another shoulder strap (the mirror image) and an extra rectangle to extend the big square, then joined them all together:
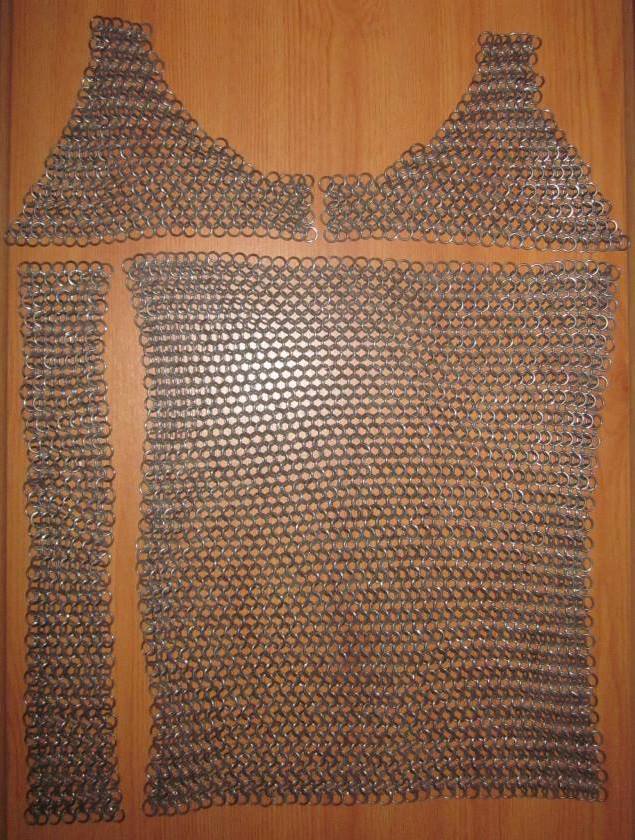
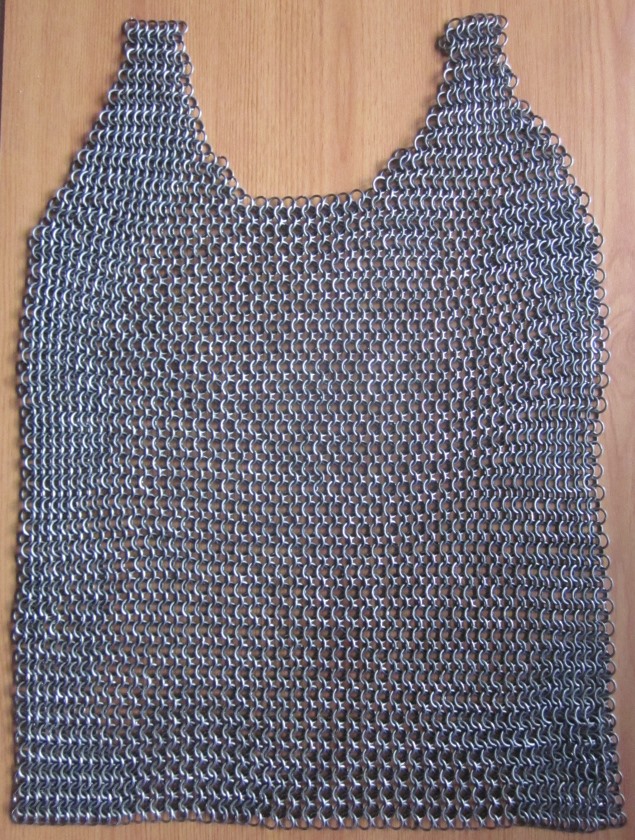
I think this is the point where it actually started to resemble a piece of clothing. Adding up the rings so far:
* The main section has 2173 rings.
* The extra column has 413 rings.
* Each shoulder strap has 324 rings, so the pair has 648 rings.
So, these pieces have 3234 rings between them. I then used an extra 77 rings to join these pieces together:
* 3 rings for the 2 shoulder straps (in the centre).
* 27 rings to join the new column to the big section.
* 47 rings to join the straps to the extended section.
So, this side has 3311 rings altogether.
Moving onto the other side, the base section was basically the same as before, except that this time I made each strip out of 12 bunches rather than 10. Similarly, I already had the design in place for the shoulder straps. Unfortunately, I was halfway through the final neck strap when I realised that I'd made a mistake, so I had to take it apart again.
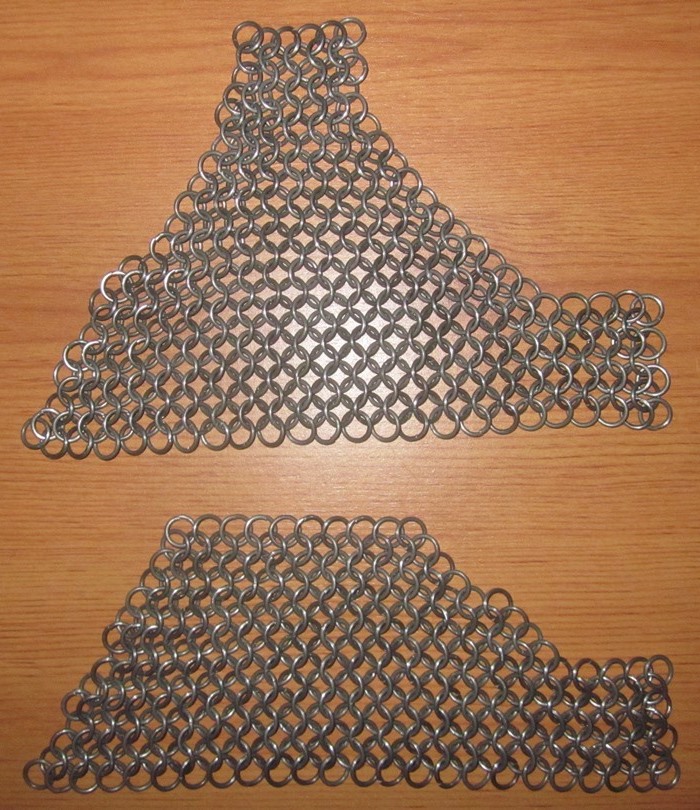
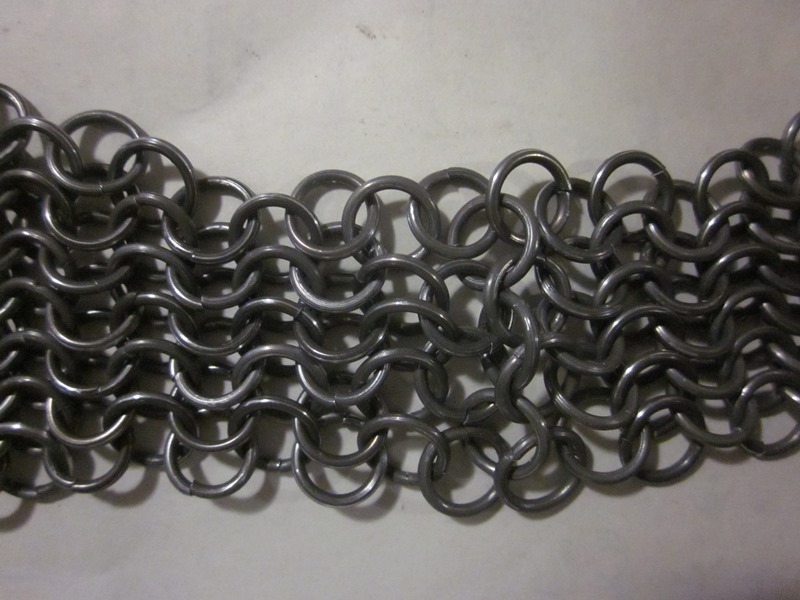
The problem is a bit subtle, so you need to know what to look for. Look closely at the bottom right corner of each strap. In the top strap, each ring overlaps the ring to the right. In the bottom strap, each ring overlaps the ring to the left. This grain needs to be consistent across the whole shirt, otherwise I'll run into problems when I join the pieces together.
You might think that it's ok because I need to flip the bottom strap over (so that the head gaps are together). However, they have rotational symmetry: if you spin them around the vertical axis, the rings still overlap in the same direction.
This probably happened because of the way I assembled the straps. As I mentioned before, when I join rows together I rotate them so that I'm going from top to bottom. In a situation like this, where the rows aren't equal in length, I found that it was easier if the bigger section was on the left; that might be because I'm right handed.
Anyway, I fixed the problem and completed the other side. So, I now had both sides ready to join together:
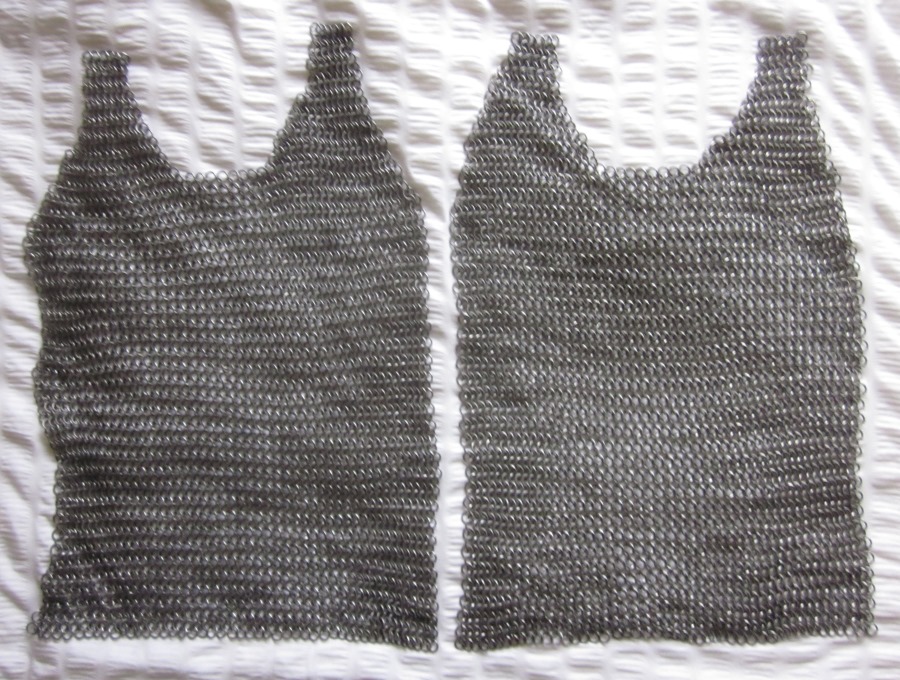
(Sorry for the poor photo - I couldn't fit both sides onto the wooden surface I was using before.)
Each side has 3311 rings, so that's 6622 rings altogether.
Joining these sides together vertically (from the armpit to the bottom) was pretty straightforward. However, I hit a snag when I tried to join the shoulder straps together:
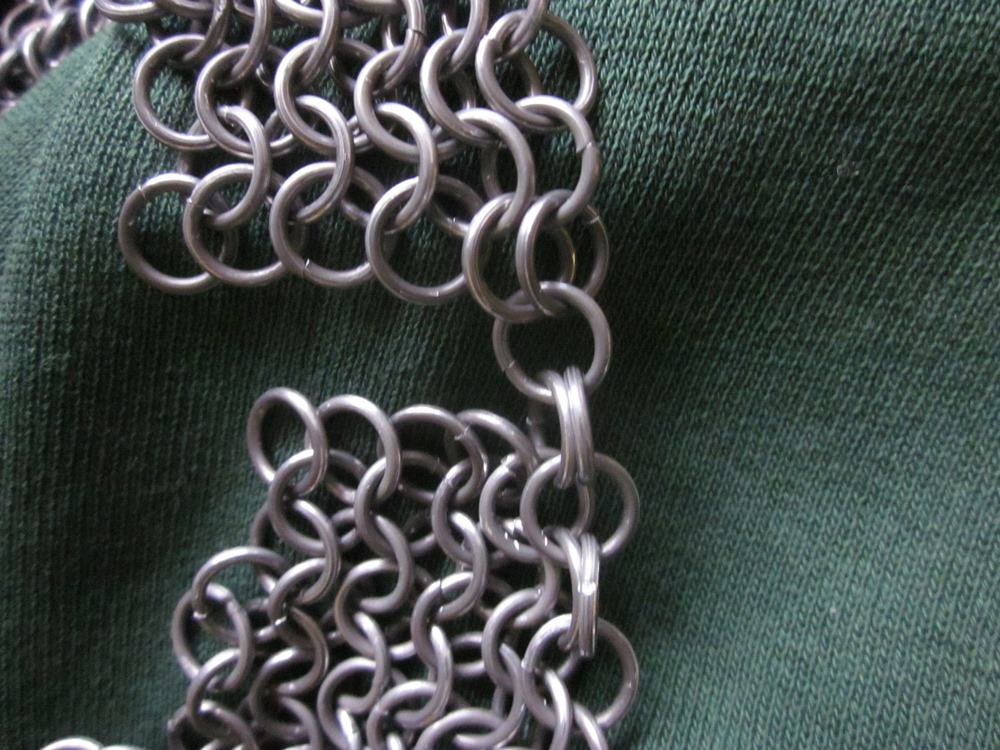
The problem here is that the "grain" of each side is going in opposite directions. In this photo, I've put in the first connecting ring. Now think about where the next ring would need to go, in order to fit through the 2nd/3rd rings from the right (top and bottom). In the top row, it would need to be in front of the first connecting ring, but on the bottom row it would need to be behind the first connecting ring, and I can't do both at once! If the problem isn't obvious, look at the connecting rings further up/down the photo, to see how they lie.
Other people advised me to make a "seam" for this, and I found some instructions online for a 90° seam and a 45° seam. In my case, I wanted a 90° seam, i.e. a section which is perpendicular to both straps.
You remember I mentioned that the easy way of joining bunches doesn't work, because then you wind up with the bunches being side by side instead of overlapping? Well, that's exactly what I wanted here. I tried a few different widths (3/4/5 pairs), but 4 pairs turned out to be the best fit:
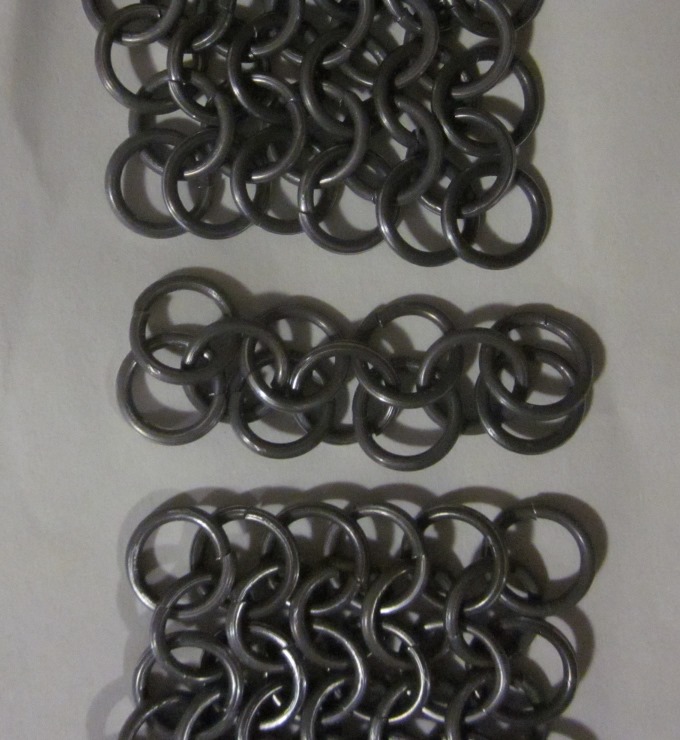
Although there are 6 rings at the end of each strap, they overlap, so 4 rings side by side in the seam takes up about the same space.
I then used 4 connecting rings to join the seam to one side of the shoulder strap:
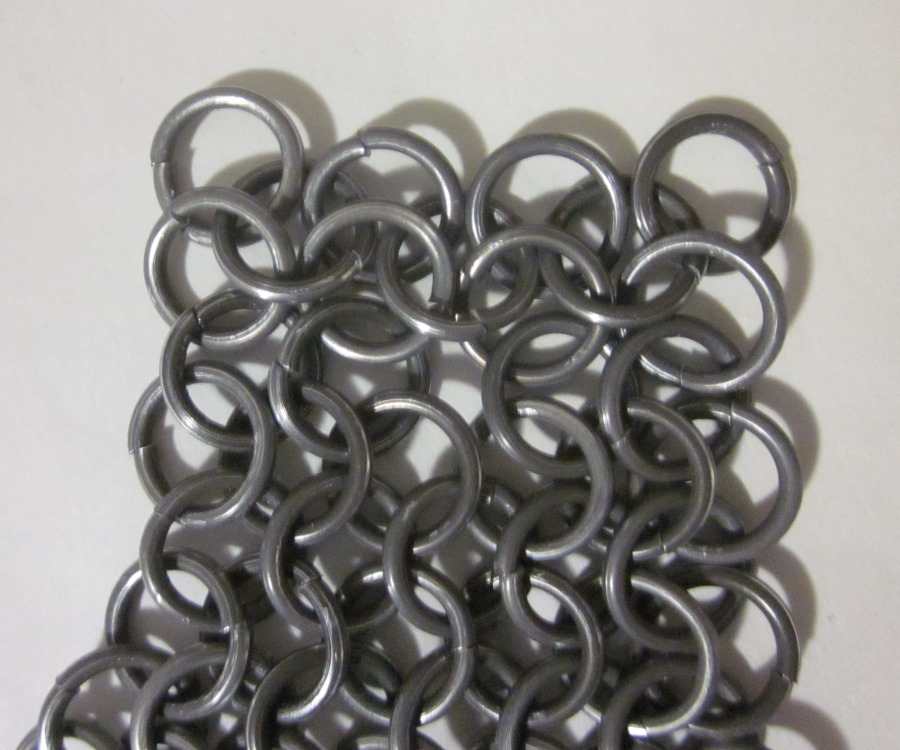
This is a slightly different technique to before, since each connecting ring is only connected to 3 other rings (rather than 4): 1 on the seam and 2 on the strap.
Here are both sides of the seam (4 connecting rings on each side):
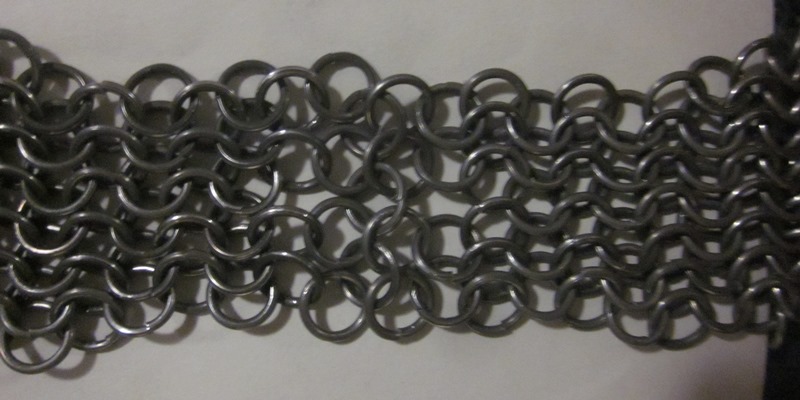
(Sorry if it's difficult to tell the rings apart. I've seen some tutorial sites that use different coloured rings for emphasis, but I didn't have enough spare time/metal for that.)
On the other shoulder strap, I tried using 5 connecting rings instead:
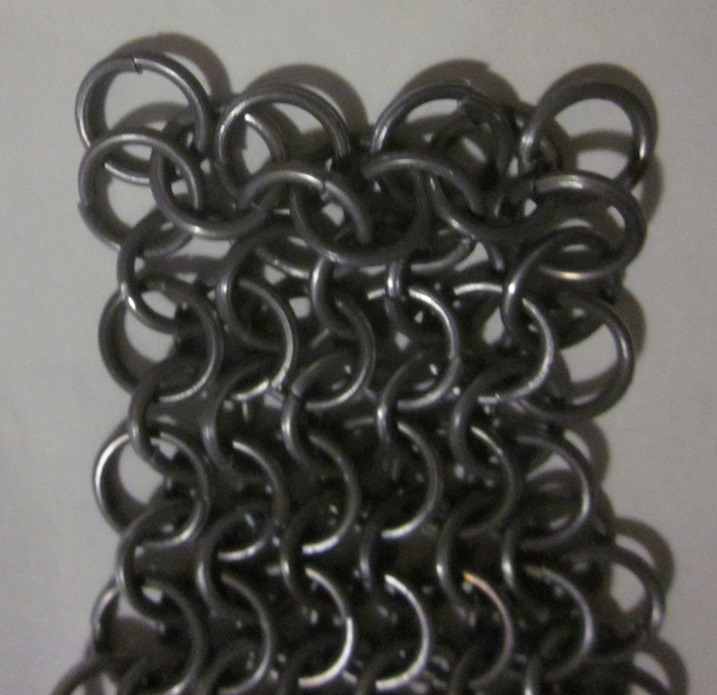
The middle connecting ring is connected to 4 rings rather than 3; this photo is a bit crowded, but it should hopefully make the whole thing a bit stronger, since these joins have to support the weight of the rest of the armour.
Similarly, I used 5 connecting rings on the other side, for symmetry:
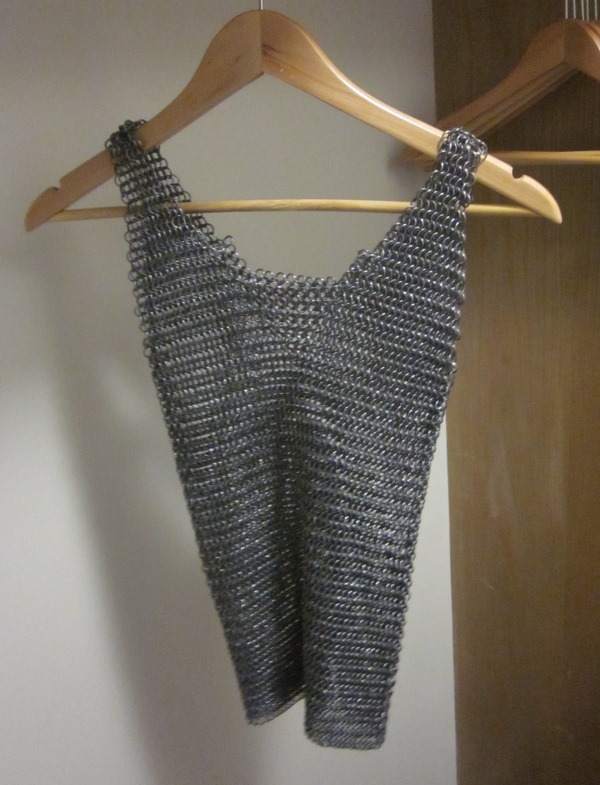
Here's the finished shirt, on a hanger and on my nephew:
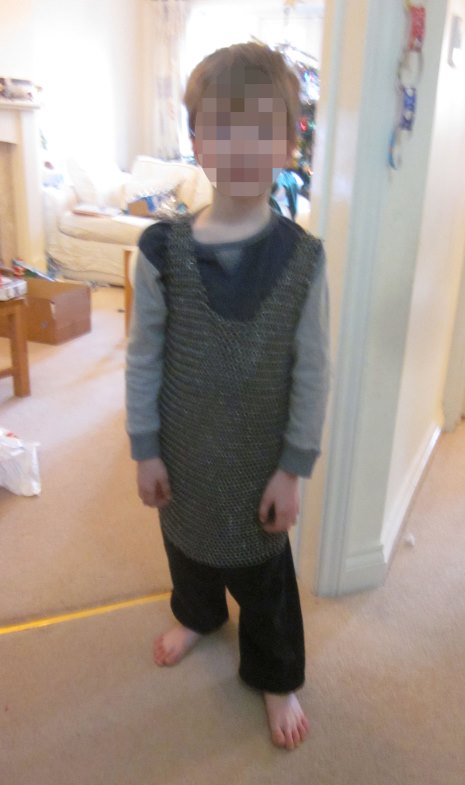
(I've blurred out his face to protect his privacy.)
There are different styles of chainmail shirts. A hauberk has sleeves, and it normally goes down to your thighs. A haubergeon is more like the length of a T-shirt, and may not have sleeves. This is a bit of a hybrid, mainly because I ran out of time to figure out how to do sleeves, so it has the length of a hauberk but the arms of a haubergeon. Really, it's more of a vest than a shirt. I think the neck dips may be a bit deeper than they really need to be, partly because I added the seam after I'd measured everything else. That will be less of a problem in the future, if I can measure the hole while I'm making it.
Final summary of rings:
* 3311 per side (x2 = 6622)
* 11 per shoulder seam (x2 = 22)
* 4 connecting rings per side on one shoulder (x2 = 8)
* 5 connecting rings per side on other shoulder (x2 = 10)
* 27 connecting rings on the left/right to join the 2 sides together (x2 = 54)
Grand total = 6716
Overall, it took me about 3 months to make: I spent a couple of hours on it every evening after I got home from work. I initially tried watching TV in the background while I made the mail, but that didn't work very well: I have to look at the rings, so I found that I wasn't really enjoying the programs/films (because I was distracted) and I was making slower progress with the mail. Instead, I listened to podcasts and audiobooks, and that worked out a lot better. It took me about 5 weeks to make the first big square (the section in the Cthulhu photo), but I got a bit faster with the next big square once I knew what I was doing, so I only slowed down again when I had to figure out how to do the shoulder straps.
On average, I'd say that it took me 1 minute per ring; it was quicker when I put together small clumps of 5 rings, but slower when I had to join big sections together. At a guess, if I'd been doing this as my full-time job (09:00-17:00, Mon-Fri), it would have taken me about a month. The rings cost £12 for 1000, so I needed to pay £84 for 7,000. (The pliers cost about £16, but I've subsequently used them for bike maintenance, and you may not need to buy them if you already have suitable tools at home.)
By contrast, Medieval Arms sell a child's shirt for £40 (zinc-plated steel, ages 5-10). So, it would have been cheaper and quicker to buy a pre-made shirt, and it would have included sleeves. I don't regret my choice, but it's something for other people to bear in mind before they start a project like this.
Just to warn you, this is a long blog post, even by my standards!
Starting with terminology, there are various forms of metal armour. If you think about jousting knights (e.g. in A Knight's Tale), they wore plate armour: basically a big sheet of solid metal. Another option is scale armour, which is pretty much what it sounds like: lots of tiny plates which overlap each other. When I was little, I used to collect badges, and I wanted to try wearing all of them at once; if I'd pinned them to the same jumper, that would have approximated scale armour. (My mother vetoed this because it would have stretched out the jumper and made it unwearable afterwards; it probably works better if you have a more sturdy garment underneath, e.g. leather.)
Looking at Robin of Sherwood, the second Robin wore ringmail: a few big metal rings attached to a leather shirt, but not attached to each other. Meanwhile, the Sheriff of Nottingham's minions typically wore chainmail: lots of small metal rings attached to each other. In fact, "chainmail" is apparently the wrong term, and there are a lot of people who prefer to say "chain" or "mail" for historical accuracy. Unfortunately, that can get a bit confusing, e.g. my bike also has a chain and mail sounds as if someone's posting letters. So, I personally switch between terms depending on context.
At the Curious Pastimes LARP events, I belong to the Lions faction. Our background page says: "Early Crusades appearance - chainmail and leather armour rather than full plate". However, it is possible to mix and match between different types of armour. For instance, this discussion has some photos from the recent Narnia films: Peter and Caspian are wearing chainmail shirts but the pauldrons (shoulder pieces) are plate armour. I've seen a few of the Lions doing that. As a side note, Peter is also wearing a cloth tabard over the top of his metal shirt, and that's quite common: the tabard doesn't offer any extra protection, but it's an easy way to identify who's on which side.
There are various companies who sell pre-made shirts; Cap-à-pie seems to have the best reputation for quality amongst people I know, although they're also one of the more expensive companies. So, nobody needs to make their own armour, but there are a couple of advantages. Firstly, you can design it to be an exact fit, rather than S/M/L; if it's made out of metal then a snug fit means that it will be lighter, which is a significant consideration if you're wearing it all day! Also, it's a bit like bike maintenance: if you know how to build it then you can make repairs when you're out and about, e.g. if it gets damaged on a battlefield. (Even in LARP, you can get holes after a few days of fighting, so people who wear armour often keep pliers in their tent.) Beyond that, I think it's interesting, and I got a sense of achievement when I'd finished it. Quoting one of my favourite cards from Magic the Gathering (Improvised Armor): "I trust what I make for myself. Do you trust more what is made for you by another?"
Historically, mail would have been made of steel: this is strong, but it's also heavy. In LARP, a lot of people use aluminium, which is lighter but weaker; since we use latex weapons, the armour doesn't actually need to protect us from killing blows. I've seen a couple of people using titanium: as with aluminium, this isn't historically accurate, and it's the most expensive option, but it's both strong and light. (Again, it's surprising how much armour has in common with cycling!) In the Lord of the Rings films, they used plastic rings, but one of the guys who made that said that it was never intended to stand up to stuntmen fighting in it. Steel can rust, but there are ways to clean it, e.g. putting the shirt inside a sack full of sand and rolling it around. Aluminium tends to leave a grey residue on your hands/clothing, unless you get it blackened.
Looking at the CP rules, if you want your chainmail armour to count as "extra heavy" (able to withstand 4 hits) then it has to be made out of metal, but they don't specify which kind. Over on the forum, the referees clarified that: "A weave of 4 in 1 with 10 - 12mm rings is sufficient for ex heavy."
There are different weaves; this method means that each ring is connected to 4 others. Typically this would be European 4-in-1.
Each ring has a diameter and a gauge. If you imagine a big stack of rings with a rod through the middle of them, the inside diameter of each ring is the diameter of that rod. The smaller the diameter, the more rings you need to cover the same area, so the armour is stronger but it takes more work to make it. The gauge is related to the cross-sectional diameter, i.e. the thickness of the original metal wire before it was turned into rings. Looking at the ruling above, 10-12mm applies to the diameter rather than the gauge, and it's a maximum rather than a minimum.
Quoting from one guide (How to Make Chain Mail Armor from Start to Finish):
"The higher the gauge, the thinner and weaker the wire. In general, anything 16 gauge and lower is quality armor. 18 to 20 works but is weaker. Anything 22 or higher is very thin and really only good for costume strength chainmail and jewelry. The higher the gauge, the less expensive the wire becomes."
Looking at The Ring Lord, they list various gauges and wire thicknesses:
Gauge (ga)Diameter (mm)Diameter (inches)
122.40.09375
142.00.08
161.60.0625
181.20.048
191.00.04
200.80.032
I'm not sure what the formula is; there doesn't seem to be any obvious linear relationship.
If you want to make something from scratch, you have to decide how far back you're willing to go. For instance, I've baked my own bread using flour and butter that I bought from a supermarket, but I haven't tried grinding my own flour from wheat or churning my own butter. For armour, you can either buy pre-made rings or buy wire and turn it into rings yourself. This video explains how to make your own rings; he recommends 14ga steel wire, which would normally be used for electric fences:
However, if you go too far down that road then you wind up shaving a yak; in my case, I was a bit dubious about drilling a hole through a cylindrical metal rod without something going wrong. Since this was my first attempt at making armour, I decided to buy pre-made rings.
There are different ways to join rings together. Butted means that you pull the ends of the ring apart, then bend them back together again. Riveted means that the ends overlap, then you hammer a rivet (a triangular wedge) through both ends to join them together. I get the impression that people would typically use butted aluminium rings or riveted steel rings. Another option is welding: this is the strongest method, but it's also a lot more expensive. (The cheapest welding machine at The Ring Lord costs $450.) Riveting is the most historically accurate approach.
I found a discussion on the Diatribe forum (for New Zealand LARPers), where someone said:
"Yes, the rivets help massively. Several years ago I tested butted vs riveted mail and the strength difference is massive. With butted mail, you only have to apply enough force to wire to bend it. With riveted mail, you have to apply enough force to tear out the rivet, break or cut through the wire. Riveted is probably 20x stronger."
My current LARP character can't wear armour at all, so it's only useful to me if I'm "monstering" or if/when Cox dies. So, I decided to start out with a shirt for my nephew. Since he's a lot smaller than me, it's quicker to make a shirt that will fit him; I started in September, with a self-imposed deadline of December so that I could give him this shirt as a Christmas present. (I also wanted to show the finished shirt to other people at our faction banquet in early December.) I figured that if the project went well, I could then make my own shirt later, although that may have to wait until next winter. I chose butted aluminium for his shirt, but I'm tempted to use riveted steel for my own shirt. There were a few occasions where I had to backtrack after a mistake, i.e. separate rings that I'd joined together, and I think it's much easier to re-open butted rings than it would be to remove rivets.
Following a friend's example, I bought 10,000 rings from Armchair Armoury (aluminium alloy, round section). Each ring had an 8mm inside diameter and the wire was 1.6mm thick (16ga). So, the diameter matched the referee's ruling, and the gauge matched the advice on strength. The total mass of this bag was 1.7kg, so each ring is about 0.17g. Some people have made armour (and dresses!) out of ringpull tabs from canned drinks. If you have access to a large supply (e.g. recycling bins) then that could work well, but it would take me ages to get hold of thousands of those. As a happy side-effect, the alloy rings that I bought don't have the normal aluminium problem of leaving grey dust everywhere. (I'm not sure what the other metal in the alloy is.)
Soon after I bought the rings, I also bought 2 new pairs of pliers from Palmer Metals: Ultra Ergo Bent Nose and Ultra Ergo Flat Nose. I did have some pliers already, but none of them had springs. With these new pliers, I can squeeze to grip and then relax my hand to release, rather than needing both hands to open the pliers; that's particularly useful when I have a pair of pliers in each hand. Also, my existing pliers have "teeth" (a slightly serrated edge) where they grip other objects, so that would have left marks in the rings. I followed the advice in the UK Jewellers Collective Jewellery Forums: these were the budget option.
Here's the bag of rings along with both pairs of pliers; a single ring is about the size of my fingernail:


Think about how many rings it will take to cover an entire torso!
I mentioned the 4-in-1 weave, so my first step was to join 5 rings together with 1 ring in the centre. It's not quite obvious in the previous photo, but when I took the rings out of the bag the ends overlapped. I bent the ends away from each other to fit another ring inside, then bent the ends back together again, but it didn't look very neat:


Incidentally, my original plan was to use the bent nose pliers the way I have them in that photo, i.e. running parallel to the ring so that I have as much metal in contact as possible. However, it turned out that this isn't very stable, and it's easy for the ring to slip out. Instead, I'd hold these pliers perpendicular to the ring (typically in my left hand), just keeping one end still, and then I'd use the flat nose pliers in my right hand to pull the other end back and forth. Unfortunately I don't have a photo of that, since I lacked a third hand to hold the camera!
Anyway, these rings obviously didn't look right. I wondered whether I was supposed to pull the ends apart (a bit like opening handcuffs) and then pull them back together. However, the correct approach is to bend one end of the ring past the other end: they're a bit springy, so it will try to go back where it started, and with practice I could get it to end up touching the other end. Since the ends "want" to overlap, this puts them under pressure, and that gives the ring its strength. It's not too hard to pull the ends apart with pliers (perpendicular to the circle), but it's a lot harder to pull them apart if you're going "in line" with the circle, so the weight of the connecting rings isn't going to make the whole thing fall apart.
This video (from Neural Culture) shows how to close a ring:
Edit: For some reason the start time isn't working properly for that video. The relevant section is 8m14s to 8m35s.
Here's the improved version of the 5-ring bunch, with a single ring off to the side to make it a bit clearer:

There's a slight "Pringle" effect to the closed rings, since I'm now trying to fit extra metal into the same space, but it's barely noticeable.
Once I'd done that, I made several more of these bunches. For each bunch, I closed 4 rings (so that they resembled washers), then opened a 5th ring and threaded the other 4 onto it (as in the pliers photo above), then closed that 5th ring. This "keyring" method is easier than trying to join the 5 rings together in their final position, because I can let 4 of them dangle out of the way while I focus on the 5th.
I suspect that people with Maths degrees may have an advantage here: they'd probably use phrases like "isomorphic topology". Basically, when you've joined rings together, there are several different patterns that you can arrange them in without actually breaking the links. So, you can swap between the keyring pattern and the pattern where all the rings are (mostly) flat and overlapping each other. However, you can't get the Olympic logo from this: you'd need to separate the rings and rejoin them.
Next, I had to join 2 bunches together, using an 11th ring. Here's the basic idea, showing before and after:


NB When the bunches are joined together, all the rings overlap in the same direction, giving a "grain". This is deliberate, and important. The idea is that if a sword hits the armour then it will slide along the surface rather than getting caught. (It also looks neater.)
The easiest approach would be to take 2 adjacent rings from the outside of each keyring, then join them together. Unfortunately, that doesn't work; it leads to a completely different shape.

The best approach I found is to arrange each keyring with all the rings on the same side, and the 2 outer rings sticking out further than the inner 2; the inner 2 have to be pushed into the centre ring as far as they'll go. It's a bit snug, but that does leave enough space to put the 11th ring through the 4 outer rings:

However, I got a bit confused when I ended up with a pattern like this:

This looks wrong, because the rings are overlapping in opposite directions. When I saw this, I took out the middle ring, repositioned all the others, then tried again. Sometimes it worked, but sometimes I encountered the same problem again. I eventually realised that this pattern is correct, or rather the rings can be rearranged into the correct pattern without separating them. However, it's not quite as simple as just tilting some of the pairs, because the whole set will naturally "hang" a particular way if you hold it from the end. I'm sure there's an elegant solution, but my approach is to rattle the whole thing around between my hands as if I was shaking dice. I do that for about 10 seconds, then check to see whether it's fixed the problem; if not, I try again, and repeat as necessary. Once extra rings are joined to the end, the middle rings will stay put, i.e. they won't change alignment, so I only need to get it right once.
After I'd figured out how to join 2 bunches together, I moved up to 10:

I'm not sure whether there's any standard terminology, but I refer to this combined set as a strip.
The top row has 10 bunches of 5 rings (50 in total).
The bottom row has 10 bunches of 5 with another 9 centre rings to join them together (59 total).
The next step is to join 2 strips (10 bunches of 5 rings) into a double width strip, using an extra line of rings in between.

The combined strip at the bottom has 137 rings: (2 x 59) + 19.
On the whole, this was easier than joining 2 bunches of 5, because the rings were already hanging in the correct positions. However, as the sections get bigger, I need somewhere to put them. Some people set up knitting boards for this, i.e. a wooden frame with a line of pins along the top: that way, you can hang the end of a strip off the pins, and they'll stay put while you work on them. I think that would be easier than laying it out on my lap, but it also requires a suitable workspace, e.g. a workbench where you can lean the board against a wall. I don't have anywhere like that at the moment, so I just had to stick with what I've got. It worked ok, but I did have to move the strips around as I went.
Sometimes when I put on a (normal) shirt, I do up the buttons then get to the bottom and realise that I've run out on one side, i.e. there was a mismatch further up. So, I then have to undo all the subsequent buttons and do them up again. This is a minor inconvenience, but it's a lot more hassle if you make the same mistake with rings! I didn't have quite the same problem, i.e. I didn't get all the way to the bottom, but I did have to remove 2 rings and reattach them during my first attempt at joining 2 strips. So, I got into the habit of lifting up the chainmail after I'd joined each new ring to make sure that it looked correct; if it seemed to "clump" anywhere then that was a warning sign, and I'd look at each row carefully to see what doesn't match.
Taking the photo above as an example, I found that it was easiest to work from the right towards the left, so that each new centre ring would lie on top of the previous ring. I also turned the strips around so that they were vertical rather than horizontal as I worked on them, although I wanted the strips to eventually be horizontal. The basic idea is that if I made the strip long enough then it would go all the way around the body and then form a circle.
Looking online, Butted Mail: A Mailmaker's Guide says:
"It is extremely important that mail hangs correctly. If mail is hung incorrectly the links spread apart defeating the purpose of the armour. The diagram to the right shows how mail consists of rows of links (the arrows show the rows and the way the links in a given row lie). For mail to hang correctly the rows must be horizontal."
Similarly, Tyrail Goodman's Chain Mail Intro has a couple of diagrams, and says:
"Note in Fig.2 that the rings have a lip that can catch the tip of a sword in a downward stroke allowing the attacker to shove the sword into the fighter. This is not something that I would what to happen to me, how about you?"
However, Lindybeige has made a video to show the effect of hanging the chainmail in different directions:
According to him, it's better to hang the strips vertically so that it bunches together at the bottom. So, I may do it differently in my next shirt, but I kept the strips horizontal for this one.
Anyway, after I'd joined 2 strips together, I repeated this process, until I'd joined 8 strips together:

This has 605 rings: (8 x 59) + (7 x 19)
This is about 17-18cm wide and 19-20cm tall. There was a bit of "give" in it, particularly at the corners, so the width/height varied depending on where I measured it.
Each strip has 10 bunches, so I originally thought that I'd need 10 strips to form a square, but I stopped after 8 when I realised that it was already taller than it was wide.
I included my hand in that photo as a basis for comparison, but the eventual shirt was intended for a 6 year old child (i.e. the same amount of mail would cover a larger portion of his body). There are some sizes here for a 5-10 year old:
Chest Size: 65 cm.
Length from Shoulder: 50 cm.
That chest size is the overall circumference, i.e. the front and back should each be about 37cm wide. So, I predicted that I would need to join 4 of these sections together for the front, then add some extra bits for the "shoulder straps", then duplicate it all at the back.
I then made sections in a few different sizes so that I could compare them:


Every section is the same width (~= 17.5cm), since they all use strips of 10 bunches. However, they vary in height, depending on the number of strips. The left photo is based on a Steps song: 5 6 7 8! Measuring the heights:
* 5 strips ~= 12.0cm.
* 6 strips ~= 14.0cm.
* 7 strips ~= 16.5cm.
* 8 strips ~= 19.0cm.
Based on that, I'd say that the 7 strip section (2nd from bottom) is closest to a square.
The next step was to join 4 sections together into a bigger square. Looking at the right photo, the left side has 2 sections with 7 strips each, while the right side has 1 section with 6 strips (at the top) and 1 section with 8 strips (at the bottom). So, this is equivalent to 4 sections with 7 strips each.
I then joined the left/right sections together to make big rectangles, and joined those rectangles together to make a big square:


Each rectangle contained 14 strips, which is 1073 rings: (14 x 59) + (13 x 19).
I needed 27 rings to join these together: each strip was 2 rings thick, so each rectangle was 28 rings tall, and there were 27 gaps between these 28 rings.
So, the combined section contained 2173 rings: (2 x 1073) + 27.
It's about 36.5cm tall (top to bottom in this photo) and 31.0cm wide. So, it's not quite a square, but near enough for my purposes.
Joining the smaller sections into rectangles was fairly straightforward: it was the same technique that I used to join strips into sections. However, joining the rectangles into the big square was different, because I was working on a different axis. As I mentioned above, I rotated these sections around when I worked on them, so in this case I was joining sections top-to-bottom rather than left-to-right.
In fact, it was similar to creating a strip of 10 bunches. I hooked the new ring through the bottom 2 rings in the top rectangle, then through the top 2 rings in the bottom rectangle. For the bottom rectangle, it's equivalent to squeezing that strip together (folding in half) although I can't normally do that while it's attached to neighbouring strips. The key point is to put the new ring through the 2 rings in each rectangle in opposite direction: down through 1, up through the other, pinching them together.
As I worked across the rectangles (a bit like closing a zip), I found that it was best to roll up the joined section. Otherwise, if it draped down, it was heavier than the unjoined section that was still on my leg, and the whole lot would slide off onto the floor. (Again, a knitting board would presumably avoid this problem.)
Here's cuddly Cthulhu on top of the big square, just to give an idea of size:

This covered the main area for one side of the mail (front or back), but I now needed to decide exactly how big it was going to be. If I was making this for myself then I could simply try it on, to see whether it fit, but that's a bit more tricky for someone else (especially for a surprise gift). Looking at the photo of the Lance in my August LARP post, the red/blue thing they're wearing is called a gambeson. This is padded, so people normally wear this underneath chainmail. (Despite the cliché of a chainmail bikini, I think that wearing chainmail next to bare skin would be very uncomfortable, because it could pinch you when you move.) Within CP, the gambeson acts as light armour when you're not wearing chainmail, so you can get some protection without clanking around all day. In my nephew's case, I figured that his anorak would be a good substitute for a gambeson, so I measured that when he wasn't looking to get a rough idea of size.

That's the back of the coat, so the bit in the top middle is the hood hanging down. The key measurements were:
* 32cm across shoulders, consisting of 6cm from each edge to the head and 20cm for the hood section.
* 44cm across lower back.
* 49cm top to bottom of coat.
* 16cm top to bottom of arm holes.
* 33cm bottom of arm holes to bottom of coat.
As a related issue, you need to consider overall body shape. The simplest approach (which I followed here) is to make the entire torso section a big tube, i.e. the same width from top to bottom. If your chest is bigger than your waist then it's a bit more tricky, because you will need to get your chest through the waist section when you pull it on. Unlike clothing, chainmail doesn't really stretch; there's a bit of "give", but not much. You may be able to get round that if you breathe out before you put it on, and make an effort to squeeze through. Another option is to design the shirt like a corset and tie it together at the back. If your waist is bigger than your chest then it should be easier. It is also possible to add/remove rings later, if your body changes shape.
Also, if you ignore the hood in the picture above, it's basically solid all the way across the back (between the shoulders). That's fine for a coat which zips up at the front, but I needed to allow space to actually fit the head through! Looking at some hat size charts, a child aged 3-10 has a head circumference of 20" (~= 51cm); this implies that the diameter is 16cm.
My big square was 31cm wide, and I wanted the main body of the shirt to be 44cm wide, so I needed to extend it by 13cm. At this point, I was still thinking in terms of my original sections (and rectangles), so I wanted to add 6cm on each side. 10 bunches of 5 rings (my original strips) are about 17.5cm long. 3 bunches ~= 5cm long, so I tried adding 3 bunches to each side of the bottom row. That came out at about 46-47cm wide, although it's hard to be certain because the corners can always stretch out a little bit and I didn't want to distort the shape. I tried 2 bunches on each side, which worked better; I then realised that I could simply add 4 bunches to the same side. That means that each row in the base section will have 24 bunches, i.e. 48 rings.
Looking back at the coat diagram, imagine that the hood is actually a dropped neck; that's basically the effect that I was aiming for. However, since the arm holes are 16cm tall, putting that dip in the front and the back would be a 32cm diameter, which is far bigger than I need for the head. So, I actually needed an asymmetric design, with a shallower dip in the middle than at the sides. Going 10cm down in the middle would be 20cm total, so that would match the "side to side" gap, and produce a circle. 10cm corresponds to 4 strips, i.e. 8 rows of rings with 7 connecting rows.
One complication here is that I have to have an integral number of rings in each row, so the head hole could actually end up with a jagged line rather than a smooth curve. (No sharp edges, I hasten to add, just not entirely neat.) I wound up drawing several diagrams, trying to work out the best number of rings in each row. I did this in Notepad, since it's fixed width, so I could represent rows like this: "xxxxxx". Graph paper might also be a good choice, so that you can shade in the relevant squares.
Here's my first shoulder strap:

Comparing this to the coat diagram above, it would be on the left, i.e. the left of this photo is for the arm hole and the right is for the head gap. Since the rows are different widths, I can't use a 4-in-1 weave for all the rings. I need each ring to be connected to at least 2 others; ideally 3, but there's 1 ring on the right (6 rows from the bottom) which is flopping around a bit. However, if I removed it then that would create the same problem for the next ring along, etc.
This strap contains 324 rings. It's 24 rings wide at the base, and 6 rings wide at the top. That means that when the 2 straps join together, they will be 48 rings wide at the base, matching the lower section of the shirt.
Measuring this strap, here are the approximate dimensions:
* Base width = 21cm
* Top width = 5cm
* Total height = 15cm
* Right height = 11cm
That doesn't quite match the coat, but it's pretty close. Overall, this is slightly smaller, but the head hole is slightly deeper than I'd intended.
I made another shoulder strap (the mirror image) and an extra rectangle to extend the big square, then joined them all together:


I think this is the point where it actually started to resemble a piece of clothing. Adding up the rings so far:
* The main section has 2173 rings.
* The extra column has 413 rings.
* Each shoulder strap has 324 rings, so the pair has 648 rings.
So, these pieces have 3234 rings between them. I then used an extra 77 rings to join these pieces together:
* 3 rings for the 2 shoulder straps (in the centre).
* 27 rings to join the new column to the big section.
* 47 rings to join the straps to the extended section.
So, this side has 3311 rings altogether.
Moving onto the other side, the base section was basically the same as before, except that this time I made each strip out of 12 bunches rather than 10. Similarly, I already had the design in place for the shoulder straps. Unfortunately, I was halfway through the final neck strap when I realised that I'd made a mistake, so I had to take it apart again.

The problem is a bit subtle, so you need to know what to look for. Look closely at the bottom right corner of each strap. In the top strap, each ring overlaps the ring to the right. In the bottom strap, each ring overlaps the ring to the left. This grain needs to be consistent across the whole shirt, otherwise I'll run into problems when I join the pieces together.
You might think that it's ok because I need to flip the bottom strap over (so that the head gaps are together). However, they have rotational symmetry: if you spin them around the vertical axis, the rings still overlap in the same direction.
This probably happened because of the way I assembled the straps. As I mentioned before, when I join rows together I rotate them so that I'm going from top to bottom. In a situation like this, where the rows aren't equal in length, I found that it was easier if the bigger section was on the left; that might be because I'm right handed.
Anyway, I fixed the problem and completed the other side. So, I now had both sides ready to join together:

(Sorry for the poor photo - I couldn't fit both sides onto the wooden surface I was using before.)
Each side has 3311 rings, so that's 6622 rings altogether.
Joining these sides together vertically (from the armpit to the bottom) was pretty straightforward. However, I hit a snag when I tried to join the shoulder straps together:

The problem here is that the "grain" of each side is going in opposite directions. In this photo, I've put in the first connecting ring. Now think about where the next ring would need to go, in order to fit through the 2nd/3rd rings from the right (top and bottom). In the top row, it would need to be in front of the first connecting ring, but on the bottom row it would need to be behind the first connecting ring, and I can't do both at once! If the problem isn't obvious, look at the connecting rings further up/down the photo, to see how they lie.
Other people advised me to make a "seam" for this, and I found some instructions online for a 90° seam and a 45° seam. In my case, I wanted a 90° seam, i.e. a section which is perpendicular to both straps.
You remember I mentioned that the easy way of joining bunches doesn't work, because then you wind up with the bunches being side by side instead of overlapping? Well, that's exactly what I wanted here. I tried a few different widths (3/4/5 pairs), but 4 pairs turned out to be the best fit:

Although there are 6 rings at the end of each strap, they overlap, so 4 rings side by side in the seam takes up about the same space.
I then used 4 connecting rings to join the seam to one side of the shoulder strap:

This is a slightly different technique to before, since each connecting ring is only connected to 3 other rings (rather than 4): 1 on the seam and 2 on the strap.
Here are both sides of the seam (4 connecting rings on each side):

(Sorry if it's difficult to tell the rings apart. I've seen some tutorial sites that use different coloured rings for emphasis, but I didn't have enough spare time/metal for that.)
On the other shoulder strap, I tried using 5 connecting rings instead:

The middle connecting ring is connected to 4 rings rather than 3; this photo is a bit crowded, but it should hopefully make the whole thing a bit stronger, since these joins have to support the weight of the rest of the armour.
Similarly, I used 5 connecting rings on the other side, for symmetry:

Here's the finished shirt, on a hanger and on my nephew:


(I've blurred out his face to protect his privacy.)
There are different styles of chainmail shirts. A hauberk has sleeves, and it normally goes down to your thighs. A haubergeon is more like the length of a T-shirt, and may not have sleeves. This is a bit of a hybrid, mainly because I ran out of time to figure out how to do sleeves, so it has the length of a hauberk but the arms of a haubergeon. Really, it's more of a vest than a shirt. I think the neck dips may be a bit deeper than they really need to be, partly because I added the seam after I'd measured everything else. That will be less of a problem in the future, if I can measure the hole while I'm making it.
Final summary of rings:
* 3311 per side (x2 = 6622)
* 11 per shoulder seam (x2 = 22)
* 4 connecting rings per side on one shoulder (x2 = 8)
* 5 connecting rings per side on other shoulder (x2 = 10)
* 27 connecting rings on the left/right to join the 2 sides together (x2 = 54)
Grand total = 6716
Overall, it took me about 3 months to make: I spent a couple of hours on it every evening after I got home from work. I initially tried watching TV in the background while I made the mail, but that didn't work very well: I have to look at the rings, so I found that I wasn't really enjoying the programs/films (because I was distracted) and I was making slower progress with the mail. Instead, I listened to podcasts and audiobooks, and that worked out a lot better. It took me about 5 weeks to make the first big square (the section in the Cthulhu photo), but I got a bit faster with the next big square once I knew what I was doing, so I only slowed down again when I had to figure out how to do the shoulder straps.
On average, I'd say that it took me 1 minute per ring; it was quicker when I put together small clumps of 5 rings, but slower when I had to join big sections together. At a guess, if I'd been doing this as my full-time job (09:00-17:00, Mon-Fri), it would have taken me about a month. The rings cost £12 for 1000, so I needed to pay £84 for 7,000. (The pliers cost about £16, but I've subsequently used them for bike maintenance, and you may not need to buy them if you already have suitable tools at home.)
By contrast, Medieval Arms sell a child's shirt for £40 (zinc-plated steel, ages 5-10). So, it would have been cheaper and quicker to buy a pre-made shirt, and it would have included sleeves. I don't regret my choice, but it's something for other people to bear in mind before they start a project like this.