Mano-mano craft: Little House Box
I was invited to teach Lia's class a craft this week. And I didn't want to just come in and have them paint a picture that will be kept in a folder and won't use any real purpose. I wanted to teach them how to make something, and then be able to use that thing and not just throw it away at the end of the day. I turned over several ideas in my head and came up with the Little House Box:

This is the model unit I made for the class. I built it the night before (yes, crammer till the end) and forgot to document my process. I wasn't sure it would work actually, until I actually built it. So buti na lang it worked, or else I wouldn't know what to teach Lia's classmates the next day.
Anyway, it worked and I taught them and they seemed to enjoy the craft. They had a little bit of difficulty with the gluing and the forming of the roof. But after the teachers and I helped them with that, they attacked the house decorating with gusto! It was great to see all the different houses they came up with. You can check out the album in The Little Juans.
Fortunately I had an extra box, so I made another house for this How To. Sorry, again it's mano-mano so I can't fully explain how I did everything. But I think it's easy enough to recreate on your own.
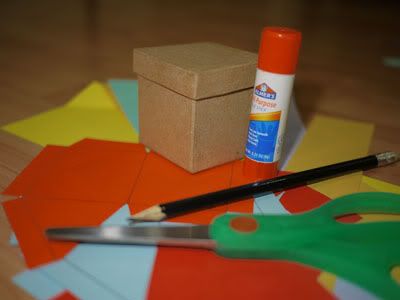
Here were my materials. The cube box is about about 5.5 cm per side. I got them in Divisoria for P10 each. Would have wanted them slightly bigger, but they didn't have it in stock. They're also not perfectly cube and some where a bit crooked, but that's ok if you're not excessively OC. And then I used a gluestick, colored paper for the walls and windows, colored card stock (board paper) for the roof. A pencil and ruler to make the roof template. And scissors of course, to cut the paper.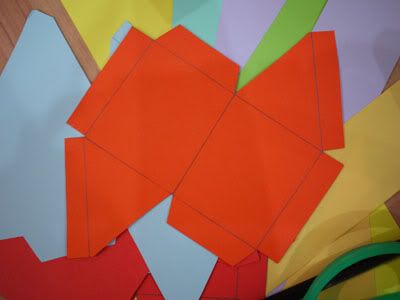
First the roof template. It's a little hard to explain the process by which I came up with this. But when you see it, it's easly to figure out and modify to suit your own sized box. If you want to copy this, go ahead. Or email me and I'll give more detailed instructions. Naks! Feeling Martha. Haha!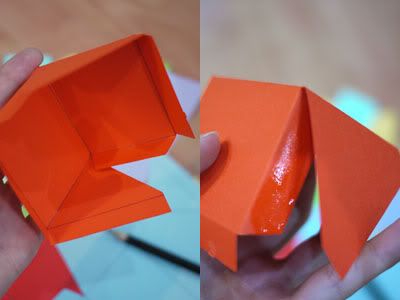
Once you've cut out the template in the colored card stock you want your roof to be, fold all the flaps inward and glue the triangle flap onto the trapezoid flaps on both sides of the roof.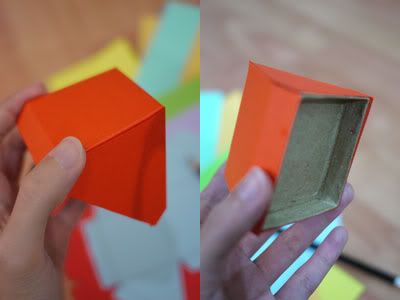
It should come out shaped like a tent. And then you can glue the long rectangle flaps to the sides of the box cover. (All the measurements of your roof template have to be based on the size and shape of your box cover).
And this will be your roof.
For the walls, just wrap the box in colored paper, up to the edge that will be covered by the roof cover. For my box, my paper strips were about 4.25 cm wide. I applied gluestick paste all over the sides of the box and pressed the paper smoothly on like wall paper so there won't be any bubbles.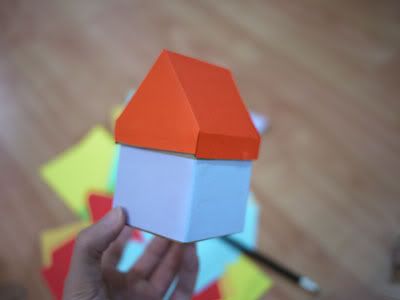
Cover your box with your roof and you have your basic house!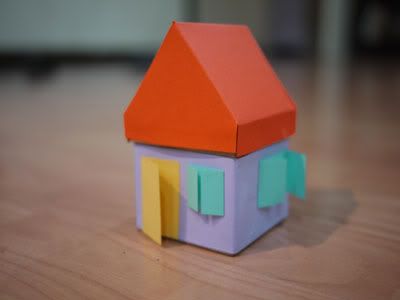
Then you can cut little squares and rectangles, fold them and glue them on to your house to make doors and windows that open and close.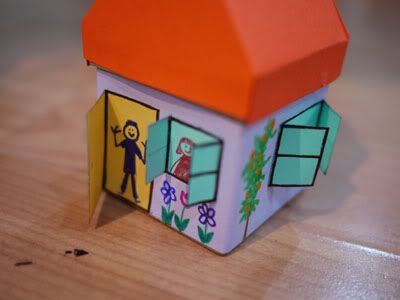
Draw your details, residents, flowers and decor with thin colored markers. Draw anything you like and there you have your Little House Box. The toy house that can you can keep little trinkets in. :-)

This is the model unit I made for the class. I built it the night before (yes, crammer till the end) and forgot to document my process. I wasn't sure it would work actually, until I actually built it. So buti na lang it worked, or else I wouldn't know what to teach Lia's classmates the next day.
Anyway, it worked and I taught them and they seemed to enjoy the craft. They had a little bit of difficulty with the gluing and the forming of the roof. But after the teachers and I helped them with that, they attacked the house decorating with gusto! It was great to see all the different houses they came up with. You can check out the album in The Little Juans.
Fortunately I had an extra box, so I made another house for this How To. Sorry, again it's mano-mano so I can't fully explain how I did everything. But I think it's easy enough to recreate on your own.

Here were my materials. The cube box is about about 5.5 cm per side. I got them in Divisoria for P10 each. Would have wanted them slightly bigger, but they didn't have it in stock. They're also not perfectly cube and some where a bit crooked, but that's ok if you're not excessively OC. And then I used a gluestick, colored paper for the walls and windows, colored card stock (board paper) for the roof. A pencil and ruler to make the roof template. And scissors of course, to cut the paper.

First the roof template. It's a little hard to explain the process by which I came up with this. But when you see it, it's easly to figure out and modify to suit your own sized box. If you want to copy this, go ahead. Or email me and I'll give more detailed instructions. Naks! Feeling Martha. Haha!

Once you've cut out the template in the colored card stock you want your roof to be, fold all the flaps inward and glue the triangle flap onto the trapezoid flaps on both sides of the roof.

It should come out shaped like a tent. And then you can glue the long rectangle flaps to the sides of the box cover. (All the measurements of your roof template have to be based on the size and shape of your box cover).
And this will be your roof.

For the walls, just wrap the box in colored paper, up to the edge that will be covered by the roof cover. For my box, my paper strips were about 4.25 cm wide. I applied gluestick paste all over the sides of the box and pressed the paper smoothly on like wall paper so there won't be any bubbles.

Cover your box with your roof and you have your basic house!

Then you can cut little squares and rectangles, fold them and glue them on to your house to make doors and windows that open and close.

Draw your details, residents, flowers and decor with thin colored markers. Draw anything you like and there you have your Little House Box. The toy house that can you can keep little trinkets in. :-)