Making Borders In Photoshop
Okay; this is just the way I perfer to make borders.
STEP ONE:
Adding borders is 95% of the time the last thing I do. So do everything & merge everything together. Now duplicate your background layer so your palette looks like this:

STEP TWO:
Now RIGHT CLICK on your BACKGROUND COPY layer and go to BLENDING OPTIONS. [should be the second from the top!
STEP THREE:
It will open up a window and choose the STROKE tab; which should be the last tab on there.
STEP FOUR:
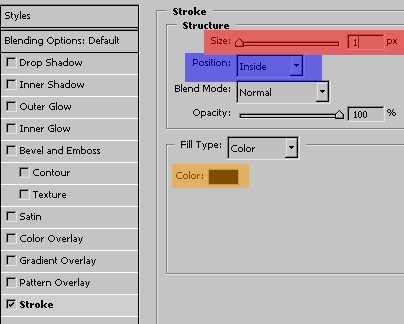
You should get a window like this:

Let me explain things:
RED: chooses the size of border you want; for icons 1 to 3 are most commonly used. they are in PIXELS.
BLUE: it tells it how you want the border to be. OUTSIDE: means outside of the layer [it is also used to outline text!] and INSIDE: is what you would use for bordor making & I never use CENTER.
ORANGE: where you choose the color you want the border to be!
**I don't use opacacy; blending mode or fill type; but you can if you wish.. they are pretty self explanatory!!**
YOU ARE DONE IF YOU JUST WANT A SIMPLE BORDER; BUT IF YOU WANT A DOUBLE BORDER.. KEEP GOING AND SET YOUR BORDER SIZE TO 3 PIXELS IN STEP FOUR!!
STEP FIVE:
Okay; merge all of your layers and then repeat steps one through four.. only have the border be 1 pixel instead. Any questions?! Just ask!
Sica
X_x
Any questions?! Just ask!
Feel Free To JOIN the comm or WATCH the comm for updates!
Also; PLEASE make suggestions on what you wish to see [tutorials/brushes..etc] here!
STEP ONE:
Adding borders is 95% of the time the last thing I do. So do everything & merge everything together. Now duplicate your background layer so your palette looks like this:

STEP TWO:
Now RIGHT CLICK on your BACKGROUND COPY layer and go to BLENDING OPTIONS. [should be the second from the top!
STEP THREE:
It will open up a window and choose the STROKE tab; which should be the last tab on there.
STEP FOUR:
You should get a window like this:

Let me explain things:
RED: chooses the size of border you want; for icons 1 to 3 are most commonly used. they are in PIXELS.
BLUE: it tells it how you want the border to be. OUTSIDE: means outside of the layer [it is also used to outline text!] and INSIDE: is what you would use for bordor making & I never use CENTER.
ORANGE: where you choose the color you want the border to be!
**I don't use opacacy; blending mode or fill type; but you can if you wish.. they are pretty self explanatory!!**
YOU ARE DONE IF YOU JUST WANT A SIMPLE BORDER; BUT IF YOU WANT A DOUBLE BORDER.. KEEP GOING AND SET YOUR BORDER SIZE TO 3 PIXELS IN STEP FOUR!!
STEP FIVE:
Okay; merge all of your layers and then repeat steps one through four.. only have the border be 1 pixel instead. Any questions?! Just ask!
Sica
X_x
Any questions?! Just ask!
Feel Free To JOIN the comm or WATCH the comm for updates!
Also; PLEASE make suggestions on what you wish to see [tutorials/brushes..etc] here!