BEGINNERS GUIDE TO PS
Okay; I just thought this might be helpful to some. I don't know everything & I am not going to act li ke I do; but I think I covered the main things people ask me about. Uhm. If you know something I don't; I don't mind if you tell me in the comments. If this helps you out; I would love to know. I posted this at my tuts comm @ gj; so I answered their questions..
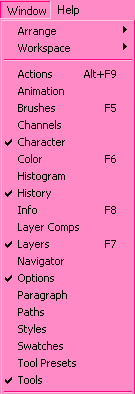
Just to make sure we have the same palettes up [and in case you want to add any of your own.. which you don’t HAVE too] here is how you do that. Go to WINDOWS and select the ones you wish to be in the window; here are the ones I have:
Here is what my PS looks like with all the menus and such:
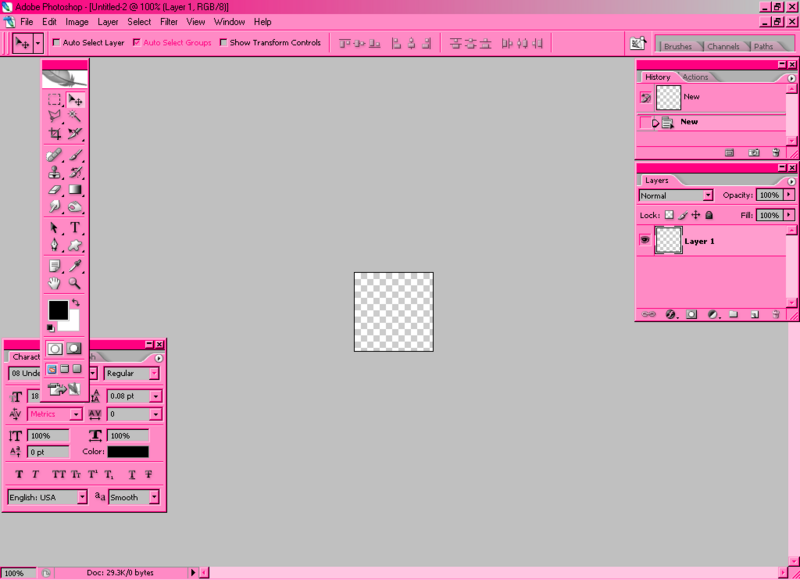
Now; lets break down each of the palettes!
HISTORY PALETTE:
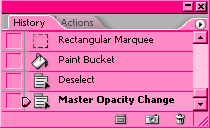
You can use the history palette to undo more than just the last action [which you can do with CTRL+Z with a PC]. Anyways; you can scroll through the actions in which you have applied to the image and remove them by selection through them.
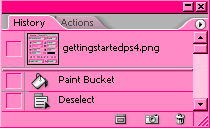
If you absolutely hate your image; you can scroll all the way up the history palette; it will have a picture of the image you started with [it is the biggest box at the very top] and if you click that box it will bring your image back to the original.
LAYER PALETTE:
++ALL OF THE FOLLOWING [WHEN CHANGED] WILL EFFECT THE LAYER HIGHLIGHTED++
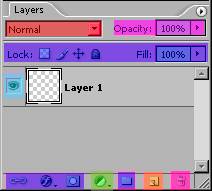
RED: This is a drop down menu where you can find the different layer settings such as SCREEN and OVERLAY
PURPLE: This is where you can change the opacacy of a certain layer. In other words; you make the layer lighter/fading/turning invisible. I hope that makes sense!!
BLUE: I have never used any of these; but if you want me to explain them - let me know. I have never found a tutorial that you use any of these for either.
TEAL: If you click inside of the square - the eye will disappear and so will the layer. It makes it very easy for when you do animations. You can choose certain layers to be visible when you merge & paste into your animation program.
GREEN: This is a shortcut to adjustment layers; such as SELECTIVE COLORING and LEVELS.
ORANGE: This is a shortcut to CREATE A NEW LAYER
PINK: This is a shortcut to DELETE the SELECTED Layer.
If you RIGHT click on a certain layer; a big menu comes up. The main ones I use are BLENDING OPTIONS [which is super neat; especially for text - go play around!!] and DUPLICATE LAYER. It just makes things easier.
FONT PALETTE:
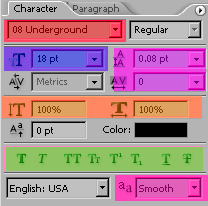
RED: This is where you choose what font you wish to use. If you have the text written and highlighted;than you can see what it looks like as you scroll through them.
BLUE: This is the size of which you want the font to be. [There are a lot of problems with this; which I will address in my COMMON PROBLEMS section!]
PURPLE: These two change the spacing between things. The top box changes the spacing between the lines of text and the bottom box changes the spacing between the letts of the words.
ORANGE: Changes the size of the letters in a word. The box on the left changes the height and the box on the right changes the width.
GREEN: Changes the font look; L to R; BOLD; ITALIC; ALL CAPS; SMALL CAPS; SUPERSCRIPT; SUBSCRIPT; UNDERLINE; STRIKETHROUGH.
PINK: Is a drop down menu where you choose the anti-alias method. NONE is used to PIXEL fonts but you can choose what ever you wish for the rest. I tend to lean towards SMOOTH.
TOOL BAR:

Okay; instead of color coding this one; I’ll make explanations starting at the top and working left to right all the way down.
RECTANGULAR MARQUEE: **can be changed to other types of marquees if you click and hold the little black arrow at the bottom of the box** Is used to make a rectangular marquee. Hold SHIFT to make a square/circle marquee. You can use this to select an area of your graphics; as I did to fill in color in the above palettes.
MOVE: Used to move objects around on layers.
POLYGONAL LASSO MARQUEE: Used to make funky shaped marquees
MAGIC WAND: Used to make a marquee of a certain area you just click the area you want to select. [hold SHIFT to add a selection and hold ALT to remove one.
CROP: used to cut out parts of the photo that you don’t want by selecting the part you do want. When you select this tool; you will get THIS at the top which I put 100 in the width and height and 1 in the resolution for when I make bases/icons. You can use anything you would like and I will explain the “1” in the COMMON PROBLEMS section.
SLICE/SLICE SELECT: No clue; I have never used it
SPOT HEALING BRUSH/HEALING BRUSH/RED EYE REMOVAL/PATCH: No clue; I have never used it
BRUSH/PENCIL/COLOR REPLACEMENT: brush: use downloaded and brushes that come with PS to stamp on a design. VERY COMMON!. Pencil is for free-hand drawing
CLONE STAMP/PATTERN STAMP: No clue; I have never used it
HISTORY BRUSH/ART HISTORY BRUSH: No clue; I have never used it
ERASER/BACKGROUND ERASER: pretty self explanatory. If you want me to explain it; I will.
GRADIENT/PAINTBUCKET: gradient: choose your colors and stuff and click where you want the gradient to start [in a new layer] and hold and drag your mouse to where you want it to stop and let go. Paint bucket: used to FILL in layers!
BLUR/SHARPEN/SMUDGE: They all do what they sound like they do; just you get to choose exactly where it is done at on the graphic.
DODGE/BURN/SPONGE: same as above; Dodge: makes lighter & Burn: makes darker
PATH SELECT/DIRECT SELECT: No clue; I have never used it
TEXT TOOL: pretty self explanatory! Choose this & click your graphic and start typing the text you want. Then go up to the TEXT PALETTE section above to learn more.
PEN: similar to pencil.
PATH SELECT/DIRECT SELECT: No clue; I have never used it
NOTES: No clue; I have never used it
EYEDROPPER: chooses a color in the graphic
HAND TOOL: No clue; I have never used it
ZOOM: zooms in and out of the graphic
This is where you change the colors to the colors you wish to use; the foreground [black] and background [white]. The arrow to the upper right hand area will switch the colors so that the black is in the background and the white will be the foreground. The two black/white boxes on the bottomr left hand area will make the colors go back to what they are at right now [black/white].
The next two sections I don’t pay any attention too and the last area where it had the big arrow from the left picture going to the right; that just transports the current window into imageready.
Sica
X_x
please; if you have ANY questions; please comment! If you want any more explanations for ANYTHING [including things already listed] then let me know!!!
Feel Free To JOIN the comm or WATCH the comm for updates!
Also; PLEASE make suggestions on what you wish to see [tutorials/brushes..etc] here!
Just to make sure we have the same palettes up [and in case you want to add any of your own.. which you don’t HAVE too] here is how you do that. Go to WINDOWS and select the ones you wish to be in the window; here are the ones I have:

Here is what my PS looks like with all the menus and such:

Now; lets break down each of the palettes!
HISTORY PALETTE:

You can use the history palette to undo more than just the last action [which you can do with CTRL+Z with a PC]. Anyways; you can scroll through the actions in which you have applied to the image and remove them by selection through them.

If you absolutely hate your image; you can scroll all the way up the history palette; it will have a picture of the image you started with [it is the biggest box at the very top] and if you click that box it will bring your image back to the original.
LAYER PALETTE:
++ALL OF THE FOLLOWING [WHEN CHANGED] WILL EFFECT THE LAYER HIGHLIGHTED++

RED: This is a drop down menu where you can find the different layer settings such as SCREEN and OVERLAY
PURPLE: This is where you can change the opacacy of a certain layer. In other words; you make the layer lighter/fading/turning invisible. I hope that makes sense!!
BLUE: I have never used any of these; but if you want me to explain them - let me know. I have never found a tutorial that you use any of these for either.
TEAL: If you click inside of the square - the eye will disappear and so will the layer. It makes it very easy for when you do animations. You can choose certain layers to be visible when you merge & paste into your animation program.
GREEN: This is a shortcut to adjustment layers; such as SELECTIVE COLORING and LEVELS.
ORANGE: This is a shortcut to CREATE A NEW LAYER
PINK: This is a shortcut to DELETE the SELECTED Layer.
If you RIGHT click on a certain layer; a big menu comes up. The main ones I use are BLENDING OPTIONS [which is super neat; especially for text - go play around!!] and DUPLICATE LAYER. It just makes things easier.
FONT PALETTE:

RED: This is where you choose what font you wish to use. If you have the text written and highlighted;than you can see what it looks like as you scroll through them.
BLUE: This is the size of which you want the font to be. [There are a lot of problems with this; which I will address in my COMMON PROBLEMS section!]
PURPLE: These two change the spacing between things. The top box changes the spacing between the lines of text and the bottom box changes the spacing between the letts of the words.
ORANGE: Changes the size of the letters in a word. The box on the left changes the height and the box on the right changes the width.
GREEN: Changes the font look; L to R; BOLD; ITALIC; ALL CAPS; SMALL CAPS; SUPERSCRIPT; SUBSCRIPT; UNDERLINE; STRIKETHROUGH.
PINK: Is a drop down menu where you choose the anti-alias method. NONE is used to PIXEL fonts but you can choose what ever you wish for the rest. I tend to lean towards SMOOTH.
TOOL BAR:

Okay; instead of color coding this one; I’ll make explanations starting at the top and working left to right all the way down.
RECTANGULAR MARQUEE: **can be changed to other types of marquees if you click and hold the little black arrow at the bottom of the box** Is used to make a rectangular marquee. Hold SHIFT to make a square/circle marquee. You can use this to select an area of your graphics; as I did to fill in color in the above palettes.
MOVE: Used to move objects around on layers.
POLYGONAL LASSO MARQUEE: Used to make funky shaped marquees
MAGIC WAND: Used to make a marquee of a certain area you just click the area you want to select. [hold SHIFT to add a selection and hold ALT to remove one.
CROP: used to cut out parts of the photo that you don’t want by selecting the part you do want. When you select this tool; you will get THIS at the top which I put 100 in the width and height and 1 in the resolution for when I make bases/icons. You can use anything you would like and I will explain the “1” in the COMMON PROBLEMS section.
SLICE/SLICE SELECT: No clue; I have never used it
SPOT HEALING BRUSH/HEALING BRUSH/RED EYE REMOVAL/PATCH: No clue; I have never used it
BRUSH/PENCIL/COLOR REPLACEMENT: brush: use downloaded and brushes that come with PS to stamp on a design. VERY COMMON!. Pencil is for free-hand drawing
CLONE STAMP/PATTERN STAMP: No clue; I have never used it
HISTORY BRUSH/ART HISTORY BRUSH: No clue; I have never used it
ERASER/BACKGROUND ERASER: pretty self explanatory. If you want me to explain it; I will.
GRADIENT/PAINTBUCKET: gradient: choose your colors and stuff and click where you want the gradient to start [in a new layer] and hold and drag your mouse to where you want it to stop and let go. Paint bucket: used to FILL in layers!
BLUR/SHARPEN/SMUDGE: They all do what they sound like they do; just you get to choose exactly where it is done at on the graphic.
DODGE/BURN/SPONGE: same as above; Dodge: makes lighter & Burn: makes darker
PATH SELECT/DIRECT SELECT: No clue; I have never used it
TEXT TOOL: pretty self explanatory! Choose this & click your graphic and start typing the text you want. Then go up to the TEXT PALETTE section above to learn more.
PEN: similar to pencil.
PATH SELECT/DIRECT SELECT: No clue; I have never used it
NOTES: No clue; I have never used it
EYEDROPPER: chooses a color in the graphic
HAND TOOL: No clue; I have never used it
ZOOM: zooms in and out of the graphic
This is where you change the colors to the colors you wish to use; the foreground [black] and background [white]. The arrow to the upper right hand area will switch the colors so that the black is in the background and the white will be the foreground. The two black/white boxes on the bottomr left hand area will make the colors go back to what they are at right now [black/white].
The next two sections I don’t pay any attention too and the last area where it had the big arrow from the left picture going to the right; that just transports the current window into imageready.
Sica
X_x
please; if you have ANY questions; please comment! If you want any more explanations for ANYTHING [including things already listed] then let me know!!!
Feel Free To JOIN the comm or WATCH the comm for updates!
Also; PLEASE make suggestions on what you wish to see [tutorials/brushes..etc] here!