My first tutorial
This is a tutorial on how to make a simple mini-movie animation on a white background in Animation Shop 3, as requested by my soul-twin 
candyflossrain.
This is what we're making:

This tutorial assumes that you’ve already made your frame by frame caps in a program like Virtual Dub. If you’d like me to add a tutorial on this however, I could.
Okay, first you want to open up Animation Shop. Click on this button to open up the animation wizard. Select “Same Size as first image frame”, next “Opaque”, next “Upper left corner” “With canvas color”, next “Yes, repeat animation indefinitely”, next.
Click “Add Image” and add all of the frames you capped (easiest way is to click the first one, hit shift, and then click the last one. That should select all the ones in between). When you return to the animation wizard window if you scroll up you’ll notice the last frame is on top. Just select it and click “Move Up”. Then hit “Next, and then “Finish”
You’ll get a window like this:
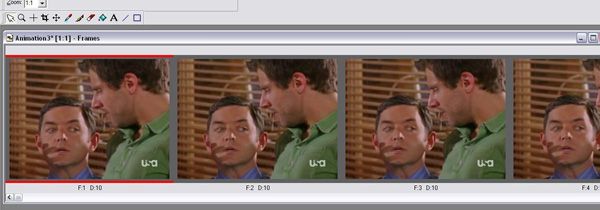
If you want to view your animation click this button. If you view it now you’ll notice it runs slow, we’ll fix that later.
Now you’re going to want to crop the frames to your liking. Click this button to get the crop tool. Use it to select the image you want. You should try to make both sides the same size. Look down here for the dimensions. Check that your subject stays within your cropping box by scrolling to the last frame. You can move the box you made around if need be. When you’re satisfied click “crop” on the toolbar.
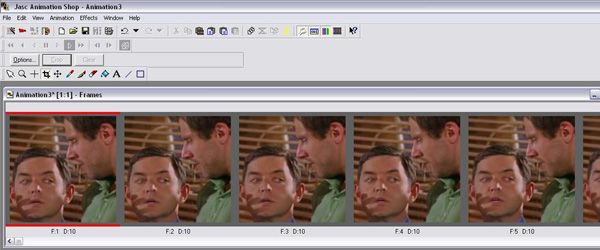
Now you’ll want to resize your animation. Go to Animation>Resize animation (shift-s). I usually resize mine to 60x60. You won’t want to go higher than 70x70, because you have to keep the animation below 40k.

Now, hold the ctrl key and select every other frame. Right-click>delete. This will not only lower the number of frames you have, but also speed up your animation so it looks normal.
Okay, now you’re ready to make the background, which looks like this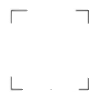
Open whatever graphics program you use (I’m using Photoshop Elements 2) and open a new file 100x100. Flood fill this file white. I made the corner thingies myself (hence the sucky-ness) but I’ve seen brushes like that on 100x100_brushes. When you’re done making the background save it and go back to animation shop.
Go to File>open, and open the background image. Now right-click on it and select “Duplicate selected”. Do this for however many frames are in your original animation plus one. I have 19 frames in my animation, so I made 20 background frames.
Now select every frame of you original animation. Drag from frame one of that, to frame one of the background animation.
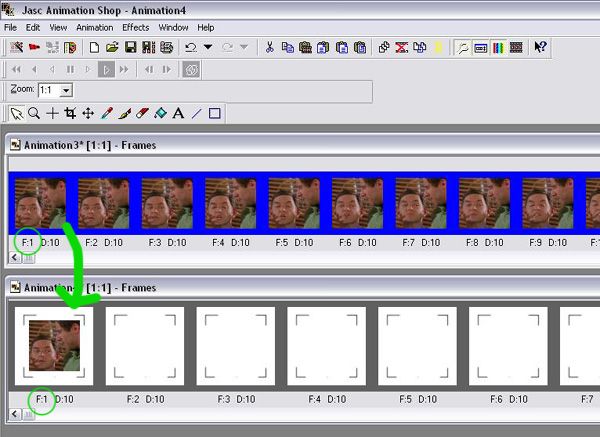
You’ll get this. If you scroll to the last frame you’ll see a blank one. This is where you’d put any text you want. Or you can simply leave it blank if all you want is a break in the animation. To add text make it in your graphics program. Copy-paste it into animation shop and then drag it onto that frame. Like this. Right click this frame, go to “Frame Properties”. Enter 100, in that box. This will make it delay for a second.
Preview your animation. If you’re satisfied with it, save it. A window like this will pop up. This will optimize the file. Use the bar at the side to adjust the quality. This takes experimentation. Hit next twice. It will show you a preview. If you’re okay with that hit next again. In the new window, look at this box. If it’s under 40k then your animation is fine. Hit finish and you’re done!
This is my first tutorial, and I’ve never been very good at explaining things, so if any part of this is unclear, don’t hesitate to scream at me ask me about it. I know that was probably long-winded. Con-crit is appreciated!

candyflossrain.
This is what we're making:

This tutorial assumes that you’ve already made your frame by frame caps in a program like Virtual Dub. If you’d like me to add a tutorial on this however, I could.
Okay, first you want to open up Animation Shop. Click on this button to open up the animation wizard. Select “Same Size as first image frame”, next “Opaque”, next “Upper left corner” “With canvas color”, next “Yes, repeat animation indefinitely”, next.
Click “Add Image” and add all of the frames you capped (easiest way is to click the first one, hit shift, and then click the last one. That should select all the ones in between). When you return to the animation wizard window if you scroll up you’ll notice the last frame is on top. Just select it and click “Move Up”. Then hit “Next, and then “Finish”
You’ll get a window like this:

If you want to view your animation click this button. If you view it now you’ll notice it runs slow, we’ll fix that later.
Now you’re going to want to crop the frames to your liking. Click this button to get the crop tool. Use it to select the image you want. You should try to make both sides the same size. Look down here for the dimensions. Check that your subject stays within your cropping box by scrolling to the last frame. You can move the box you made around if need be. When you’re satisfied click “crop” on the toolbar.

Now you’ll want to resize your animation. Go to Animation>Resize animation (shift-s). I usually resize mine to 60x60. You won’t want to go higher than 70x70, because you have to keep the animation below 40k.

Now, hold the ctrl key and select every other frame. Right-click>delete. This will not only lower the number of frames you have, but also speed up your animation so it looks normal.
Okay, now you’re ready to make the background, which looks like this

Open whatever graphics program you use (I’m using Photoshop Elements 2) and open a new file 100x100. Flood fill this file white. I made the corner thingies myself (hence the sucky-ness) but I’ve seen brushes like that on 100x100_brushes. When you’re done making the background save it and go back to animation shop.
Go to File>open, and open the background image. Now right-click on it and select “Duplicate selected”. Do this for however many frames are in your original animation plus one. I have 19 frames in my animation, so I made 20 background frames.
Now select every frame of you original animation. Drag from frame one of that, to frame one of the background animation.

You’ll get this. If you scroll to the last frame you’ll see a blank one. This is where you’d put any text you want. Or you can simply leave it blank if all you want is a break in the animation. To add text make it in your graphics program. Copy-paste it into animation shop and then drag it onto that frame. Like this. Right click this frame, go to “Frame Properties”. Enter 100, in that box. This will make it delay for a second.
Preview your animation. If you’re satisfied with it, save it. A window like this will pop up. This will optimize the file. Use the bar at the side to adjust the quality. This takes experimentation. Hit next twice. It will show you a preview. If you’re okay with that hit next again. In the new window, look at this box. If it’s under 40k then your animation is fine. Hit finish and you’re done!
This is my first tutorial, and I’ve never been very good at explaining things, so if any part of this is unclear, don’t hesitate to scream at me ask me about it. I know that was probably long-winded. Con-crit is appreciated!