coloring tutorial 2
Requested by impress_mebaby
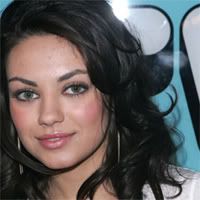
How to go from this

to

THIS COLORING DOES NOT WORK WITH ALL IMAGES!!!!
Start out with your image. I'm going to start out with a picture of Mila Kunis most known as Jackie on That 70s Show the picture is from Mila Kunis Central.
This type of coloring works best with less yellows in the original picture, however, too much yellow can always be modified.
Crop it how you would like and resize it to 200x200 (Or 100x100, I just like starting larger because it makes the image more crisp in my opinion)
Now, since we're trying to yellow her up a bit, and take out the blues, we're going to add an exclusion layer. This also decreases the contrast. So, make a new layer, color fill with a dark blue suchas #00074A and set it to Exclusion at 40% (this can vary based on your image)


Not a huge difference, but it will help later. Now it's looking all ugly and blah. So we're going to duplicate the base image (the one of mila) and set it to Screen around 30% and move it above your exclusion layer. So layer order should be:
MILA- SCREEN 30%
DARK BLUE- EXCLUSION 40%
MILA BASE- NORMAL 100%
Again, this doesn't make a huge difference but will in the long run.

Now comes the fun part. Selective coloring.
REDS;
Cyan: -100%
Magneta: 0%
Yellow: 100%
Black: 0%
YELLOWS;
Cyan: -100%
Magneta: -100%
Yellow: -100%
Black: 0%
CYANS;
Cyan: 100%
Magneta: 0%
Yellow: 0%
Black: 0%
MAGENTAS;
Cyan: 100%
Magneta: 100%
Yellow: 100%
Black: 100%
NEUTRALS;
Cyan: -3%
Magneta: -2%
Yellow: 10%
Black: 3%
You should end up with something like this...

Now, time for another selective coloring layer.
REDS;
Cyan: -13%
Magneta: 49%
Yellow: 42%
Black: 10%
CYANS;
Cyan: -100%
Magneta: -37%
Yellow: -40%
Black: -83%
WHITES;
Cyan: 35%
Magneta: 0%
Yellow: 0%
Black: 0%
NEUTRALS;
Cyan: 26%
Magneta: 0%
Yellow: 0%
Black: 0%
BLACKS;
Cyan: 100%
Magneta: 13%
Yellow: -4%
Black: 20%
Now you should have something along the lines of this
One more selective coloring layer, last one, I promise!
REDS;
Cyan: -11%
Magneta: 13%
Yellow: 7%
Black: -17%
YELLOWS;
Cyan: 55%
Magneta: 27%
Yellow: 27%
Black: 0%
CYANS;
Cyan: 100%
Magneta: 0%
Yellow: 0%
Black: 0%
WHITES;
Cyan: 34%
Magneta: 0%
Yellow: 0%
Black: 0%
NEUTRALS;
Cyan: 20%
Magneta: 13%
Yellow: 3%
Black: -5%
BLACKS;
Cyan: 100%
Magneta: 0%
Yellow: 0%
Black: -3%
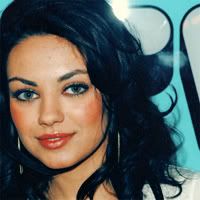
YAY. Coloring is done. Now you should have something like this.

At this point you may resize your icon if its still at 200x200, however for the purpose of the tutorial I'm going to leave mine at this size. What I do next is go back to the base layer and use the blur tool set on a soft brush at 20% and blur her skin, only the skin, don't mess with her eyes or hair.
Then sharpen once. If you don't think it's sharp enough but sharpening a second time makes it too sharp, what I like to do is sharpen the screen layer, that way it becomes sharper but you can control how sharp. In the end I end up with this
TADA. NOW YOU HAVE A PRETTY, SHINY, CRISP ICON :]
Enjoy and Feel free to ask any questions you have! Also I'd love to see results! :]
How to go from this

to
THIS COLORING DOES NOT WORK WITH ALL IMAGES!!!!
Start out with your image. I'm going to start out with a picture of Mila Kunis most known as Jackie on That 70s Show the picture is from Mila Kunis Central.
This type of coloring works best with less yellows in the original picture, however, too much yellow can always be modified.
Crop it how you would like and resize it to 200x200 (Or 100x100, I just like starting larger because it makes the image more crisp in my opinion)
Now, since we're trying to yellow her up a bit, and take out the blues, we're going to add an exclusion layer. This also decreases the contrast. So, make a new layer, color fill with a dark blue suchas #00074A and set it to Exclusion at 40% (this can vary based on your image)
Not a huge difference, but it will help later. Now it's looking all ugly and blah. So we're going to duplicate the base image (the one of mila) and set it to Screen around 30% and move it above your exclusion layer. So layer order should be:
MILA- SCREEN 30%
DARK BLUE- EXCLUSION 40%
MILA BASE- NORMAL 100%
Again, this doesn't make a huge difference but will in the long run.
Now comes the fun part. Selective coloring.
REDS;
Cyan: -100%
Magneta: 0%
Yellow: 100%
Black: 0%
YELLOWS;
Cyan: -100%
Magneta: -100%
Yellow: -100%
Black: 0%
CYANS;
Cyan: 100%
Magneta: 0%
Yellow: 0%
Black: 0%
MAGENTAS;
Cyan: 100%
Magneta: 100%
Yellow: 100%
Black: 100%
NEUTRALS;
Cyan: -3%
Magneta: -2%
Yellow: 10%
Black: 3%
You should end up with something like this...
Now, time for another selective coloring layer.
REDS;
Cyan: -13%
Magneta: 49%
Yellow: 42%
Black: 10%
CYANS;
Cyan: -100%
Magneta: -37%
Yellow: -40%
Black: -83%
WHITES;
Cyan: 35%
Magneta: 0%
Yellow: 0%
Black: 0%
NEUTRALS;
Cyan: 26%
Magneta: 0%
Yellow: 0%
Black: 0%
BLACKS;
Cyan: 100%
Magneta: 13%
Yellow: -4%
Black: 20%
Now you should have something along the lines of this
One more selective coloring layer, last one, I promise!
REDS;
Cyan: -11%
Magneta: 13%
Yellow: 7%
Black: -17%
YELLOWS;
Cyan: 55%
Magneta: 27%
Yellow: 27%
Black: 0%
CYANS;
Cyan: 100%
Magneta: 0%
Yellow: 0%
Black: 0%
WHITES;
Cyan: 34%
Magneta: 0%
Yellow: 0%
Black: 0%
NEUTRALS;
Cyan: 20%
Magneta: 13%
Yellow: 3%
Black: -5%
BLACKS;
Cyan: 100%
Magneta: 0%
Yellow: 0%
Black: -3%
YAY. Coloring is done. Now you should have something like this.
At this point you may resize your icon if its still at 200x200, however for the purpose of the tutorial I'm going to leave mine at this size. What I do next is go back to the base layer and use the blur tool set on a soft brush at 20% and blur her skin, only the skin, don't mess with her eyes or hair.
Then sharpen once. If you don't think it's sharp enough but sharpening a second time makes it too sharp, what I like to do is sharpen the screen layer, that way it becomes sharper but you can control how sharp. In the end I end up with this
TADA. NOW YOU HAVE A PRETTY, SHINY, CRISP ICON :]
Enjoy and Feel free to ask any questions you have! Also I'd love to see results! :]