TUTORIAL // Tutorial #1
I know I said I didn't do tutorials, but... I lied. Someone requested a tutorial for this type of icon:
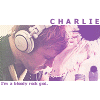
So I decided to make one! Yaay. This is my first go at tutorial making, so if you don't get what I'm saying, then just leave a comment and let me know, and I'll try to clarify better..
I use Paint Shop Pro 7, so that's what this tutorial is for, though hopefully it'll work in other programs as well.
I start by cropping down a promo image of Charlie from Episode 7, into this:

When you crop the image, be sure not to have anything too important in the top and bottom sections of the square, since they'll get covered up by the white borders.
Next, I sharpen the base image, and duplicate it twice. Now I have three layers, all of the same image.
Select the top layer. Go to Colors > Adjust > Hue/Saturation/Lightness. Set Saturation to -100. Now set the layer blend mode to Soft Light.

Now select the middle layer. Go to Colors > Adjust > Brightness/Contrast. Set Brightness to 0 and Contrast to 40. Then set the layer blend mode to Screen.

Create a new layer between the Screen layer and the Soft Light layer. Fill it with a dark blue. I used this shade:

Set the layer blend mode to Exclusion. You should now have something like this:

Create another layer above the Exclusion layer and fill it with a gradient. I used this gradient:

Set this layer blend mode to Screen. Your image now looks something like this:

Now, above everything, create a new layer and fill it with white. Then, make this layer invisible, and use the rectangle selection tool to select the area of the icon you want visible. My area is 100 x 56 pixels.

Now, make the top layer visible again and delete the selected area. You will have something like this:

Create another new layer beneath the newest layer and above the Soft Light layer. Use the dropper tool to select a darkish shade in your icon, then use some kind of splatter paint brush.

I feel bad, I can't remember where I got this brush from... if anyone knows, please let me know so I can give proper credit.
Next, create yet another layer above everything else. This is your text layer. On the top part, I wrote 'CHARLIE' in Tahoma size 5 with 450 kerning. On the bottom part, I wrote 'I'm a bloody rock god.' in Tahoma size 3 with no kerning. Then, just flatten all the layers, and you're done!

Feel free to take this icon as well. I made a whole new one to create this tutorial, so it isn't posted in my earlier icon post.
So I decided to make one! Yaay. This is my first go at tutorial making, so if you don't get what I'm saying, then just leave a comment and let me know, and I'll try to clarify better..
I use Paint Shop Pro 7, so that's what this tutorial is for, though hopefully it'll work in other programs as well.
I start by cropping down a promo image of Charlie from Episode 7, into this:
When you crop the image, be sure not to have anything too important in the top and bottom sections of the square, since they'll get covered up by the white borders.
Next, I sharpen the base image, and duplicate it twice. Now I have three layers, all of the same image.
Select the top layer. Go to Colors > Adjust > Hue/Saturation/Lightness. Set Saturation to -100. Now set the layer blend mode to Soft Light.
Now select the middle layer. Go to Colors > Adjust > Brightness/Contrast. Set Brightness to 0 and Contrast to 40. Then set the layer blend mode to Screen.
Create a new layer between the Screen layer and the Soft Light layer. Fill it with a dark blue. I used this shade:
Set the layer blend mode to Exclusion. You should now have something like this:
Create another layer above the Exclusion layer and fill it with a gradient. I used this gradient:
Set this layer blend mode to Screen. Your image now looks something like this:
Now, above everything, create a new layer and fill it with white. Then, make this layer invisible, and use the rectangle selection tool to select the area of the icon you want visible. My area is 100 x 56 pixels.
Now, make the top layer visible again and delete the selected area. You will have something like this:
Create another new layer beneath the newest layer and above the Soft Light layer. Use the dropper tool to select a darkish shade in your icon, then use some kind of splatter paint brush.
I feel bad, I can't remember where I got this brush from... if anyone knows, please let me know so I can give proper credit.
Next, create yet another layer above everything else. This is your text layer. On the top part, I wrote 'CHARLIE' in Tahoma size 5 with 450 kerning. On the bottom part, I wrote 'I'm a bloody rock god.' in Tahoma size 3 with no kerning. Then, just flatten all the layers, and you're done!
Feel free to take this icon as well. I made a whole new one to create this tutorial, so it isn't posted in my earlier icon post.