Icon Tutorial #2- Shoujo EVE
We'll be going from

->
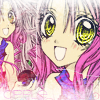
-Take this picture of Eve, from Shoujo Eve ->
.
-First things first, we want to get rid of all the text. So I use the healing brush tool on the default settings.
-Now, I crop the picture down to a smaller size, so only the parts I want in my icon are showing ->

-Next, I color in the skin, eyes, apple and crown, all on separate layers. I set all the layers except the eyes to 'multiply'. The eyes are set to 'color'. Then I make the little blush lines. I set this layer to 'lighten'. ->

-Now, I select her clothes and nails. I use this gradient-
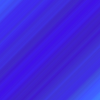
on a new layer and set it to 'multiply'.->

-Now,for the hair. I use a simple light pink and purple gradient to fill it in. I'm not completely satisfied, so I use this gradient ->
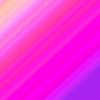
as well (on a new layer).
-I set the simple hair layer to 'multiply'. I bring the simple hair to the top of the other one. the other hair layer to 'linear burn'. Then I erase it with this eraser->

until I like how it looks.->

-Now I merge all the layers. I use the selection tool and select part of the picture and resize it to height 100 px. I then paste it on a new canvas that is icon sized [100 x 100 px.]
-I then crop a close up of the face and paste it on the new canvas below the other selection. I then use a mask, gradient and eraser to blend the two layers together to my liking.
-Now, some tweaks->

->set to 'exclusion' at 57%

-> set to 'oft light' at 100%
-> by eveningwalk and set to 'screen'

-> by colorfilter and set to 'screen'
-> I then add some text, and set it to 'darken'

-> finally I add this border by sugarplumkitten
And now I have this ->